Usage and Performance of Built-in Shaders
Shaders in Unity are used through Materials, which essentially combine shader code with parameters like textures. An in-depth explanation of the Shader/Material relationship can be read here.
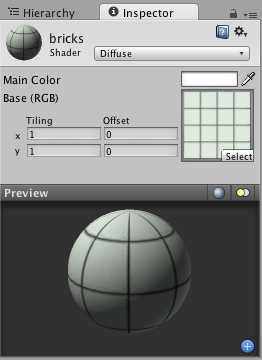
Material properties will appear in the Inspector when either the Material itself or a GameObject that uses the Material is selected. The Material Inspector looks like this:

Each Material will look a little different in the Inspector, depending on the specific shader it is using. The shader iself determines what kind of properties will be available to adjust in the Inspector. Material inspector is described in detail in Material reference page. Remember that a shader is implemented through a Material. So while the shader defines the properties that will be shown in the Inspector, each Material actually contains the adjusted data from sliders, colors, and textures. The most important thing to remember about this is that a single shader can be used in multiple Materials, but a single Material cannot use multiple shaders.
Performance Considerations
There are a number of factors that can affect the overall performance of your game. This page will talk specifically about the performance considerations for Built-in Shaders. Performance of a shader mostly depends on two things: shader itself and which Rendering Path is used by the project or specific camera. For performance tips when writing your own shaders, see ShaderLab Shader Performance page.
Rendering Paths and shader performance
From the rendering paths Unity supports, Deferred Shading and Vertex Lit paths have the most predictable performance. In Deferred shading, each object is generally drawn once, no matter what lights are affecting it. Similarly, in Vertex Lit each object is generally drawn once. So then, the performance differences in shaders mostly depend on how many textures they use and what calculations they do.
Shader Performance in Forward rendering path
In Forward rendering path, performance of a shader depends on both the shader itself and the lights in the scene. The following section explains the details. There are two basic categories of shaders from a performance perspective, Vertex-Lit, and Pixel-Lit.
Vertex-Lit shaders in Forward rendering path are always cheaper than Pixel-Lit shaders. These shaders work by calculating lighting based on the mesh vertices, using all lights at once. Because of this, no matter how many lights are shining on the object, it will only have to be drawn once.
Pixel-Lit shaders calculate final lighting at each pixel that is drawn. Because of this, the object has to be drawn once to get the ambient & main directional light, and once for each additional light that is shining on it. Thus the formula is N rendering passes, where N is the final number of pixel lights shining on the object. This increases the load on the CPU to process and send off commands to the graphics card, and on the graphics card to process the vertices and draw the pixels. The size of the Pixel-lit object on the screen will also affect the speed at which it is drawn. The larger the object, the slower it will be drawn.
So pixel lit shaders come at performance cost, but that cost allows for some spectacular effects: shadows, normal-mapping, good looking specular highlights and light cookies, just to name a few.
Remember that lights can be forced into a pixel (“important”) or vertex/SH (“not important”) mode. Any vertex lights shining on a Pixel-Lit shader will be calculated based on the object’s vertices or whole object, and will not add to the rendering cost or visual effects that are associated with pixel lights.
General shader performance
Out of Built-in Shaders, they come roughly in this order of increasing complexity:
- Unlit. This is just a texture, not affected by any lighting.
- VertexLit.
- Diffuse.
- Normal mapped. This is a bit more expensive than Diffuse: it adds one more texture (normal map), and a couple of shader instructions.
- Specular. This adds specular highlight calculation.
- Normal Mapped Specular. Again, this is a bit more expensive than Specular.
- Parallax Normal mapped. This adds parallax normal-mapping calculation.
- Parallax Normal Mapped Specular. This adds both parallax normal-mapping and specular highlight calculation.
Mobile simplified shaders
Additionally, Unity has several simplified shaders targeted at mobile platforms, under “Mobile” category. These shaders work on other platforms as well, so if you can live with their simplifications (e.g. approximate specular, no per-material color support etc.), try using them!
To see the specific simplifications that have been made for each shader, look at the .shader files from the “built-in shaders” package and the information is listed at the top of the file in some comments.
Some examples of changes that are common across the Mobile shaders are:
- There is no material color or main color for tinting the shader.
- For the shaders taking a normal map, the tiling and offset from the base texture is used.
- The particle shaders do not support
AlphaTestorColorMask. - Limited feature and lighting support - e.g. some shaders only support one directional light.