Panoramic video
Unity’s panoramic video feature enables you to:
- Easily include real-world video shot in 360 degrees.
- Reduce Scene complexity in VR by including a pre-rendered backdrop video instead of real geometry.
Unity supports 180 and 360 degree videos in either an equirectangular layout (longitude and latitude) or a cubemap layout (6 frames).
Equirectangular 2D videos should have an aspect ratio of exactly 2:1 for 360 content, or 1:1 for 180 content.
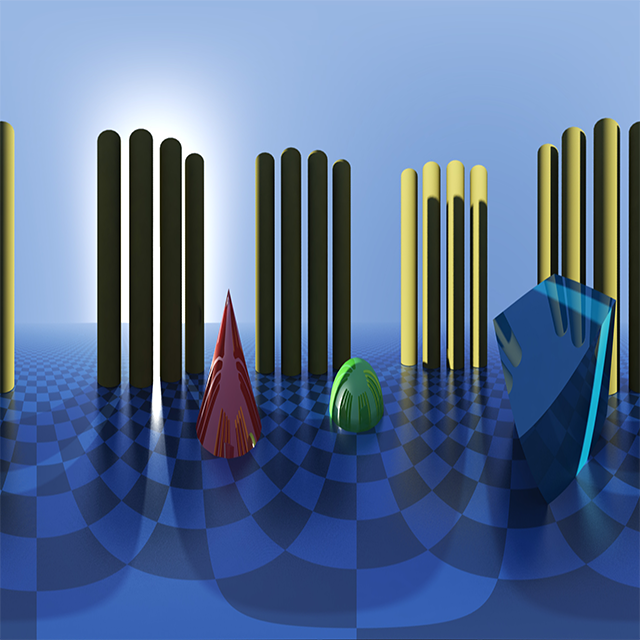
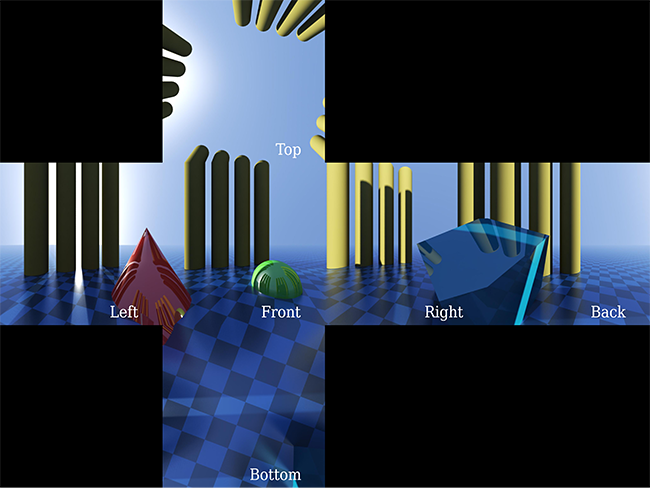
Cubemap 2D videos should have an aspect ratio of 1:6, 3:4, 4:3, or 6:1, depending on face layout:
To use the panoramic video features in the Unity Editor, you must have access to panoramic video clips, or know how to author them.
This page describes the following steps to display any panoramic video in the Editor:
Set up a Video Player to play the video source to a Render Texture.
Set up a Skybox Material that receives the Render Texture.
Set the Scene to use the Skybox Material.
Note: This is a resource-intensive feature. For best visual results, use panoramic videos in the highest possible resolution (often 4K or 8K). Large videos require more computing power and resources for decoding. Most systems have specific limits on maximum video decoding resolutions (for example, many mobiles are limited to HD or 2K, and older desktops might be limited to 2K or 4K).
1. Video player setup
Import your video into Unity as an Asset. To create a Video Player, drag the video Asset from the Project view to an empty area of Unity’s Hierarchy view. By default, this sets up the component to play the video full-screen for the default Camera. Press Play to view this.
You should change this behaviour so that it renders to a Render Texture. That way, you can control exactly how it is displayed. To do this, go to Assets > Create > Render Texture.
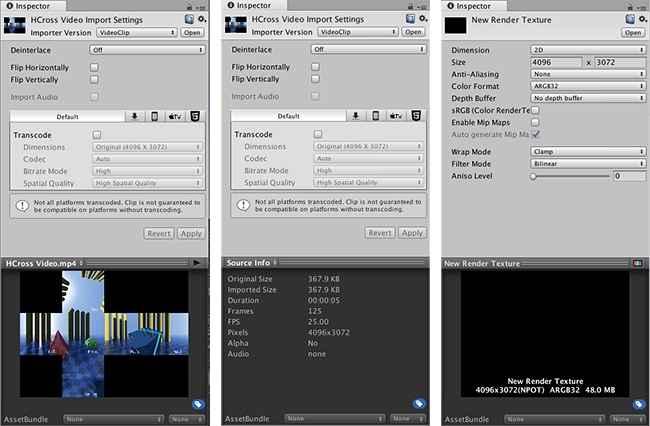
Set the Render Texture’s Size to match your video exactly. To check the dimensions of your video, select the video in your Assets folder and view the Inspector window. Scroll to the section where Unity previews your video, select your video’s name in the preview window, and change it to Source Info.
Next, set your Render Texture’s Depth Buffer option to No depth buffer.
Now, open the Video Player Inspector and switch the Render Mode to Render Texture. Drag your new Render Texture from the Asset view to the Target Texture slot.
Enter Play mode to verify that this is functioning correctly.
The video doesn’t render in the Game window, but you can select the Render Texture Asset to see that its content updating with each video frame.

2. Create a Skybox Material
You need to replace the default Skybox with your video content to render the panoramic video as a backdrop to your Scene.
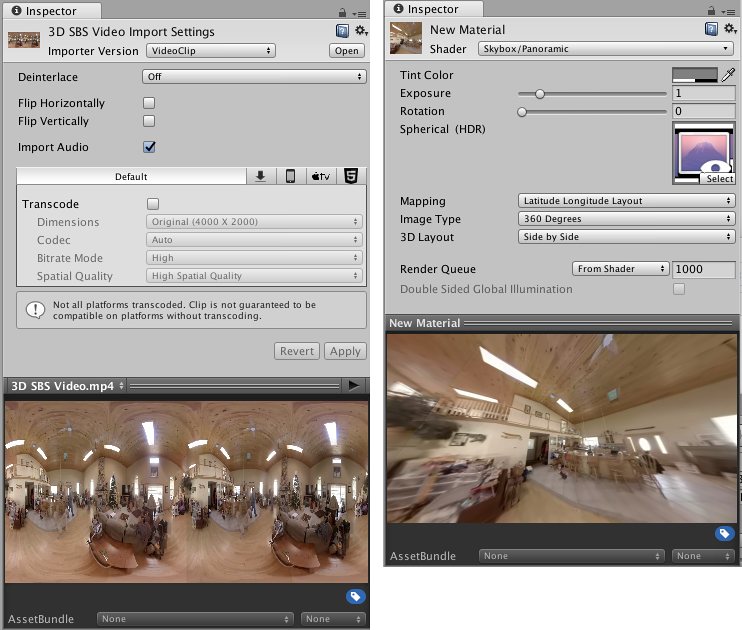
To do this, create a new Material (Assets > Create > Material). Go to your new Material’s Inspector and set the Material’s Shader to Skybox/Panoramic (go to Shader > Skybox > Panoramic).
Drag the Render Texture from the Asset view to the Texture slot in the new Material’s Inspector.
You must correctly identify the type of content in the video (cubemap or equirectangular) for the panoramic video to display properly. For cubemap content (such as a cross and strip layout, as is common for static Skybox Textures), set Mapping to 6 Frames Layout.
For equirectangular content, set Mapping to Latitude Longitude Layout, and then either the 360 degree or 180 degree sub-option. Choose the 360 degree option if the video covers a full 360-degree view. Choose 180 degree if the video is just a front-facing 180-degree view.
Look at the Preview at the bottom of the Material Inspector. Pan around and check that the content looks correct.
3. Render the panoramic video to the Skybox
Finally, you must connect your new Skybox Material to the Scene.
Open up the Lighting window (menu: Window > Lighting > Settings).
Drag and drop the new Skybox Material Asset to the first slot under Environment.
Press Play to show the video as a Scene backdrop on the Skybox.
Change the Scene Camera orientation to show a different portion of the Skybox (and therefore a different portion of the panoramic video).
3D panoramic video
Turn on Virtual Reality Support in the Player Settings (menu: Edit > Project Settings > Player >XR Settings), especially if your source video has stereo content. This unlocks an extra 3D Layout option in the Skybox/Panoramic Material. The 3D Layout has three options : Side by Side, Over Under, and None (default value).
Use the Side by Side settings if the video contains the left eye’s content on the left and the right eye’s content on the right. Choose Over Under if the left and right content are positioned above and below one another in the video. Unity detects which eye is currently being rendered and sends this information to the Skybox/Panoramic shader using Single Pass Stereo rendering. The shader contains the logic to select the correct half of the video based on this information when Unity renders each eye’s content in VR.
For non–360 3D video (where you shouldn’t use a Skybox Material), the same 3D Layout is available directly in the Video Player component when using the Camera Near/Far Plane Render Modes.
Alternate Render Texture type for cubemap videos
When working with cubemap videos, instead of the Video Player rendering to a 2D Render Texture and preserving the exact cube map layout, you can render the Video Player directly to a Render Texture Cube.
To achieve this, change the Render Texture Asset’s Dimension from 2D to Cube and set the Render Texture’s Size__ to be exactly the dimensions of the individual faces of the source video.
For example, if you have a 4 x 3 horizontal cross cubemap layout video with dimensions 4096 x 3072, set the Render Texture’s Size to 1024 x 1024 (4096 / 4 and 3072 / 3).
While rendering to a Cube Target Texture, the Video Player assumes that the source video contains a cube map in either a cross or a strip layout (which it determines using the video aspect ratio). The Video Player then fills out the Render Texture’s faces with the correct cube faces.
Use the resulting Render Texture Cube as a Skybox. To do this, create a Material and assign Skybox/Cubemap as the Shader(Shader > Skybox > Cubemap) instead of the Skybox/Panoramic Material described above.
Video dimensions and transcoding
Including 3D content requires double either the width or the height of the video (corresponding to Side-by-Side or Over-Under layouts).
Keep in mind that many desktop hardware video decoders are limited to 4K resolutions and mobile hardware video decoders are often limited to 2K or less which limits the resolution of playback in real-time on those platforms.
You can use video transcoding to produce lower resolution versions of panoramic videos, but take precautions to avoid introducing bleeding at the edge between left and right 3D content, or, between cube map faces and adjacent black areas. In general, you should author video in power-of-two dimensions and transcoding to other power-of-two dimensions to reduce visual artifacts.
2017–10–25 Page published with limited editorial review
Added 2D and 3D panoramic video support in 2017.3 NewIn20173
对文档有任何疑问,请移步至开发者社区提问,我们将尽快为您解答