Adding team members to your Unity Project
Unity Collaborate is part of Unity Teams. For each person you want to collaborate with, you must assign a Unity Teams seat for them in your organization.
Unity Teams is available in two versions:
Basic, which gives you 3 free seats.
Advanced, which gives you 3 seats after which you can purchase additional seats.
For more information on Unity Teams features, see the Unity Teams homepage.
This page describes how to do the following:
- Enable Collaborate for a team member
- Allow collaboration on all Projects in your organization
- Allow collaboration on individual Projects
- Manage team members in your organization
- Manage Unity Teams member access
Enable Collaborate for a team member
There are two ways to enable collaboration with your team members. You can:
Allow collaboration on all Projects in your organization
Allow collaboration on individual Projects
To add team members for either of these scenarios, you must be a Manager or Owner of the organization that the Projects are part of.
To learn how to verify your role within an organization, see Managing Your Organization, below.
Allow collaboration on all Projects in your organization
To give a team member access to all of the Projects in your organization that have Collaborate is enabled:
Make them an Owner or Manager of the organization. To learn how to do this, see Manage Your Organization, below.
Give them access to Unity Teams. To learn how to do this, see Managing Collaborators in your organization, below.
For more information on enabling collaboration, see documentation on Setting up Unity Collaborate.
Allow collaboration on individual Projects
To give team members access to specific Projects:
On the Unity toolbarA row of buttons and basic controls at the top of the Unity Editor that allows you to interact with the Editor in various ways (e.g. scaling, translation). More info
See in Glossary, click the Collab button.In the Collaborate panel, click the Invite Teammate icon.

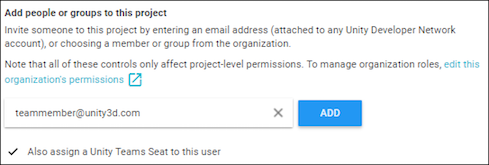
When you click the Invite Teammate icon, Unity launches the Users section of the Unity Developer Dashboard in your browser. From the Users section, you can invite anyone with a Unity ID to join your Project:

Note: You must tick Also assign a Unity Teams Seat to this user to enable the user to use Collaborate on your Project.
To add the user as a guest in your organization, click ADD. This assigns a Unity Teams seat to the user.
When your team member has access to the Project, they can see the Project in their Launcher (ProjectsIn Unity, you use a Project to design and develop a game. A Project stores all of the files that are related to a game, such as the Asset and Scene files. More info
See in Glossary > In The Cloud) and they can download the Project.

Manage team members in your organization
Manage team members in the Organizations page of the Unity ID website. To manage team members:
Sign into Unity ID.
On the left-hand side of the page, click Organizations.
Select your organization.
On the left-hand side, select Members & Groups.
From this view you can see the members of your organization, as well as the role of each member. Users can have one of four roles: Owner, Manager, User, or Guest.
If you are an organization Owner, you can change the roles of all members. Additionally, you can add and remove members of all roles: Owner, Manager, User, and Guest.
If you are an organization Manager, you can change the role of Manager, User, and Guest members. Additionally, you can add and remove Manager, User, and Guest members.
For more information, see Unity’s Knowledgebase article What can Owners, Managers and Users do in my Unity Organization?.
Manage Unity Teams member access
To access Collaborate and Cloud BuildA continuous integration service for Unity Projects that automates the process of creating builds on Unity’s servers. More info
See in Glossary functionality, your team members must have access to Unity Teams. To check your team members’ access:
Sign into Unity ID.
On the left-hand side of the page, click Organizations.
Select your organization.
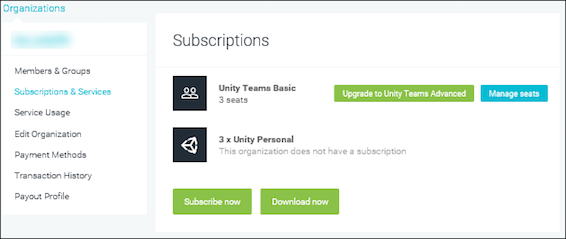
Click Subscriptions & Services.
Select your Unity Teams subscription and click Manage seats.

This opens a page which allows you to assign Unity Teams seats to members of your organization. Use the Occupied seats tab to review team members to whom you have assigned a Teams seat. Use the Assign seats tab to add team members with registered Unity IDs, using the email address they used to register for a Unity ID.

2017–12–01 Page published with no editorial review
2017–12–01 - Service compatible with Unity 2017.1 onwards at this date but version compatibility may be subject to change.
New feature in 2017.1