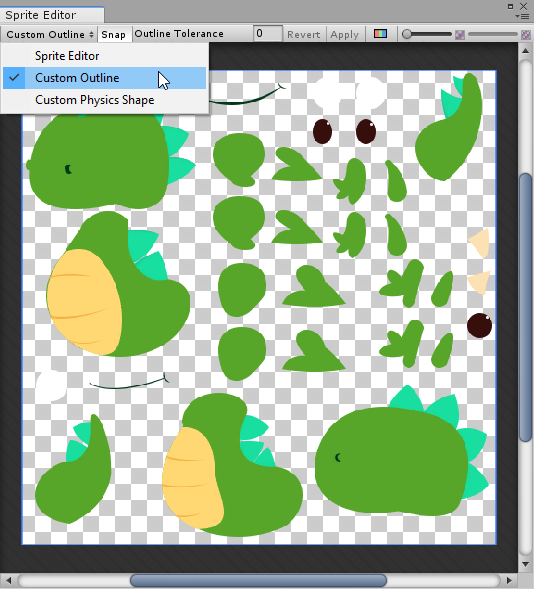
Sprite Editor: Custom Outline
Use the Sprite Editor’s Custom Outline option to edit the shape of the MeshThe main graphics primitive of Unity. Meshes make up a large part of your 3D worlds. Unity supports triangulated or Quadrangulated polygon meshes. Nurbs, Nurms, Subdiv surfaces must be converted to polygons. More info
See in Glossary that Unity renders the SpriteA 2D graphic objects. If you are used to working in 3D, Sprites are essentially just standard textures but there are special techniques for combining and managing sprite textures for efficiency and convenience during development. More info
See in Glossary texture on. The Custom Outline editor allows you to use control points to create and define the shape of the Sprite’s Mesh outline.
By default, Unity renders each Sprite on a rectangle Mesh. This Mesh might include transparent areas outside the Texture’s border, and renderingThe process of drawing graphics to the screen (or to a render texture). By default, the main camera in Unity renders its view to the screen. More info
See in Glossary these transparent areas can negatively affect performance. When you use the Custom Outline editor to define a Mesh outline that matches the outline of the Sprite Texture, you reduce the size of the transparent areas, which improves performance.
To access the Custom Outline editor, select a Sprite, then select Sprite Editor in its InspectorA Unity window that displays information about the currently selected GameObject, Asset or Project Settings, alowing you to inspect and edit the values. More info
See in Glossary window. Click the Sprite Editor drop-down at the top left of the Sprite Editor window, and select Custom Outline.
Automatically generating a Mesh outline
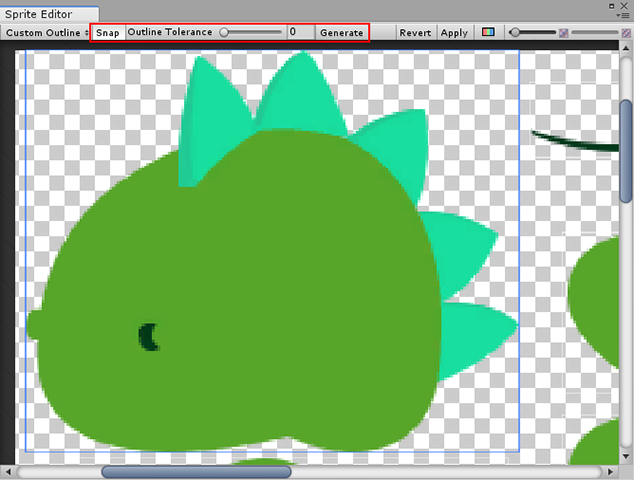
Unity can automatically generate a Mesh outline for you. Custom Outline mode has settings to adjust how Unity does this.
Properties
| Property | Function |
|---|---|
| Snap | Snap control points to the nearest pixelThe smallest unit in a computer image. Pixel size depends on your screen resolution. Pixel lighting is calculated at every screen pixel. More info See in Glossary. Enable this to use Outline Tolerance effectively. |
| Outline Tolerance | Use the slider to control the complexity and accuracy of the generated Mesh outline. At the minimum value (0), the Sprite Editor generates a basic Mesh outline around the Sprite with the minimal number of control points. At the maximum value (1), the Sprite Editor generates a Mesh outline with many control points and a tight Mesh that follows the pixel outline of the Sprite as closely as possible. |
| Generate | Click to automatically create a Mesh outline. |
To automatically generate a Mesh outline:
- Select a Sprite, navigate to the Sprite Editor > Custom Outline window, and select Generate. The Editor automatically generates a Mesh outline that follows the transparent border of the Sprite.
- Enable Snap to make sure the generated Mesh outline follows the shape of the Sprite Texture.
- Use the Outline Tolerance slider to adjust how tightly the generated Mesh outline attempts to follow the outline of the Sprite Texture. This affects the overall complexity of the Mesh outline, and the number of control points generated.
- Select Generate to refresh the Mesh outline after each change.

Right: An automatically generated Mesh outline with a high Outline Tolerance.
Creating a custom Mesh outline
You can create your own custom Mesh outline. This is useful if you want the Mesh to be smaller, larger, or a different shape to your Sprite Texture. Follow this workflow to create a custom Mesh outline.
Create a Mesh outline: Click and drag over a Sprite to create a rectangle Mesh outline with four control points. Repeat this step to create multiple Mesh outlines within the Sprite. Unity only renders the areas enclosed within the Mesh outlines.

Change the shape of a Mesh outline: To adjust the shape of the Mesh outline, click and drag the control points. When you hover over a control point, it turns blue to indicate that you can select it. Click and drag the control point to different positions to adjust the shape of the Mesh outline.
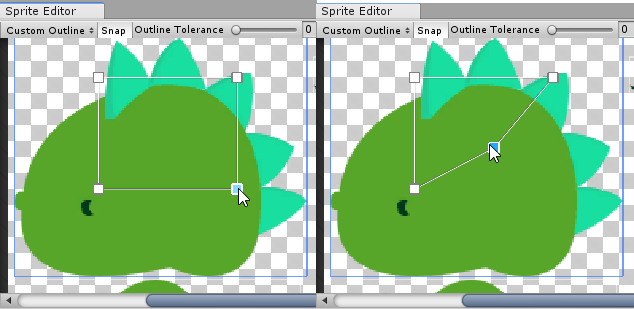
Add a control point to a Mesh outline: To add a control point, hover over a section of the Mesh outline. A preview of the control point appears along the Mesh outline’s edge. Click to add a new control point at that location.
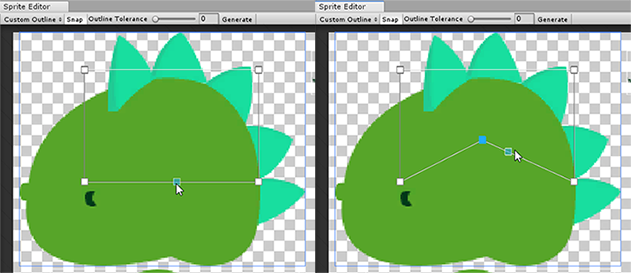
Move a section of Mesh outline between control points: To move a section between two control points, hold Ctrl while hovering over the Mesh outline section. This section of the Mesh outline turns yellow. While holding Ctrl, click and drag the section to move it to a different position.

2018–10–19 Page amended with editorial review
Edit Outline renamed to Custom Outline in Unity version 2017.3.
对文档有任何疑问,请移步至开发者社区提问,我们将尽快为您解答