Setup multiple scenes
You can add multiple scenes, edit how you view them, and change the sceneA Scene contains the environments and menus of your game. Think of each unique Scene file as a unique level. In each Scene, you place your environments, obstacles, and decorations, essentially designing and building your game in pieces. More info
See in Glossary settings.
To create a new scene, see Creating, loading, and saving Scenes.
Add scenes
There are two ways you can add a new scene to your project:
* Right click to open the menu of a scene asset in the Project windowA window that shows the contents of your Assets folder (Project tab) More info
See in Glossary and select Open Scene Additive.
* Drag one or more scenes from the Project window into the Hierarchy window.
View scenes
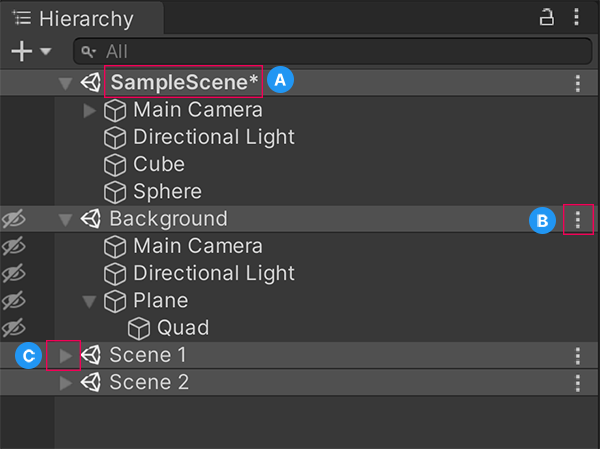
The Hierarchy window shows all of the scenes that are part of your project:

A: Scenes with unsaved changes have an asterisk by the scene name. B: The scene More menu allows you to perform actions on the scene. C: The scene divider (inverted triangle) lets you to collapse a scene and hide the contents from the Hierarchy to better manage multiple scenes.
Tip: To add a scene to the Hierarchy window without loading it, press Alt (macOS: press Option) and drag the scene into the Hierarchy window. This lets you load the scene when convenient.
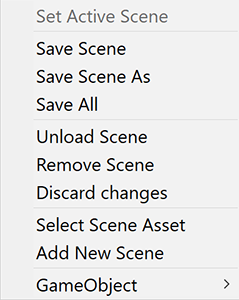
Loaded scene More menu (⋮)
There are several ways you can interact with and edit a loaded scene:

| Setting | Description |
|---|---|
| Set Active Scene | This sets the scene as the target for new GameObjectsThe fundamental object in Unity scenes, which can represent characters, props, scenery, cameras, waypoints, and more. A GameObject’s functionality is defined by the Components attached to it. More info See in Glossary created through script. For more information, see SceneManager.SetActiveScene. |
| Save Scene | This saves the scene that you selected. |
| Save Scene As | This opens your file browser so you can choose where and how to save the scene. |
| Save All | This saves all the scenes you have open in the Hierarchy window. |
| Unload Scene | This hides the contents of the scene from the Scene viewAn interactive view into the world you are creating. You use the Scene View to select and position scenery, characters, cameras, lights, and all other types of Game Object. More info See in Glossary and the Hierarchy window. If you have unsaved changes, save them before you unload the scene to avoid losing any changes. |
| Remove Scene | This removes the scene from the Hierarchy window. |
| Discard changes | This undoes any changes that you haven’t saved. |
| Select Scene Asset | This highlights the scene asset in the Project window. |
| Add New Scene | This adds a new untitled scene below the scene you have selected. |
| GameObject | This opens a dropdown menu of GameObjects that you can add to the scene you have selected. |
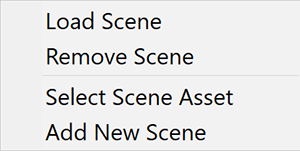
Unloaded scene More menu (⋮)
There are fewer actions you can perform on unloaded scenes:

| Setting | Description |
|---|---|
| Load Scene | This shows the contents of the scene in the Hierarchy window and the Scene view, and allows you to edit them. |
| Remove Scene | This removes the scene from the Hierarchy window. |
| Select Scene Asset | This highlights the scene asset in the Project window. |
| Add New Scene | This adds a new untitled scene below the scene you have selected. |
Multiple scenes in Play mode
When you are in Play mode and have multiple scenes in the Hierarchy window, the Editor displays an additional scene called DontDestroyOnLoad. You can’t access the DontDestroyOnLoad scene and it’s also not available at runtime.
Scene-specific settings
The following settings are specific to each scene:
- RenderSettings and LightmapSettings (both found in the Lighting window).
- NavMeshA mesh that Unity generates to approximate the walkable areas and obstacles in your environment for path finding and AI-controlled navigation. More info
See in Glossary settings. - Scene settings in the Occlusion CullingA feature that disables rendering of objects when they are not currently seen by the camera because they are obscured (occluded) by other objects. More info
See in Glossary window.
As each scene manages its own settings, only settings associated with that scene save to the scene file.
To change the settings of a specific scene, you must either open that specific scene and change the settings, or set the scene as the active scene and change the settings. Otherwise, if you have multiple scenes open, Unity uses the renderingThe process of drawing graphics to the screen (or to a render texture). By default, the main camera in Unity renders its view to the screen. More info
See in Glossary and NavMesh settings from the active scene.
When you switch to a new active scene in the Editor or at runtime, Unity replaces all previous settings with the settings from the new active scene.