Content and Context
When thinking about lighting in Unity, it is handy to divide the concepts into what we call the content the item being lit and rendered, and the context, which is the lighting that exists in the sceneA Scene contains the environments and menus of your game. Think of each unique Scene file as a unique level. In each Scene, you place your environments, obstacles, and decorations, essentially designing and building your game in pieces. More info
See in Glossary which affects the object being lit.
The Context
When lighting an object it is important to understand which sources of light are affecting the object. There are usually direct light sources in your scene: Game Object lights that you may have placed around your scene. There are also indirect light sources such as reflections and bounced light. These all have an effect on the object’s material to give the final result that the cameraA component which creates an image of a particular viewpoint in your scene. The output is either drawn to the screen or captured as a texture. More info
See in Glossary sees across the surface of the object.
This is not a hard and fast separation, often what might be considered “content” could also be the part of the lighting context for another object.
A good example of this would be a building situated in a desert landscape. The building would take light information from the skyboxA special type of Material used to represent skies. Usually six-sided. More info
See in Glossary, and perhaps bounced light from the surrounding ground.
However there may be a character standing near an exterior wall of the building. For this character, the building is part of the lighting context - it may be casting a shadow, it may be casting bounced light from its wall onto the character, or the character may have reflective parts which are directly reflecting the building itself.
The Default Lighting Context
At startup, Unity shows an empty scene. This scene already has a default lighting context available with ambient, skydome-based reflections and a directional light. Any object placed in that scene should, by default, have all lighting it needs to look correct.
Let’s add a sphere to the scene, to see the effect of the default lighting context.

The added sphere will be using the Standard shaderA program that runs on the GPU. More info
See in Glossary by default. Focusing the camera on the sphere will result on something like this:

Notice the reflection along the edges of the sphere as well as the subtle ambient, from brown (bottom) to the sky blue (top). By default, in an empty scene, all lighting context is derived from the skybox and a directional light (which is added to the Scene by default).
Of course this is the default setup, a single lighting and sky reflection may not be enough in some cases. You can easily add more lighting and reflection probes:
For an in-depth view on how reflection and light probes work please see the documentation on light probesLight probes store information about how light passes through space in your scene. A collection of light probes arranged within a given space can improve lighting on moving objects and static LOD scenery within that space. More info
See in Glossary and reflection probesA rendering component that captures a spherical view of its surroundings in all directions, rather like a camera. The captured image is then stored as a Cubemap that can be used by objects with reflective materials. More info
See in Glossary.
Skyboxes
A Skybox, baked or procedural, can be an integral part of your lighting setup. It can be used to control the ambient lighting and the reflections in your objects in addition to rendering the sky. Procedural Skyboxes also allow you to set the colours directly and create a sun disc instead of using a bitmap - more information can be found in the Skybox Documentation
While reflecting the skybox can be useful for many objects in your scenes, particularly outdoor scenes, there are often cases where you need to vary the reflections an object uses - there may be dark areas in an outdoor scene, such as alleyways or dense forest, or you may have interior areas which require reflections to match each room.
To meet the needs of these various reflective requirements, Unity has reflection probes which allow you to sample the environment in your scene at a certain point in space, for use as the ambient lightLight that doesn’t come from any specific direction, and contributes equal light in all directions to the Scene. More info
See in Glossary and reflection source for any objects near that point instead of the default skybox. Reflection probes can be placed around your scene in any locations where the scene’s skybox is not sufficient or appropriate.
Global Illumination
The concept of Global IlluminationA group of techniques that model both direct and indirect lighting to provide realistic lighting results. Unity has two global illumination systems that combine direct and indirect lighting: Baked Global Illumination and Enlighten Realtime Global Illumination.
See in Glossary is integral to Unity. Both the Standard shader and Unity’s GI systems have been designed to play well with each other. The GI system takes care of creating and tracking bounced light, light from emissive materials and light from the environment.
You can find the details here.
The context is a critical part of the overall look of the image. In this example you can see how a scene reflects changes in context, while content and camera remains the same.

The Content
The content is the term used to describe the objects in your scene that are being rendered. Their appearance is a result of the lighting context acting on the materials that have been applied to the objects.
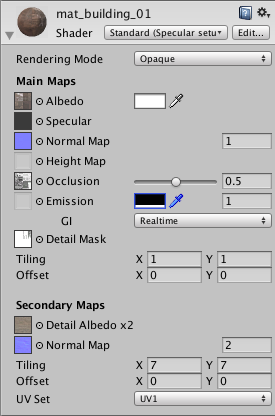
The Material Editor
When viewing a material in the inspectorA Unity window that displays information about the currently selected GameObject, asset or project settings, allowing you to inspect and edit the values. More info
See in Glossary which uses the Standard Shader, the editor displays all parameters for the material including textures, blending modes, masking and secondary maps. At a glance you be able to see which features are used and preview the material.
As the Standard shader is data-driven: Unity will only use the shader code required by the configuration the user has set for the material. In other words if a feature or texture slot of the material is not used, there is no cost for it and the shader combination is optimised behind the scenes.
How to create a material
The Standard shader allows for many configurations in order to represent a great variety of material types. Values can be set with texture maps or colour pickers and sliders. Generally UV mapping is required in conjunction with textures to describe which part of your meshThe main graphics primitive of Unity. Meshes make up a large part of your 3D worlds. Unity supports triangulated or Quadrangulated polygon meshes. Nurbs, Nurms, Subdiv surfaces must be converted to polygons. More info
See in Glossary refers to which part of the texture map. The Standard Shader material allows you therefore to have different material properties across the same mesh when used in conjunction with specular and smoothness map or a metallic map. In other words you can create rubber, metal and wood on one mesh where the resolution of the texture can exceed the polygon topology allowing for smooth borders and transition between material types, of course this has implications for a greater complexity in the workflow, but this will depend on your texture creation method.
Textures for your materials tend to be generated in one of two ways - painting and compositing in a 2D image editor like Photoshop, or rendering / baking from your 3D package, where you can also make use of higher resolution models to generate your normal mapsA type of Bump Map texture that allows you to add surface detail such as bumps, grooves, and scratches to a model which catch the light as if they are represented by real geometry.
See in Glossary and occlusion maps in addition to the albedo, specular and other maps. This workflow varies dependent on the external packages used.
Generally no texture map should contain inherent lighting (shadows, highlights, etc). One of the advantages of PBS is that objects react to light as you would expect, which is not possible if maps already contain lighting information.
Copyright © 2023 Unity Technologies
优美缔软件(上海)有限公司 版权所有
"Unity"、Unity 徽标及其他 Unity 商标是 Unity Technologies 或其附属机构在美国及其他地区的商标或注册商标。其他名称或品牌是其各自所有者的商标。
公安部备案号:
31010902002961