Importing a model
Model files can contain a variety of data, such as meshes, animation rigs and clips, materials and textures. Your file might not contain all of these elements, but you can follow any portion of the workflow that you need to:
- Select the file in the Project view to see the Import Settings window
- Set any Model-specific or general importer options
- Set up options for importing Rigs and Animation (not available for SpeedTree Models)
- Dealing with Materials and Textures
- Drag the file into Unity
For guidelines on how to export Humanoid animation from your 3D modeling software, see Preparing Humanoid Models for export.
Note: Unity’s primary support for Model filesA file containing a 3D data, which may include definitions for meshes, bones, animation, materials and textures. More info
See in Glossary is the FBX format. However, you can save your 3D files from most common 3D modeling software in their native format (for example, .max, .blend, .mb, .ma). When Unity finds these file types in your Assets folder, it calls your 3D modeling software’s FBX export plug-inA set of code created outside of Unity that creates functionality in Unity. There are two kinds of plug-ins you can use in Unity: Managed plug-ins (managed .NET assemblies created with tools like Visual Studio) and Native plug-ins (platform-specific native code libraries). More info
See in Glossary, and imports the file. The 3D modeling software must be installed on the same computer as Unity, so in most cases it’s best practice to directly export as FBX from your application into your Assets folder.
Accessing the Import Settings window
No matter what kind of data you want to extract from the Model file, you always start the same way:
Open the ProjectIn Unity, you use a project to design and develop a game. A project stores all of the files that are related to a game, such as the asset and Scene files. More info
See in Glossary window and the InspectorA Unity window that displays information about the currently selected GameObject, asset or project settings, allowing you to inspect and edit the values. More info
See in Glossary so that you can see both at once.-
Select the ModelA 3D model representation of an object, such as a character, a building, or a piece of furniture. More info
See in Glossary file you want to import from the AssetAny media or data that can be used in your game or project. An asset may come from a file created outside of Unity, such as a 3D Model, an audio file or an image. You can also create some asset types in Unity, such as an Animator Controller, an Audio Mixer or a Render Texture. More info
See in Glossary folder in the Project window.The Import Settings window opens in the Inspector showing the Model tab by default.
Setting Model-specific and general importer options
The options that are available for SpeedTree Models vs. other Models are very different. For example, the SpeedTree Model tab provides options mostly for setting up transitions between LODThe Level Of Detail (LOD) technique is an optimization that reduces the number of triangles that Unity has to render for a GameObject when its distance from the Camera increases. More info
See in Glossary levels.
Character and animated Models provide more diverse options on their Model tab, which allow you to:
- Use the Scale Factor and Convert Units properties to adjust how Unity interprets units. For example, 3ds Max uses 1 unit to represent 10 centimeters, whereas Unity uses 1 unit to represent 1 meter.
- Use the Mesh Compression, Read/Write Enabled, Optimize Mesh, Keep Quads, Index Format, or Weld Vertices properties to reduce resources and save memory.
- You can enable the Import BlendShapes option if the Model file came from Maya or 3ds Max, or any other 3d modeling application that supports morph target animation.
- You can enable the Generate Colliders option for environment geometry.
- You can enable specific FBX settings, such as Import Visibility, or Import Cameras and Import Lights.
- For Model files that contain only Animation, you can enable the Preserve Hierarchy option to prevent hierarchy mismatch in your skeleton.
- You can set the Swap UVs and Generate Lightmap UVs if you are using a LightmapA pre-rendered texture that contains the effects of light sources on static objects in the scene. Lightmaps are overlaid on top of scene geometry to create the effect of lighting. More info
See in Glossary. - You can exercise control over how Unity handles the Normals and Tangents in your Model with the NormalsThe direction perpendicular to the surface of a mesh, represented by a Vector. Unity uses normals to determine object orientation and apply shading. More info
See in Glossary, Normals Mode, Tangents, or Smoothing Angle options.
Setting options for importing Rigs and Animation
If your file contains Animation data, you can follow the guidelines for setting up the Rig using the Rig tab and then extracting or defining Animation ClipsAnimation data that can be used for animated characters or simple animations. It is a simple “unit” piece of motion, such as (one specific instance of) “Idle”, “Walk” or “Run”. More info
See in Glossary using the Animation tab. The workflow differs between Humanoid and Generic (non-Humanoid) animation types because Unity needs the Humanoid’s bone structure to be very specific, but only needs to know which bone is the root nodeA transform in an animation hierarchy that allows Unity to establish consistency between Animation clips for a generic model. It also enables Unity to properly blend between Animations that have not been authored “in place” (that is, where the whole Model moves its world position while animating). More info
See in Glossary for the Generic type:
Note: SpeedTree Models have neither a Rig nor an Animation tab.
Dealing with Materials and Textures
If your file contains materials and textures, you can define how you want to deal with them:
- Click the Materials tab in the Import Settings window.
- From the Material Creation Mode drop-down menu, choose how you want to import the Materials from the FBX file. Unless you chose None, several options appear in the MaterialsAn asset that defines how a surface should be rendered. More info
See in Glossary tab, including the Location option, whose value determines what the other options are. - Choose the Use Embedded Materials option to keep the Materials inside the imported Asset.
- When you have finished setting the options, click the Apply button at the bottom of the Import Settings window to save them or click the Revert button to cancel.
Finding textures
Unity follows a specific search plan to automatically look for textures on import. First, the importer looks for a sub-folder called Textures within the same folder as the meshThe main graphics primitive of Unity. Meshes make up a large part of your 3D worlds. Unity supports triangulated or Quadrangulated polygon meshes. Nurbs, Nurms, Subdiv surfaces must be converted to polygons. More info
See in Glossary, or in any parent folder. If this fails, Unity performs an exhaustive search of all textures in the project. Although slightly slower, the main disadvantage of the exhaustive search is that there could be two or more textures in the project with the same name. In this case, it is not guaranteed that Unity can find the right one.
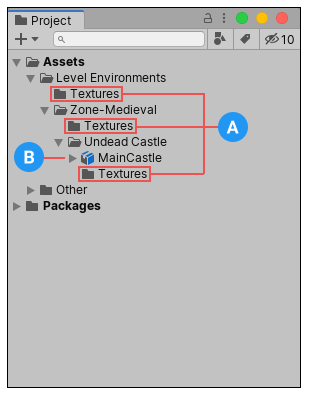
(A) Possible places to find Textures
(B) Mesh being imported
Normal maps
If you have a character with a normal mapA type of Bump Map texture that allows you to add surface detail such as bumps, grooves, and scratches to a model which catch the light as if they are represented by real geometry.
See in Glossary that was generated from a high-polygon version of the Model, you should import the game-quality version with a Smoothing Angle of 180 degrees. This prevents odd-looking seams in lighting due to tangent splitting. If the seams are still present with these settings, choose Calculate Legacy With Split Tangents from the Tangents drop-down menu. If you are converting a greyscale image into a normal map, you don’t need to worry about this.
Drag the file into Unity
Finally, you can import the file into your scene:
- If it contains a Mesh, drag the file into the SceneA Scene contains the environments and menus of your game. Think of each unique Scene file as a unique level. In each Scene, you place your environments, obstacles, and decorations, essentially designing and building your game in pieces. More info
See in Glossary view to instantiate it as a PrefabAn asset type that allows you to store a GameObject complete with components and properties. The prefab acts as a template from which you can create new object instances in the scene. More info
See in Glossary for a GameObjectThe fundamental object in Unity scenes, which can represent characters, props, scenery, cameras, waypoints, and more. A GameObject’s functionality is defined by the Components attached to it. More info
See in Glossary. - If it contains Animation Clips, you can drag the file into the Animator window to use in the State Machine. You can also drag the Animation take directly onto an instantiated Prefab in the Scene viewAn interactive view into the world you are creating. You use the Scene View to select and position scenery, characters, cameras, lights, and all other types of Game Object. More info
See in Glossary. This automatically creates an Animation Controller and connects the animation to the Model.
Copyright © 2023 Unity Technologies
优美缔软件(上海)有限公司 版权所有
"Unity"、Unity 徽标及其他 Unity 商标是 Unity Technologies 或其附属机构在美国及其他地区的商标或注册商标。其他名称或品牌是其各自所有者的商标。
公安部备案号:
31010902002961