Removing an installed package from a project
When you “remove” a package from your project, the Package Manager is actually removing the project’s direct dependencyA direct dependency occurs when your project “requests” a specific package version. To create a direct dependency, you add that package and version to the dependencies property in your project manifest (expressed in the form package_name@package_version). More info
See in Glossary from your project manifestEach Unity project has a project manifest, which acts as an entry point for the Package Manager. This file must be available in the <project>/Packages directory. The Package Manager uses it to configure many things, including a list of dependencies for that project, as well as any package repository to query for packages. More info
See in Glossary. The result of removing the direct dependency varies, based on the dependencies for the package you are removing:
- If there are no other packages or feature setsA feature set is a collection of related packages that you can use to achieve specific results in the Unity Editor. You can manage feature sets directly in Unity’s Package Manager. More info
See in Glossary that have a dependency on this package, any Editor or run-time functionality that it implemented is no longer available in your project. For more information about direct and indirect dependenciesAn indirect, or transitive dependency occurs when your project requests a package which itself “depends on” another package. For example, if your project depends on thealembic@1.0.7package which in turn depends on thetimeline@1.0.0package, then your project has an direct dependency on Alembic and an indirect dependency on Timeline. More info
See in Glossary, see Dependency and resolution. - If another installed package or an installed feature set depends on the package you are trying to remove, this procedure removes only the dependency from your project manifest. The package itself and all its functionality is still installed in your project, even though it might not appear in the In Project list context. For example, the Show Dependencies setting is disabled by default, so packages that are installed as indirect dependencies don’t appear until you enable this setting. For more information, including an illustrated comparison, see Show Dependencies.
Before you begin
Make sure you understand these important notes before you begin:
- Use this procedure to remove a package only if you added it to the current project by installing it, such as (but not limited to) Installing a feature set, Installing from a registry, and installing custom packages. Don’t use this procedure to attempt to remove packages that you imported to your project, such as an Asset Store package that you downloaded and imported. For information about removing Asset StoreA growing library of free and commercial assets created by Unity and members of the community. Offers a wide variety of assets, from textures, models and animations to whole project examples, tutorials and Editor extensions. More info
See in Glossary packages that you downloaded and imported, see Remove imported assets from a project. - If you use this procedure to remove a package that you installed from a registry, the operation removes the package from the current project. It doesn’t remove the same package that might exist in other projects. It also doesn’t remove the package from the global cache; this action isn’t supported by the Package Manager, and manually manipulating the global cache is discouraged.
- If you use this procedure to remove a package that you embedded in your project, the Package Manager deletes the entire package folder from your computer. However, removing packages installed from any other source (including local packages) removes only the reference to the package in the manifest but leaves the package itself and its contents intact.
Procedure
To remove an installed package:
-
Open the Package Manager window and select In Project from the PackagesPackages are collections of assets to be shared and re-used in Unity. The Unity Package Manager (UPM) can display, add, and remove packages from your project. These packages are native to the Unity Package Manager and provide a fundamental method of delivering Unity functionality. However, the Unity Package Manager can also display Asset Store packages that you downloaded from the Asset Store. More info
See in Glossary drop-down menu.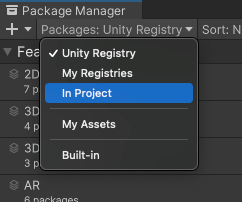
Switch the context to In Project Select the package you want to remove from the list of packages. The details view now displays that package’s information.
-
Click the Remove button. If this button is:
- Not displayed, you might be viewing the My Assets list. See Before you begin.
- Disabled, you can’t remove this package. For more information, see Locked and non-removable packages.
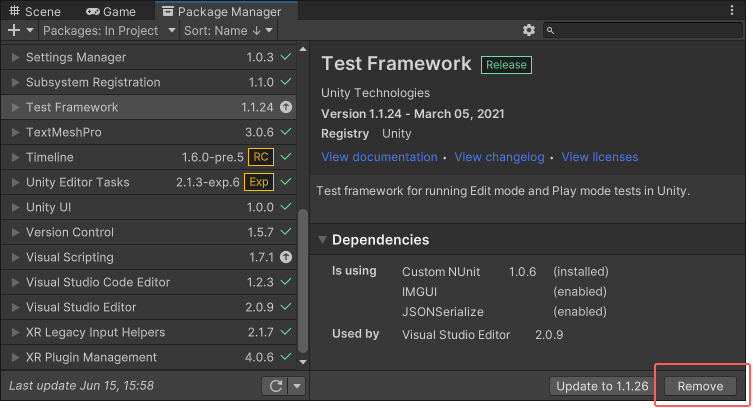
When the progress bar finishes, the package disappears from the list.
If you want to restore a removed package, follow the instructions for installing a package.
Note: You can remove multiple packages with one click by using the multiple select feature. For more information, see Perform an action on multiple packages or feature sets.
Locked and non-removable packages
You can only remove packages which are not required by another package or a feature set. The Package Manager enforces this by disabling the Remove button for all required packages.
| Required by: | Description: |
|---|---|
| A feature set | If a feature set requires the package, it displays a lock icon ( ) both in the list view and in the details view. The details view also displays the name of the feature set that requires the package below the package name in the details view. ) both in the list view and in the details view. The details view also displays the name of the feature set that requires the package below the package name in the details view. However, even if you click the Unlock button, you still can’t remove the package from your project until you remove all feature sets which require it. Unlocking the package lets you request a different version for your project, but it still doesn’t let you remove it. |
| Another package | If one or more packages require the selected package, the Remove button is disabled. You can find the name of the package that has the dependency from the Dependencies section of the details view. If you don’t need the other packages, you can remove them and the Package Manager automatically removes this package too. |
Tip: If you don’t see the Dependencies section, follow these instructions to enable the Show Dependencies setting:
-
Select Advanced Project Settings under the advanced settings
 icon.
icon.
Advanced Project Settings opens up the Package Manager project settings window The Package Manager project settingsA broad collection of settings which allow you to configure how Physics, Audio, Networking, Graphics, Input and many other areas of your project behave. More info
See in Glossary window appears. Under the Advanced Settings group, enable the Show Dependencies option.
Close the Project Settings window. Any packages that are only installed as dependencies in your project now appear in the package list and the detail view now displays a Dependencies section.
Note: You can unlock multiple packages with one click by using the multiple select feature. For more information, see Perform an action on multiple packages or feature sets.
Copyright © 2023 Unity Technologies
优美缔软件(上海)有限公司 版权所有
"Unity"、Unity 徽标及其他 Unity 商标是 Unity Technologies 或其附属机构在美国及其他地区的商标或注册商标。其他名称或品牌是其各自所有者的商标。
公安部备案号:
31010902002961