Light Probes
Although lightmapping adds greatly to the realism of a scene, it has the disadvantage that non-static objects in the scene are less realistically rendered and can look disconnected as a result. It isn’t possible to calculate lightmapping for moving objects in real time but it is possible to get a similar effect using light probes. The idea is that the lighting is sampled at strategic points in the scene, denoted by the positions of the probes. The lighting at any position can then be approximated by interpolating between the samples taken by the nearest probes. The interpolation is fast enough to be used during gameplay and helps avoid the disconnection between the lighting of moving objects and static lightmapped objects in the scene.
Adding Light Probes
The Light Probe Group component (menu: Component -> Rendering -> Light Probe Group) can be added to any available object in the scene. The inspector can be used to add new probes to the group. The probes appear in the scene as yellow spheres which can be positioned in the same manner as GameObjects. Selected probes can also be duplicated with the usual keyboard shortcut (ctrl+d/cmd+d).

Choosing Light Probe positions
Remember to place probes where you want to sample light or sample darkness. The probes need to form a volume within the scene for the space subdivision to work properly.
The simplest approach to positioning is to arrange them in a regular 3D grid pattern. While this setup is simple and effective, it is likely to consume a lot of memory (each light probe is essentially a spherical, panoramic HDR image of the view from the sample point encoded using Spherical Harmonics). It is worth noting that probes are only needed for regions that players, NPCs or other dynamic objects can actually move to. Also, since lighting conditions are interpolated for positions between probes, it is not necessary to use lots of them across areas where the light doesn’t change very much. For example, a large area of uniform shadow would not need a large number of probes and neither would a brightly lit area far away from reflective objects. Probes are generally needed where the lighting conditions change abruptly, for instance at the edge of a shadow area or in places where pieces of scenery have different colors.
In some cases, the infrastructure of the game can be useful in choosing light probe positions. For example, a racing game typically uses waypoints around the track for AI and other purposes. These are likely to be good candidates for probe positions and it would likely be straightforward to set these positions from an editor script. Similarly, navigation meshes typically define the areas that can be reached by players and these also lend themselves to automated positioning of probes.
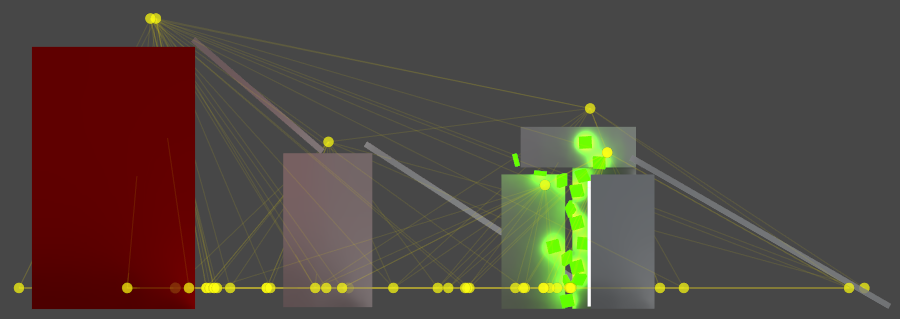
Here light probes have been baked over surfaces where our characters can walk on, but only where there are interesting lighting changes to capture:

Flat 2D levels
As it is now, the light probe system can’t bake a completely flat probe cloud. So even if all your characters move only on a plane, you still have to take care to position at least some probes in a higher layer, so that a volume is formed and interpolation can work properly.


Using Light Probes
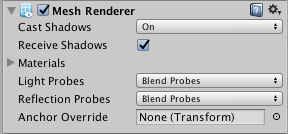
To allow a mesh to receive lighting from the probe system, you should use the Light Probes option on its Mesh Renderer:


The probe interpolation requires a point in space to represent the position of the mesh that is receiving light. By default, the centre of the mesh’s bounding box is used but it is possible to override this by dragging a Transform to the Mesh Renderer’s Anchor Override property (this Transform’s position will be used as the interpolation point instead). This may be useful when an object contains two separate adjoining meshes; if both meshes are lit individually according to their bounding box positions then the lighting will be discontinuous at the place where they join. This can be prevented by using the same Transform (for example the parent or a child object) as the interpolation point for both Mesh Renderers.
Another option is to use a grid of interpolated light probes by setting the Light Probe Blend Mode option to Use Proxy Volume and using an additional LightProbeProxyVolume component. This component will generate a 3D grid of interpolated light probes inside a bounding volume where the resolution of the grid can be user specified. The spherical harmonics coefficients of the interpolated light probes are updated into 3D textures which are sampled at render time to compute the contribution to the diffuse ambient lighting. This will add a spatial gradient and it’s useful for large dynamic objects, particle systems or skinned mesh objects that cannot use lightmaps.
When an object using light probes is the active selected object and the Light Probes gizmo is enabled, its interpolated probe will be rendered on top of it for preview if lighting data has been built. The interpolated probe is the one used for rendering the object and is connected with 4 thin yellow lines (3 when outside of the probe volume) to the probes it is being interpolated between:

Lightmapping modes
In Unity 5.3 the default behaviour is that all static lighting (including lights set to ‘Mixed’ lightmapping mode) is baked into the light probes.
In Unity 5.4 light probes will store full illumination from sky lights, emissive materials and ‘Baked’ lights, but only indirect illumination from ‘Mixed’ lights. Thanks to that, objects can be lit in real-time with ‘Mixed’ lights and take advantage of dynamic elements such as real-time shadows, but at the same time receive indirect lighting added to the scene by these lights.