Spatial Mapping components
The Unity Editor has low-level Script Ref API for gathering information about surfaces in your project environment. This low-level Script Ref API gives you maximum control over when to query the device for surface changes, and when to create or update the corresponding surface game objects. The Spatial Mapping components allow you to quickly get up and running with mixed reality, without directly using the low-level Script Ref API.

Spatial Mapping components
There are two Spatial Mapping components: the Spatial Mapping Renderer and the Spatial Mapping Collider. Go to Component > Add… (or click on Add Component in the Inspector window) to bring up the Add Component menu. The spatial mapping components are under the AR category in the Add Component menu.

You can use the components together or independently. Each Spatial Mapping component uses its own surface observer to understand changes in the physical world. Depending on how the component is configured, each Spatial Mapping component periodically queries the system to understand what changes have occurred in physical space. When the system notifies the component of the relevant changes, the component prioritizes the baking of the various changed surfaces. The baking process involves generating a Mesh Filter with a Mesh that corresponds to the physical surface. The Spatial Mapping Renderer and Spatial Mapping Collider components use this Mesh Filter in their own specific ways.
Spatial Mapping Renderer (Script)

The Spatial Mapping Renderer component gives a visual representation of Spatial Mapping surfaces. This is useful for visually debugging surfaces and adding visual effects to the environment.
The Spatial Mapping Renderer component periodically asks the system for changes in physical space. Each time the component is notified of these changes, it bakes the returned surface data into GameObjects. These GameObjects contain a Mesh Filter and a Mesh Renderer. The Renderer component manages the lifetime of the surface GameObjects. This means that the Spatial Mapping Renderer component handles creating, updating, and destroying the surface GameObject.
The component provides an easy way to change the material on all the generated surfaces dynamically. It ships with two material types:
An Occlusion Material that appears transparent but conceals holograms. This is a useful material to use if, for example, you want a real-world desk to conceal an in-game holographic object placed underneath it.
-
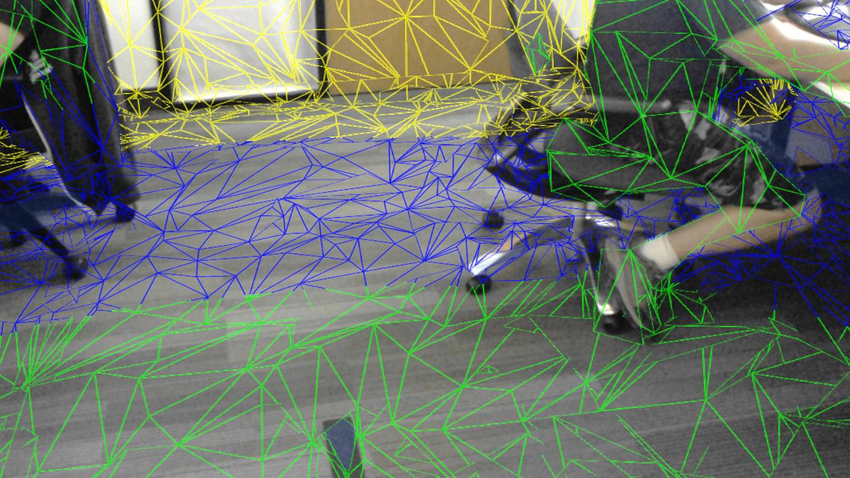
A wireframe Shader that applies to all the component’s surfaces. The colors of the wireframe represent distances. The following are the distance-to-color mappings.
0 to 1 meters = Black
1 to 2 meters = Red
2 to 3 meters = Green
3 to 4 meters = Blue
4 to 5 meters = Yellow
5 to 6 meters = Cyan
6 to 7 meters = Magenta
7 to 8 meters = Maroon
8 to 9 meters = Teal
9 to 10 meters = Orange
10 meters or greater = White

Render Settings
| Setting | Property |
|---|---|
| Custom Render Setting | Select one of the three options to render surfaces: Occlusion Material - A transparent material which hides GameObjects behind real world surfaces. NOTE: Enables all of a surface’s Mesh Renderers, overriding any other setting. Custom Material - Your own material for visualizing the surfaces. Use this for debugging, visual effects, or your own occlusion material. This enables all of a surface’s Mesh Renderers, overriding any other setting. None (Game Object) - Disables all the Mesh Renderers assigned to the surfaces. |
| Custom Material | Select the material you want to use for rendering. The default is the built-in SpatialMappingWireframe material. The option you select here is the render material that applies to your Custom Render Settings. Note that both active options in the Custom Render Settings (both Occlusion Material and Custom Material) require a Custom Material setting here. |
For information on the General Settings see General Settings, below.
Notes:
All surface GameObjects take their material from the Custom Render Setting. If you change the Custom Render Setting, all surface GameObjects’ render materials change to those of the Custom Render Setting. This reduces the number of draw calls, which in turn improves the rendering performance. Using a shared material also reduces the amount of memory that rendering uses.
When you assign a new material to the Custom Material setting, it does not automatically change the surface material of your surface GameObjects. You must also set Custom Render Setting to Custom Material or Occlusion Material to apply the new material to all surfaces.
If the Occlusion Material or Custom Material properties in Custom Render Setting are not assigned at runtime, they are destroyed with the Renderer component. However, any Occlusion Material or Custom Material assigned at runtime are not destroyed with the component, so you need to destroy them individually.
Example script: Change surface material at runtime
The following script example demonstrates how to to change the material applied to all surface GameObjects dynamically at runtime.
SpatialMappingRenderer renderer = spatialMappingGameObject.AddComponent<SpatialMappingRenderer>();
renderer.customMaterial = new Material(Shader.Find("VR/SpatialMapping/Wireframe"));
renderer.currentRenderSetting = SpatialMappingRenderer.RenderSetting.CustomMaterial;
Spatial Mapping Collider (Script)

The Spatial Mapping Collider component allows holographic content to interact with physical surfaces. It handles creating, updating, and destroying the surface GameObjects.
The component periodically queries the system for surface changes in the physical world. When the system reports surface changes, the Spatial Mapping Collider component prioritizes when each reported surface is baked. When a surface is baked, a new GameObject is created that has a Mesh Filter and Mesh Collider component. Once the surface has a Mesh Collider, you can cast rays against the surface and collide with it.
Collider Settings
| Setting | Property |
|---|---|
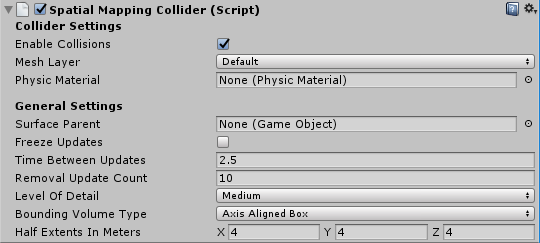
| Enable Collisions | Check this box to turn on the surface Mesh Colliders. |
| Mesh Layer | Set the Layer property on all the surface Mesh Colliders. Note that you need to set Layers for raycasts. When performing a raycast, you must indicate which Layers you want the ray intersection to test against. By default, all GameObjects are assigned to the Default Layer. However, it is good practice to assign your GameObjects to a specific Layer. See Performance optimization, below. See the Layers page and Raycast page for more information. See also Example script: SpatialSurface raycast, below. |
| Physic Material | Specify which Physic Material to assign to the Mesh Collider. The default is None (Physic Material). A Physic Material specifies how other Rigidbody components should interact with it. For example, a surface can simulate ice, and therefore apply less friction to an object moving on it. The Spatial Mapping Collider component applies its Physic Material to all of the Mesh Colliders on its surface GameObjects. See the the Physic Material page for more information. |
For information on the General Settings see General Settings, below.
Example script: SpatialSurface raycast
The following example demonstrates how to raycast against GameObjects on the SpatialSurface Layer.
using UnityEngine;
using System.Collections;

public class CustomLayerCollision : MonoBehaviour
{
    // Update is called once per frame.
    void Update()
    {
        // When the user presses the left mouse button,
        // Do a collision test.  You could fire the
        // DetectCollisions based on a gesture event.*

        if(Input.GetMouseButtonDown(0))
        {
            DetectCollisions();
        }
    }

    void DetectCollisions()
    {
        // Raycast against all game objects that are on either the
        // spatial surface or UI layers.
        int layerMask = 1 << LayerMask.NameToLayer("SpatialSurface");
        // We use ScreenPointToRay to create a ray whose origin is the
        // main camera's position and direction is from the position of the main
        // camera to the position of where the mouse position would be in world space.
        RaycastHit[] hits = Physics.RaycastAll(Camera.main.ScreenPointToRay(Input.mousePosition), float.MaxValue, layerMask);

        if(hits.Length > 0)
        {
            foreach(RaycastHit hit in hits)
            {
                Debug.Log(string.Format("Hit Object **\"**{0}**\"** at position **\"**{1}**\"**", hit.collider.gameObject, hit.point));
            }
        }
        else
        {
            Debug.Log("Nothing was hit.");
        }
    }
}
Settings
General Settings
General Settings function in the same way for the Spatial Mapping Renderer (Script) and Spatial Mapping Collider (Script) components.
| Setting | Property |
|---|---|
| Surface Parent | Select the Surface Parent GameObject that you want surface GameObjects generated by Spatial Mapping components to inherit from. Leave this as None (Game Object), to automatically generate a Surface Parent GameObject. |
| Freeze Updates | Check this box to stop the component querying the system for surface changes. NOTE: Each Spatial Mapping component periodically queries the system for surface changes in physical space. Querying and baking surfaces cost memory, performance, and power. For environments that you expect to be mostly static, allow users to look around the environment for a duration of time without updates. |
| Time Between Updates | Specify the time in tenths of a second (ie 3.7 or 4.6) between queries for surface changes in physical space. The default is 2.5 seconds. Note that the more regular the queries, the higher the cost in memory, performance, and power. |
| Removal Update Count | Specify the number of updates before a surface GameObject is removed. An update is the same as a frame in this context. The default is 10 updates (frames). NOTE: The removal update count down begins when the system notifies the component that a surface GameObject is no longer in the surface observer’s bounding volume - ie it is gone from the defined area the system reports on. Here you specify how many updates (frames) should follow after this event before removing the surface GameObject. |
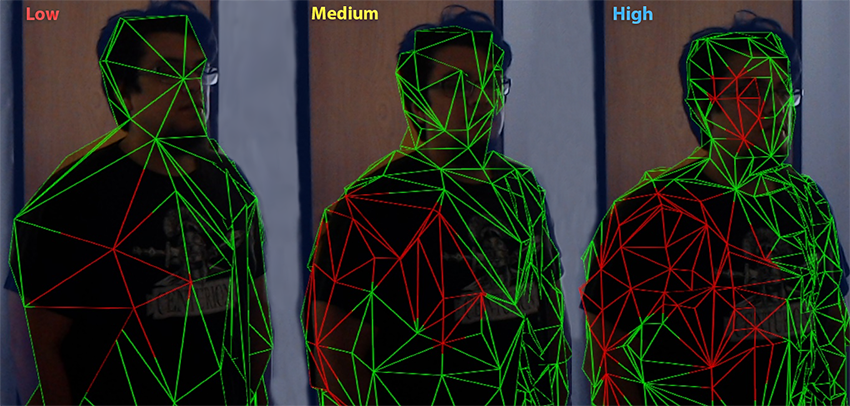
| Level of Detail | Select Low, Medium, or High quality of the Mesh generated by the component. The default is Medium. The higher the quality, the more accuracy in the Collider and rendering, the lower the quality, the less cost in performance and power. See the image below for an example of the three Level Of Detail modes. |
| Bounding Volume Type | Choose here between bounding volume area shapes: Sphere or Axis Aligned Box. The default is Axis Aligned Box. NOTE: The bounding volume is the defined area about which the system reports physical surface changes. |
| Size In Meters | Set the size of the bounding volume in meters. Configure Sphere by radius; the default radius is 2 meters. Configure Axis Aligned Box by its extents; the default is a Vector3 (4,4,4) or 4 cubic meters. NOTE: The observer’s bounding volume is the defined area about which the system reports physical surface changes. |
Level Of Detail

Performance optimization
Keep in mind that each Spatial Mapping component is independent of other Spatial Mapping components. This means that each component maintains its own list of surfaces, even if multiple components see the same surface. Try to limit how many Spatial Mapping components you use, in order to optimize performance.
If you expect the environment in your simulation to be fairly static and unchanging (like a board game), you can scan as much surface data as needed upfront and then set the Freeze Updates property to false. This increases performance slightly and consumes less power.
There is a small cost in performance for moving a Spatial Mapping component. Try to avoid moving a GameObject that has a Spatial Mapping component.
In Collider Settings > Level of Detail, use the Low setting. This increases performance and reduces power usage when calculating collision intersections.
Spatial Mapping Mesh Colliders have less latency in updates than Spatial Mapping Mesh Renderers. This means the Colliders update faster than the Renderers.
In Collider Settings > Mesh Layer, by default, all game objects are assigned to the Default Layer. However, it is good practise to assign your GameObjects to a specific Layer: Raycasting is an expensive calculation to perform, in that it can slow performance. By using Layers, you can filter which GameObjects you are doing your raycast calculations against, and so optimise performance. If you don’t have a lot of complicated Meshes on your Default Layer, then doing the raycast test for collision won’t have a large performance cost. However, it is best to organize your GameObjects into Layers to reduce the complexity of raycast tests when doing collisions.