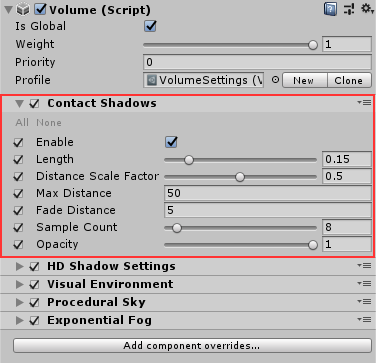
Contact Shadows
The Contact Shadows Volume Override specifies properties which control the behavior of Contacts Shadows. Contact Shadows are shadows that The High Definition Render Pipeline (HDRP) ray marches in screen space inside the depth buffer. The goal of using Contact Shadows is to capture small details that regular shadow mapping algorithms fail to capture.
Enabling Contact Shadows
[!include[](Snippets/Volume-Override-Enable.md)]For this feature: The property to enable in your HDRP Asset is: Lighting > Shadows > Use Contact Shadows. The property to enable in your Frame Settings is: Lighting > Contact Shadows.
Using Contact Shadows
Contact Shadows use the Volume framework, so to enable and modify Contact Shadow properties, you must add a Contact Shadows override to a Volume in your Scene. To add Contact Shadows to a Volume:
- In the Scene or Hierarchy view, select a GameObject that contains a Volume component to view it in the Inspector.
- In the Inspector, navigate to Add Override > Shadowing and click on Contact Shadows. HDRP now applies Contact Shadows to any Camera this Volume affects.
You can enable Contact Shadows on a per Light basis for Directional, Point, and Spot Lights. Tick the Enable checkbox under the Contact Shadows drop-down in the Shadows section of each Light to indicate that HDRP should calculate Contact Shadows for that Light.
Only one Light can cast Contact Shadows at a time. This means that, if you have more than one Light that casts Contact Shadows visible on the screen, only the dominant Light renders Contact Shadows. HDRP chooses the dominant Light using the screen space size of the Light’s bounding box. A Directional Light that casts Contact Shadows is always the dominant Light.
Note: A Light casts Contact Shadows for every Mesh Renderer that uses a Material that writes to the depth buffer. This is regardless of whether you enable or disable the Cast Shadows property on the Mesh Renderer. This means that you can disable Cast Shadows on small GameObjects/props and still have them cast Contact Shadows. This is good if you do not want HDRP to render these GameObjects in shadow maps. If you do not want this behavior, use Shader Graph to author a Material that does not write to the depth buffer.
Properties

To edit properties in any Volume component override, enable the checkbox to the left of the property. This also tells HDRP to use the property value you specify for the Volume component rather than the default value. If you disable the checkbox, HDRP ignores the property you set and uses the Volume’s default value for that property instead.
| Property | Description |
|---|---|
| Enable | Enable the checkbox to make HDRP process Contact Shadows for this Volume. |
| Length | Use the slider to set the length of the rays, in meters, that HDRP uses for tracing. It also functions as the maximum distance at which the rays can captures details. |
| Distance Scale Factor | HDRP scales Contact Shadows up with distance. Use the slider to set the value that HDRP uses to dampen the scale to avoid biasing artifacts with distance. |
| Max Distance | The distance from the Camera, in meters, at which HDRP begins to fade Contact Shadows out to zero. |
| Fade Distance | The distance, in meters, over which HDRP fades Contact Shadows out when at the Max Distance. |
| Sample Count | Use the slider to set the number of samples HDRP uses for ray casting. Increasing this increases quality at the cost of performance. |
| Opacity | Use the slider to set the opacity of the Contact Shadows. Lower values result in softer, less prominent shadows. |
Details
For Mesh Renderer components, setting Cast Shadows to Off does not apply to Contact Shadows.
Contact shadow have a variable cost between 0.5 and 1.3 ms on the base PS4 at 1080p.