Push Kit (HMS)
Service Introduction
HUAWEI Push Kit is a messaging service provided for you to establish a messaging channel from the cloud to devices. By integrating Push Kit, you can send messages to your apps on user devices in real time. This helps you maintain closer ties with users and increases user awareness of and engagement with your apps.You can click here to watch the MOOC video about Push Kit.
Use Cases
| Use Case | Description |
|---|---|
| Social | When a user takes actions, such as likes, comments, and sharing, in a social app, the app will call Push Kit to notify their friends. Users can receive messages even when the app is not running. This greatly increases user interactions and app engagement. |
| Marketing | To promote products and launch marketing campaigns, games, e-commerce apps, and utility apps can call Push Kit server APIs to select target audiences by tag and push messages to them, attracting more users and improving the conversion rate. |
| System notifications | Utility apps or other apps that have system notification requirements need to notify users in a timely manner when the status of users or system functions changes. Such apps can call Push Kit server APIs to push messages to target devices, reminding users to complete specific operations. |
| User engagement | Generally, it is necessary to engage users in different phases of a product's life cycle, for example, pushing the product introduction to new users. In addition, you can also send messages to help new users solve possible problems that they may encounter or notify them of attractive promotions, to improve user retention and increase active users. |
| News | Usually, news and video apps need to quickly push the latest events and most popular content to users. Such apps can push messages to users with specific tags within the shortest period of time, getting more views and improving user loyalty. |
Integrating into Your Unity Project
Register and get verified
Before doing this step, you need to create an HMS Account, project and App according to the HMS document.


Now you have your Huawei HMS Project and App information.
Create an app
Create Unity project, and you will also need to set up the build environment for building Android apk with HMS SDK. Then, finish the following preparation.

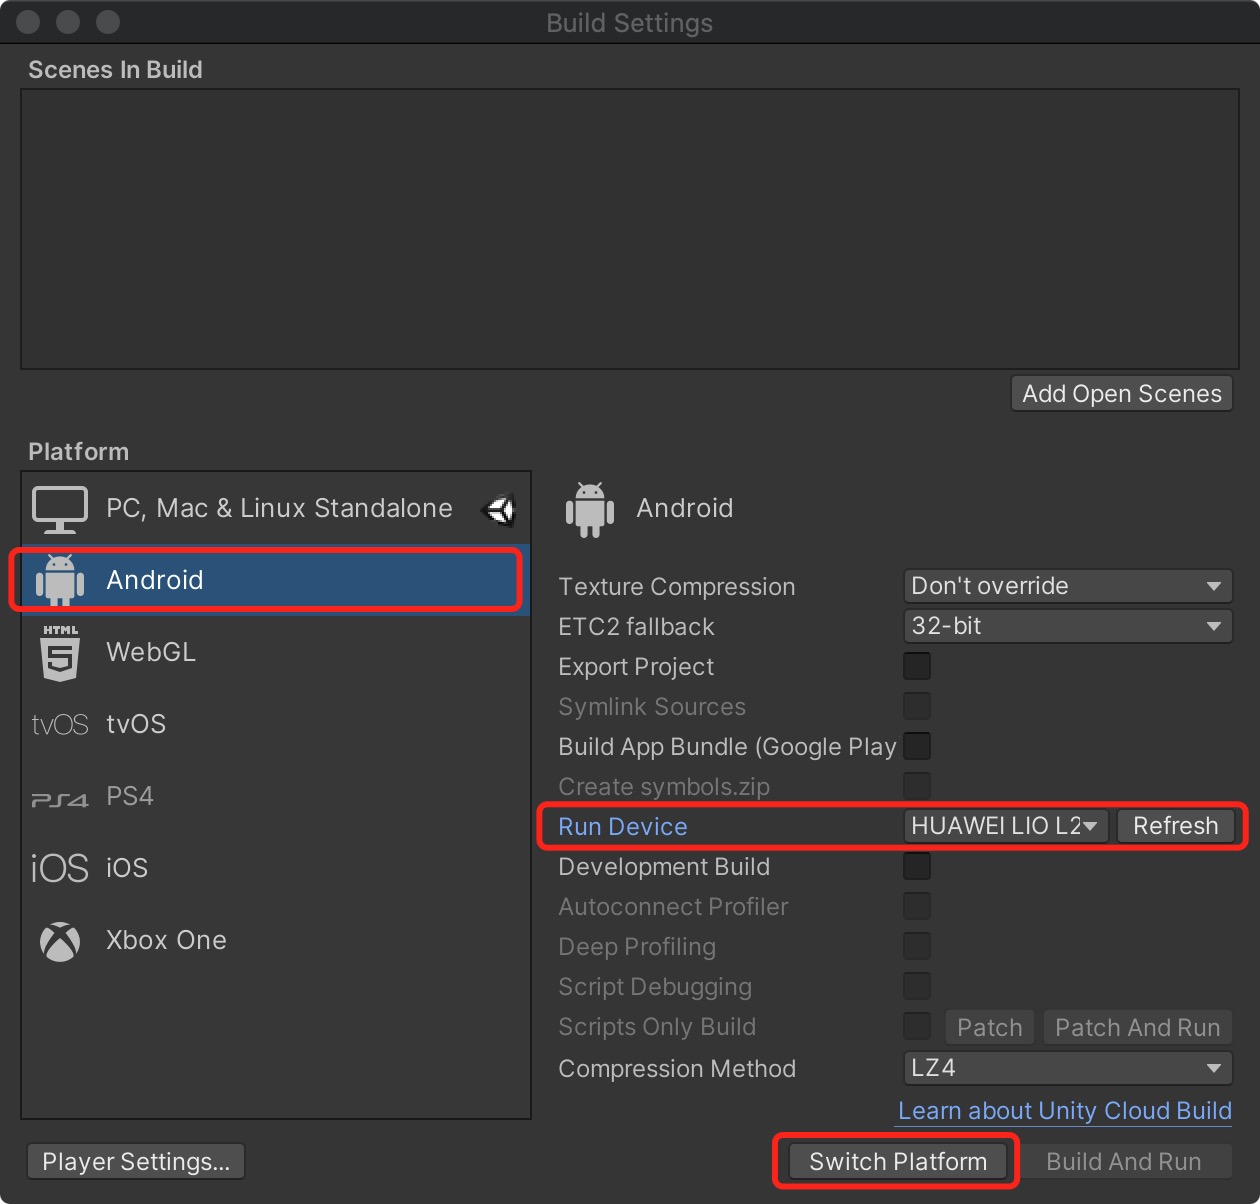
In Editor -> Build Settings, Switch platform to Andriod and Connect your Android device
In Player Settings -> Publishing Settings, enable the following environment checkboxes

Prepare for development
According to HMS integration process introduction, we still need to add some configurations to the gradle files for development preparations.

You can follow Huawei documentation guidance to do the configuration, you can also refer and compare with the files in our Unity example project.
Enable and add configurations to
AndroidManifest.xmlGo to Edit -> Project Settings -> Player -> Android(icon) -> Publishing Settings -> Build
Enable Custom Main Manifest
We should enable AndroidManifest when we use push or location sdk.
If Unity Version is 2019.2 or before, there is no AndroidManifest checkbox, but you can put
AndroidManifest.xmlunderAssets/Plugins/Android.<?xml version="1.0" encoding="utf-8"?> <!-- GENERATED BY UNITY. REMOVE THIS COMMENT TO PREVENT OVERWRITING WHEN EXPORTING AGAIN--> <manifest xmlns:android="http://schemas.android.com/apk/res/android" package="com.unity3d.player" xmlns:tools="http://schemas.android.com/tools"> <uses-permission android:name="android.permission.ACCESS_COARSE_LOCATION"/> <uses-permission android:name="android.permission.ACCESS_FINE_LOCATION"/> <uses-permission android:name="android.permission.ACCESS_BACKGROUND_LOCATION" /> <uses-permission android:name="com.huawei.hms.permission.ACTIVITY_RECOGNITION" /> <uses-permission android:name="android.permission.ACTIVITY_RECOGNITION" /> <uses-permission android:name="android.permission.ACCESS_MOCK_LOCATION" /> <application> <activity android:name="com.hms.hms_analytic_activity.HmsAnalyticActivity" android:theme="@style/UnityThemeSelector"> <intent-filter> <action android:name="android.intent.action.MAIN" /> <category android:name="android.intent.category.LAUNCHER" /> </intent-filter> <meta-data android:name="unityplayer.UnityActivity" android:value="true" /> </activity> <service android:name="com.unity.hms.push.MyPushService" android:exported="false"> <intent-filter> <action android:name="com.huawei.push.action.MESSAGING_EVENT"/> </intent-filter> </service> <receiver android:name="com.unity.hms.location.LocationBroadcastReceiver" android:exported="true"> <intent-filter> <action android:name="com.huawei.hmssample.location.LocationBroadcastReceiver.ACTION_PROCESS_LOCATION" /> </intent-filter> </receiver> <receiver android:name="com.unity.hms.location.GeoFenceBroadcastReceiver" android:exported="true"> <intent-filter> <action android:name="com.huawei.hmssample.geofence.GeoFenceBroadcastReceiver.ACTION_PROCESS_LOCATION" /> </intent-filter> </receiver> </application> </manifest>Enable and add configurations to project gradle
Go to Edit -> Project Settings -> Player -> Android(icon) -> Publishing Settings -> Build
Enable Custom Base Gradle Template and add the AppGallery Connect plugin and the Maven repository. The path is
Assets/Plugins/Android/baseProjectTemplate.gradle.If your unity version is 2019.2 or before, you should add implement and other configuration on
MainGradleTemplate.gradle.// GENERATED BY UNITY. REMOVE THIS COMMENT TO PREVENT OVERWRITING WHEN EXPORTING AGAIN allprojects { buildscript { repositories {**ARTIFACTORYREPOSITORY** google() jcenter() maven { url 'https://developer.huawei.com/repo/' } } dependencies { // If you are changing the Android Gradle Plugin version, make sure it is compatible with the Gradle version preinstalled with Unity // See which Gradle version is preinstalled with Unity here https://docs.unity3d.com/Manual/android-gradle-overview.html // See official Gradle and Android Gradle Plugin compatibility table here https://developer.android.com/studio/releases/gradle-plugin#updating-gradle // To specify a custom Gradle version in Unity, go do "Preferences > External Tools", uncheck "Gradle Installed with Unity (recommended)" and specify a path to a custom Gradle version classpath 'com.android.tools.build:gradle:3.4.0' classpath 'com.huawei.agconnect:agcp:1.2.1.301' **BUILD_SCRIPT_DEPS** } } repositories {**ARTIFACTORYREPOSITORY** google() jcenter() flatDir { dirs "${project(':unityLibrary').projectDir}/libs" } maven { url 'https://developer.huawei.com/repo/' } } } task clean(type: Delete) { delete rootProject.buildDir }Enable and add configurations to app gradle
Go to Edit -> Project Settings -> Player -> Android(icon) -> Publishing Settings -> Build
Enable Custom Launcher Gradle Template and add build dependencies in
launcherTemplate.gradle. The path isAssets/Plugins/Android/launcherTmeplate.gradle.If unity version is 2019.2 or before, you should add implement and other configuration on
MainGradleTemplate.dependencies { implementation project(':unityLibrary') implementation 'com.huawei.hms:push:4.0.3.301' implementation 'com.android.support:appcompat-v7:28.0.0' implementation 'com.huawei.hms:base:4.0.1.300' implementation 'com.huawei.hms:hwid:4.0.1.300' }Enable and add configurations to unity library gradle
Go to Edit -> Project Settings -> Player -> Android(icon) -> Publishing Settings -> Build
Enable Custom Main Gradle Template and add build dependencies. The path is
Assets/Plugins/Android/mainTemplate.gradle.If unity version is 2019.2 or before, you should add implement and other configuration on
MainGradleTemplate.gradle.dependencies { implementation fileTree(dir: 'libs', include: ['*.jar']) implementation 'com.huawei.hms:hianalytics:5.0.0.301' implementation 'com.huawei.agconnect:agconnect-core:1.2.0.300' implementation 'com.huawei.hms:base:4.0.1.300' implementation 'com.huawei.hms:hwid:4.0.1.300' implementation 'com.huawei.hms:game:4.0.1.300' **DEPS**}Signature
Go to Edit -> Project Settings -> Player -> Android(icon) -> Publishing Settings -> Keystore Manager
Click Keytore... -> create new

You need to enter the password when you open unity, otherwise you cannot build. There's no need to add a signature on gradle.
Signing Certificate Fingerprint
Please refer to Huawei preparation documentation step 4 for generating a SHA256 Certificate Fingerprint.

And refer to Huawei preparation documentation step 5 to add Fingerprint to AppGallery Connect.

Package name
Set the package name in Edit -> Project Settings -> Player
The package name is
com.${Company Name}.${Product Name}.You can also complete the rest of the settings here, such as version number, icons, resolution, etc.

agconnect-services.jsonWe should put the json file under
Assets/Plugins/Android.Add this following message into the json file downloaded from your Huawei developer dashboard. Also, you can refer to that file in our Unity example project.
"agcgw":{
"backurl":"connect-drcn.dbankcloud.cn",
"url":"connect-drcn.hispace.hicloud.com"
},
You can refer to this link to create
agconnect-services.json.
Get activity
For getting the activity, you can use the
Common.GetActivity()function.
Developing with the SDK
Developing
There are corresponding example scenes in the example project for all 4 Kits. For testing, you will need to build it onto Android mobile build by HMS. Make sure you have already created your HMS account and project. Then, you can change the configuration and test different functions.

In the example project, the corresponding scene for Push Kit is Assets/HuaweiServiceDemo/Scenes/HmsPushSampleScene.unity and the code is Assets/HuaweiServiceDemo/Scripts/test/PushTest.cs.
We need to set service.
Implement interface
IPushServiceListenerGet Receiver by method
PushListenerRegister.RegisterListenerAdd the following code to
AndroidManifest.xml<application> ... <service android:name="com.unity.hms.push.MyPushService" android:exported="false"> <intent-filter> <action android:name="com.huawei.push.action.MESSAGING_EVENT"/> </intent-filter> </service> ... </application>android:nameis fixed.
Test & Release
Please refer to Huawei integration procedure for testing and releasing.

