Analytics Kit (HMS)
Service Introduction
Analytics Kit is a one-stop user behavior analysis platform for products such as mobile apps, web apps, and mini-programs. It offers scenario-specific data collection, management, and analysis, helping enterprises achieve effective user acquisition, product optimization, precise operations, and business growth.

It is a one-stop digital, intelligent data analysis platform tailored to meet the needs of enterprises' cross-departmental and cross-role personnel.
Based on the user events, user attributes, and user behavior data automatically collected by the Analytics SDK, Analytics Kit can automatically generate data dashboards and analysis reports on user retention, users, user behavior, user lifecycle, versions, and crashes. In addition, it supports multi-dimensional drill-down analysis and comparison, satisfying data analysis requirements of different roles, such as the marketing personnel, product managers, activity operations personnel, user experience management personnel, and technical developers, as well as driving intelligent business analysis and decision-making.

Integrating into Your Unity Project
Register and get verified
Before doing this step, you need to create an HMS Account, project and App according to the HMS document.

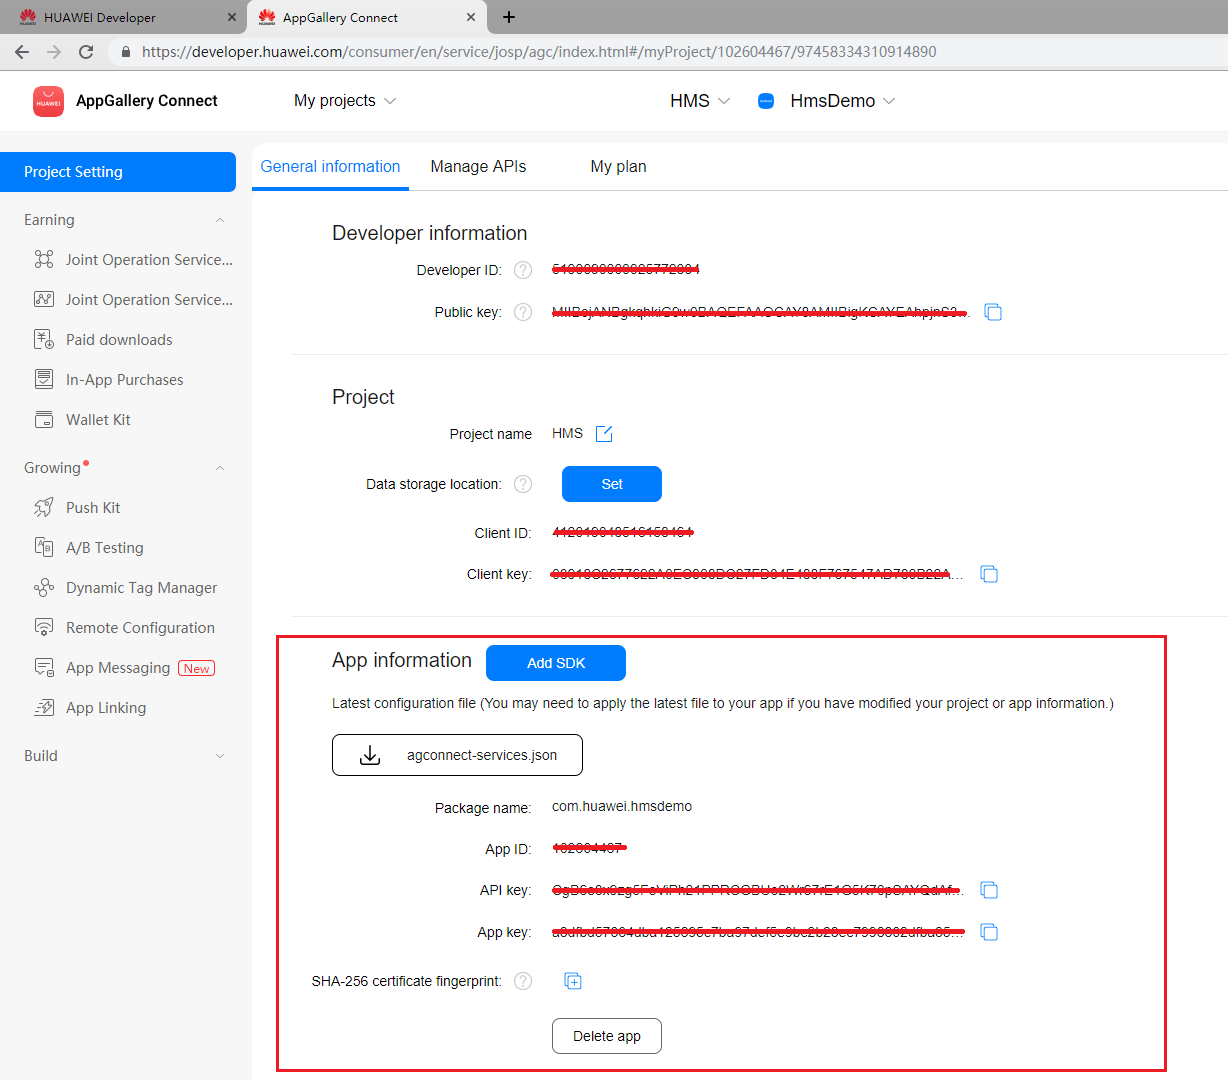
Now you have your Huawei HMS Project and App information.
Create an app
Create Unity project, and you will also need to set up the build environment for building Android apk with HMS SDK. Then, finish the following preparation.

In Editor -> Build Settings, Switch platform to Andriod and Connect your Android device

In Player Settings -> Publishing Settings, enable the following environment checkboxes

Prepare for development
According to HMS integration process introduction, we still need to add some configurations to the gradle files for development preparations.

You can follow Huawei documentation guidance to do the configuration, you can also refer and compare with the files in our Unity example project.
Enable and add configurations to
AndroidManifest.xmlGo to Edit -> Project Settings -> Player -> Android(icon) -> Publishing Settings -> Build
Enable Custom Main Manifest
If Unity Version is 2019.2 or before, there is no AndroidManifest checkbox, but you can put
AndroidManifest.xmlunderAssets/Plugins/Android.<?xml version="1.0" encoding="utf-8"?> <!-- GENERATED BY UNITY. REMOVE THIS COMMENT TO PREVENT OVERWRITING WHEN EXPORTING AGAIN--> <manifest xmlns:android="http://schemas.android.com/apk/res/android" package="com.unity3d.player" xmlns:tools="http://schemas.android.com/tools"> <uses-permission android:name="android.permission.ACCESS_COARSE_LOCATION"/> <uses-permission android:name="android.permission.ACCESS_FINE_LOCATION"/> <uses-permission android:name="android.permission.ACCESS_BACKGROUND_LOCATION" /> <uses-permission android:name="com.huawei.hms.permission.ACTIVITY_RECOGNITION" /> <uses-permission android:name="android.permission.ACTIVITY_RECOGNITION" /> <uses-permission android:name="android.permission.ACCESS_MOCK_LOCATION" /> <uses-permission android:name="android.permission.FOREGROUND_SERVICE" /> <application> <activity android:name="com.hms.hms_analytic_activity.HmsAnalyticActivity" android:theme="@style/UnityThemeSelector"> <intent-filter> <action android:name="android.intent.action.MAIN" /> <category android:name="android.intent.category.LAUNCHER" /> </intent-filter> <meta-data android:name="unityplayer.UnityActivity" android:value="true" /> </activity> <service android:name="com.unity.hms.push.MyPushService" android:exported="false"> <intent-filter> <action android:name="com.huawei.push.action.MESSAGING_EVENT"/> </intent-filter> </service> <receiver android:name="com.unity.hms.location.LocationBroadcastReceiver" android:exported="true"> <intent-filter> <action android:name="com.huawei.hmssample.location.LocationBroadcastReceiver.ACTION_PROCESS_LOCATION" /> </intent-filter> </receiver> <receiver android:name="com.unity.hms.location.GeoFenceBroadcastReceiver" android:exported="true"> <intent-filter> <action android:name="com.huawei.hmssample.geofence.GeoFenceBroadcastReceiver.ACTION_PROCESS_LOCATION" /> </intent-filter> </receiver> </application> </manifest>Enable and add configurations to project gradle
Go to Edit -> Project Settings -> Player -> Android(icon) -> Publishing Settings -> Build
Enable Custom Base Gradle Template and add the AppGallery Connect plugin and the Maven repository. The path is
Assets/Plugins/Android/baseProjectTemplate.gradle.If your unity version is 2019.2 or before, you should add implement and other configuration on
MainGradleTemplate.gradle.// GENERATED BY UNITY. REMOVE THIS COMMENT TO PREVENT OVERWRITING WHEN EXPORTING AGAIN allprojects { buildscript { repositories {**ARTIFACTORYREPOSITORY** google() jcenter() maven { url 'https://developer.huawei.com/repo/' } } dependencies { // If you are changing the Android Gradle Plugin version, make sure it is compatible with the Gradle version preinstalled with Unity // See which Gradle version is preinstalled with Unity here https://docs.unity3d.com/Manual/android-gradle-overview.html // See official Gradle and Android Gradle Plugin compatibility table here https://developer.android.com/studio/releases/gradle-plugin#updating-gradle // To specify a custom Gradle version in Unity, go do "Preferences > External Tools", uncheck "Gradle Installed with Unity (recommended)" and specify a path to a custom Gradle version classpath 'com.android.tools.build:gradle:3.6.4' classpath 'com.huawei.agconnect:agcp:1.6.1.300' **BUILD_SCRIPT_DEPS** } } repositories {**ARTIFACTORYREPOSITORY** google() jcenter() flatDir { dirs "${project(':unityLibrary').projectDir}/libs" } maven { url 'https://developer.huawei.com/repo/' } } } task clean(type: Delete) { delete rootProject.buildDir }Enable and add configurations to app gradle
Go to Edit -> Project Settings -> Player -> Android(icon) -> Publishing Settings -> Build
Enable Custom Launcher Gradle Template and add build dependencies in
launcherTemplate.gradle. The path isAssets/Plugins/Android/launcherTmeplate.gradle.If unity version is 2019.2 or before, you should add implement and other configuration on
MainGradleTemplate.dependencies { implementation project(':unityLibrary') implementation 'com.huawei.hms:ads-lite:13.4.49.301' implementation 'com.huawei.hms:ads-consent:3.4.49.301' implementation 'com.huawei.hms:push:6.1.0.300' implementation 'com.huawei.hms:hianalytics:6.4.1.301' implementation 'com.huawei.hms:location:6.2.0.300' implementation 'com.android.support:appcompat-v7:28.0.0' implementation 'com.huawei.agconnect:agconnect-core:1.6.1.300' implementation 'com.huawei.hms:hwid:6.1.0.303' implementation 'com.huawei.hms:game:6.1.0.301' }Enable and add configurations to unity library gradle
Go to Edit -> Project Settings -> Player -> Android(icon) -> Publishing Settings -> Build
Enable Custom Main Gradle Template and add build dependencies. The path is
Assets/Plugins/Android/mainTemplate.gradle.If unity version is 2019.2 or before, you should add implement and other configuration on
MainGradleTemplate.gradle.dependencies { implementation fileTree(dir: 'libs', include: ['*.jar']) implementation 'com.huawei.hms:hianalytics:6.3.2.300' implementation 'com.huawei.agconnect:agconnect-core:1.6.1.300' implementation 'com.huawei.hms:hwid:6.1.0.303' implementation 'com.huawei.hms:game:6.1.0.301' **DEPS**}Signature
Go to Edit -> Project Settings -> Player -> Android(icon) -> Publishing Settings -> Keystore Manager
Click Keytore... -> create new

You need to enter the password when you open unity, otherwise you cannot build. There's no need to add a signature on gradle.
Signing Certificate Fingerprint
Please refer to Huawei preparation documentation step 4 for generating a SHA256 Certificate Fingerprint.

And refer to Huawei preparation documentation step 5 to add Fingerprint to AppGallery Connect.

Package name
Set the package name in Edit -> Project Settings -> Player
The package name is
com.${Company Name}.${Product Name}.You can also complete the rest of the settings here, such as version number, icons, resolution, etc.

agconnect-services.jsonWe should put the json file under
Assets/Plugins/Android.Add this following message into the json file downloaded from your Huawei developer dashboard. Also, you can refer to that file in our Unity example project.
"agcgw":{
"backurl":"connect-drcn.dbankcloud.cn",
"url":"connect-drcn.hispace.hicloud.com"
},
You can refer to this link to create
agconnect-services.json.
Configuring Obfuscation Scripts
Before building the APK, configure the obfuscation configuration file to prevent the HMS Core SDK from being obfuscated.(Reference)
Open the proguard file in your Unity project and add configurations to exclude the HMS Core SDK from obfuscation.
-ignorewarnings
-keepattributes *Annotation*
-keepattributes Exceptions
-keepattributes InnerClasses
-keepattributes Signature
-keepattributes SourceFile,LineNumberTable
-keep class com.huawei.hianalytics.**{*;}
-keep class com.huawei.updatesdk.**{*;}
-keep class com.huawei.hms.**{*;}
-keep class * extends com.huawei.location.router.LocationApiRequest{ *; }
-keep class * extends com.huawei.hms.core.aidl.IMessageEntity{ *; }
-keep public class com.huawei.location.nlp.network.** {*; }
-keep class com.huawei.wisesecurity.ucs.**{*;}
(Optional) Configure the keep.xml file as follows to keep layout resources if you have enabled R8 resource shrinking (with shrinkResources being set to true in the project-level build.gradle file) and strict reference checks (with shrinkMode being set to strict in the res/raw/keep.xml file). Not keeping layout resources will lead to app rejection during release to HUAWEI AppGallery.
<?xml version="1.0" encoding="utf-8"?>
<resources xmlns:tools="http://schemas.android.com/tools"
  tools:keep="@layout/hms_download_progress,@drawable/screen_off"
  tools:shrinkMode="strict" />
Get activity
For getting the activity, you can use the
Common.GetActivity()function.
Developing with the SDK
Developing
There are corresponding example scenes in the example project for all 4 Kits. For testing, you will need to build it onto Android mobile build by HMS. Make sure you have already created your HMS account and project. Then, you can change the configuration and test different functions.

In the example project, the corresponding scene for Analytics Kit is Assets/HuaweiServiceDemo/Scenes/HmsAnalyticSampleScene.unity and the code is Assets/HuaweiServiceDemo/Scripts/test/AnalyticTest.cs.
Analytic initialization must be done in onCreate of the first activity .
You can extend the UnityPlayerActivity file, and put java file in Plugins/Android.
public class HmsAnalyticActivity extends UnityPlayerActivity{
    @Override
    protected void onCreate(Bundle savedInstanceState) {
        super.onCreate(savedInstanceState);
        HiAnalyticsTools.enableLog();//analytic initialize
        HiAnalytics.getInstance(this);
    }
}
Then you need to set activity of AndroidManifest.xml.
 <application>
    <activity android:name="com.hms.hms_analytic_activity.HmsAnalyticActivity"
              android:theme="@style/UnityThemeSelector">
        <intent-filter>
            <action android:name="android.intent.action.MAIN" />
            <category android:name="android.intent.category.LAUNCHER" />
        </intent-filter>
        <meta-data android:name="unityplayer.UnityActivity" android:value="true" />
    </activity>
    ...
</application>
If you initialize analytic, you need to add analytic implentment to mainTemplate.gradle.
Test & Release
Please refer to Huawei integration procedure for testing and releasing.

