AudioGroup Inspector
在 AudioGroup 层级视图、AudioGroup 视图或 Project 窗口中选择某个音频组(作为子资源)将显示此音频组的检视面板。
音频组的检视面板包含多个元素:
Inspector Header
音频组(AudioGroup)检视面板的顶部是音频组(AudioGroup)的名称,还包含所有对象检视面板通用的齿轮下拉菜单。

齿轮菜单包含以下功能:
- Copy all effect settings to all snapshots: This lets you to copy all of the effect parameter, volume and pitch settings of this AudioGroup to all of the other snapshots present within the Audio Mixer. This lets you to quickly make all snapshots ‘like this one’ for this AudioGroup.
- Toggle CPU usage display: This toggles CPU performance information for all the effects present in the AudioGroup Inspector. Use this to understand which effects in your DSP setup consume the most resources. To use this setting, enable Enable FMOD Profiling (Edit > Preferences > Diagnostics > Audio).
Edit in Playmode


When in Playmode within Unity, the Inspector for an AudioGroup includes a button at the top called Edit in Playmode. By default, the parameter values of an Audio Mixer are not editable in Playmode and are fully controlled by the current snapshot within the game.
Edit in Playmode allows you to override the snapshot system and make edits to the current snapshot directly during playmode. This is a great way to mix and master a game while playing it in realtime.
Pitch slider
音频组检视面板顶部有一个滑动条,用于通过该音频组来定义播放音高。要更改音高,请使用滑动条,或者在右侧的文本字段中手动输入音高。

Attenuation Unit
Every AudioGroup within an Audio Mixer has exactly 1 Attenuation Unit.
在衰减单元中,您可以对通过音频组的音频信号应用衰减/增益。对衰减的计算并将其应用于信号都是在单元内进行的(不会与其他衰减设置合并,也不会应用于语音源)。因此,通过与发送/接收单元和非线性 DSP 效果组合后,可创建非常复杂且有趣的设置。应用衰减后可降低至 –80dB(静音),而应用增益后可提高至 +20dB。

每个衰减单元在检视面板中都有一个 VU 计量表。此计量表显示信号链中此时刻(即刚应用衰减之后)的音频信号水平。这意味着,如果在衰减单元之后设置了 DSP 效果或接收单元,则您在此音频组的 AudioGroup 条带中看到的计量信息将不同于在衰减单元中看到的计量信息。您可以通过在处理链中上下拖动衰减单元来查看不同位置的计量信息,因此这是一种非常不错的音频组信号链调试方法。
VU 计量表将同时显示 RMS 值和峰值保持值。
- To move the Attenuation Unit (or any effect) up or down the signal chain, select the Unit’s header and drag up or down the inspector to reposition it.
- 要更改衰减设置,请移动计量信息上方的滑动条,或在文本框中输入值。
Effect Units
效果单元 (Effect Unit) 提供常规 DSP 效果,可修改通过音频组播放的音频信号,例如高通 (Highpass) 或混响 (Reverb)。效果单元还可以处理从发送单元 (Send Unit) 发送到效果单元的旁链信号信息。每个效果单元的界面各有不同,但大部分都显示了一组可供修改的参数,通过修改参数即可更改对信号应用效果的方式。例如,参数均衡器 (Parameter EQ) 效果有 3 个参数可用于修改信号的处理方式:
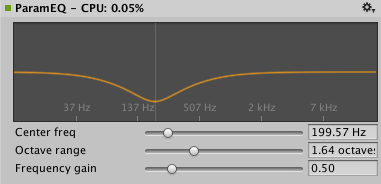
Unity comes with a collection of in-built effects that you can use within an AudioGroup. There is also the ability to create custom DSP effect plugins that can be used within an Audio Mixer.
- To add an effect to the AudioGroup, select Add Effect button at the bottom of the AudioGroup Inspector.

To change the ordering of the effect within the AudioGroup, select the effect header and drag up or down to place it in a different position.
To remove the effect from the AudioGroup, right-click on the effect header and select Remove this effect.
Send Units
发送单元可用于分发音频信号流,并可发送可能衰减的信号副本以用作另一个效果单元(如旁链比较器压缩器)中的旁链。您可以在信号链中的任何位置插入发送单元,从而能够在任何点分发信号。

Initially, when Sends are added to an AudioGroup, they don’t send to anything, and the Send Level is set to 80dB. To send to another Effect Unit, you must already have an Effect Unit that can accept side-chain signals in the Audio Mixer somewhere. After the destination Effect Unit has been selected, you need to increase the Send Level to send signal to the destination.
- To add a Send to an AudioGroup, select Add Effect at the bottom of the AudioGroup Inspector and choose Send.
- 要将发送单元连接到另一个效果单元(能够接收信号),请从发送单元检视面板 (Send Unit Inspector) 的下拉菜单中选择目标。
- 使用“Send Level”来设置发送到目标的信号水平
Receive Units
Receives are the signal sinks of Sends. They take the audio signal that is sent to them from Sends and mix it with the current signal passing through their AudioGroup. There are no parameters to a Receive.

Note: If you Solo a Receive unit, the sound stops playing. This is by design.
Duck Volume Units
Duck Volume Units allow you to create side-chain compression from signal sent from Sends. Duck Volume is a great way to control the attenuation of a signal based on audio being played somewhere else in the Audio Mixer.
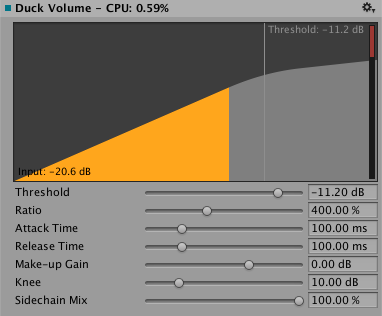
可以像任何其他效果单元一样添加减弱音量单元,并且必须至少从一个发送单元向减弱音量单元发送信号才能使用。
Common options
音频组检视面板中的每个单元都包含一些通用特性。
Gear options
- Allow Wet Mixing - 开启此选项可围绕效果创建干声道。启用此选项后显示的滑动条表示传递到湿/干分量的信号百分比。启用此选项会提高内存使用量和 CPU 开销。此选项仅对某些单元可用。
- Bypass - 开启此选项将完全绕过效果单元,从而在信号链中有效禁用该单元。
- Copy Effect Settings to all Snapshots - Selecting this will copy all the parameter values within this Effect Unit to all the other Snapshots in the Audio Mixer. This is useful when adding a new Effect Unit, making changes to that Effect Unit and wanting those settings to be the same across all Snapshots.
- Add Effect Before - 允许在音频组中的当前效果单元之前插入一个效果单元。从显示的菜单中选择所需效果。
- Add Effect After - 允许在音频组中的当前效果单元之后插入一个效果单元。从显示的菜单中选择所需效果。
- Remove This Effect - Remove this Effect Unit completely from the Audio Mixer. Attenuation Units cannot be removed from AudioGroups.
Wet Mixing
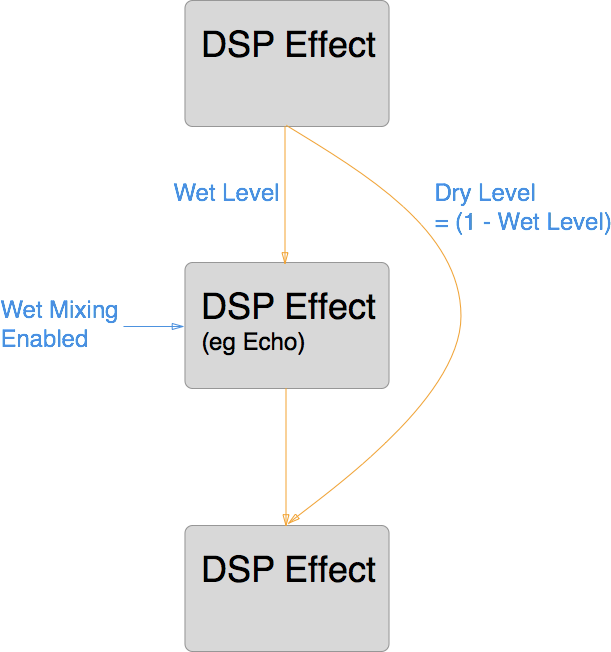
Allowing Wet Mixing on a DSP effect allows you to decide how much of the audio signal that is to enter the effect actually is processed by the effect. Enabling Wet Mixing effectively creates a dry channel around the effect. You can then select the effect slot and drag left and right to increase or decrease the percentage of audio signal that is passed through the DSP effect unit. The rest of the signal is passed through the dry channel. The following diagram illustrates this concept:
如果用户希望控制某一效果对于混音的影响并保留一定比例的原始信号,湿混将很有用。
Exposed parameters
Exposed parameters allow you to bypass the Snapshot system of an Audio Mixer and set the value of any parameter within an Audio Mixer from script. When an exposed parameter is set via script, that parameter is locked to that value and will not change as the the game transitions Snapshots.
Exposing a parameter with an Audio Mixer is done in the AudioGroup Inspector. For any parameter shown in the Inspector (including Pitch, Volume, Send Level and Wet Level), you can right-click on the name of the parameter and choose ‘Expose X to script’.
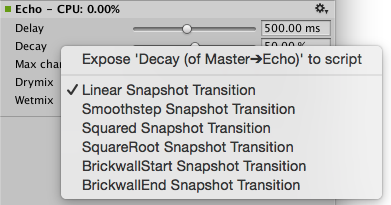
After a parameter is exposed, it shows up in the Exposed Parameter drop down in the top right corner of the Audio Mixer Window. Selecting on this drop down reveals all the exposed parameters in the Audio Mixer.

- To rename an exposed parameter, right-click on the name of the exposed parameter and select Rename. This name will be how you reference the parameter from the AudioMixer API.
- To delete an exposed parameter, right-click on the name of the exposed parameter and select Delete.
Transition overrides
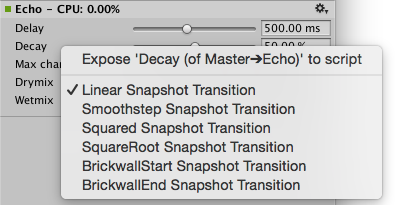
When transitioning between Snapshots, by default all transitions are done with linear interpolation from the beginning to target values. In some cases this transition behaviour is not desired however, for example when it’s preferable to brick-wall the change at the start or end of the transition.
All of the parameters available within the Audio Mixer can have their transition behaviour changed. Transition behaviours are defined per-Snapshot, with the target Snapshot defining the transition behaviour.
To set the transition override for a particular parameter for the current Snapshot, right-click on the parameter name and select the required transition type.
Audi Mixer inspector
混音器资源自身包含一个检视面板,可用于指定混音器的总体激活/暂停行为。混音器用作资源,只要任何音频源在混音器中播放,混音器基本上就会被激活,而且只要有这样一个驱动因素向混音器提供音频数据,混音器就会一直处于活动状态。由于还可通过 Scene 视图中的音频预览按钮来激活混音器,因此激活行为不同于场景对象(比如 MonoBehavior)的激活行为。所以,即使在停止模式下,混音器也可能处于激活状态(继而耗用 CPU)。
To avoid running out of CPU resources in a project that contains a large number of mixers that are not supposed to be running all at the same time (say, because specific levels use certain specialized mixers), the audio mixers have functionality built-in to put themselves into suspended mode in which all processing stops. To do this in a natural way that doesn’t lead to audible artefacts such as clicks or missing reverb/echo tails each mixer uses the following strategy:
As long as any audio source is playing into this mixer or the mixer is receiving audio data from other sub-mixers the mixer will keep itself active. After the last sound source has finished playing, the mixer will wait for a second and then continually use loudness-measurement at its own output to decide if it should suspend itself. This is needed because reverb and echo tails can potentially decay very slowly. The loudness threshold at which the mixer suspends itself is determined by enabling Auto Mixer Suspend and setting the Threshold Volume parameter on the mixer asset’s inspector which is shown then the mixer asset is selected in the project browser (not when selecting a sub-asset like a mixer group or snapshot). The value of –80 dB is chosen as the default and matches the lowest value of the faders in the mixer. In practice it is often possible to set it to a significantly larger value to get quicker deactivation and avoid intermediate CPU spikes that could cause stutter.
