Creating custom Profiler counters
To display custom metrics in the Unity profiler, you must use the ProfilerCounter API in the Unity Profiling Core package.
You can use the Profiling Core API to track a metric in your application. You can display the information that a counter tracks in the Unity Profiler. Use custom Profiler countersPlaced in code with the ProfilerCounter API to track metrics, such as the number of enemies spawned in your game. More info
See in Glossary to compare system metrics and identify performance issues in the Profiler window.
A custom Profiler counter can display data from ProfilerCounter or ProfilerCounterValue.
For a complete guide to using the Unity Profiling Core API to create Profiler counters, see the Profiler counters API guide.
To add a profiler counter, create scripts to do the following:
- Create a new counter.
- Assign your counter to a Profiler categoryIdentifies the workload data for a Unity subsystem (for example, Rendering, Scripting and Animation categories). Unity applies color-coding to categories to visually distinguish between the types of data in the Profiler window.
See in Glossary. - Update the counter’s value.
The code examples in these sections add a Profiler counter to track the total number of particles that Unity created for every instance of a GameObject’s trail effects. In these examples, the GameObject’s name is “Tank”.
Defining a counter
To create a new counter, write a script to define the value type of the new counter, and assign a name and a unit to this type.
When you create a counter you must specify which Profiler category your new counter belongs to. To do this use an existing Unity category. For example, the script example below uses the existing ProfilerCategory.Scripts category.For more information, see Using Profiler categories
The following example script defines the ProfilerCounterValue TankTrailParticleCount, with the name “Tank Trail Particles”. This counter has a unit of “Count”:
 public static class GameStats
 {
    public static readonly ProfilerCategory TanksCategory = ProfilerCategory.Scripts;

    public const string TankTrailParticleCountName = "Tank Trail Particles";
    public static readonly ProfilerCounterValue<int> TankTrailParticleCount =
        new ProfilerCounterValue<int>(TanksCategory, TankTrailParticleCountName, ProfilerMarkerDataUnit.Count,
            ProfilerCounterOptions.FlushOnEndOfFrame | ProfilerCounterOptions.ResetToZeroOnFlush);
}
The options FlushOnEndOfFrame and ResetToZeroOnFlush automatically send the counter to the Profiler data stream and reset the Count value to zero at the end of the frame.
Using Profiler categories
Unity automatically groups Profiler counters into categories based on the type of work the counters profile, for example, Rendering, Scripting, or Animation. You can assign a custom Profiler counter to any of Unity’s profiling categories. For a full list of available Profiler categories, see ProfilerCategory.
Assigning a Profiler counter to a Profiler category
A Profiler counter must belong to a Profiler category. You should assign a category to a Profiler counter when you define the counter. To do this, use the ProfilerModule’s optional autoEnabledCategoryNames constructor argument to assign one or more categories to a Profiler counter. There is an example of this method in the following example code:
 using Unity.Profiling;
 using Unity.Profiling.Editor;

 [System.Serializable]
 [ProfilerModuleMetadata("Tank Effects")]
 public class TankEffectsProfilerModule : ProfilerModule
 {
    static readonly ProfilerCounterDescriptor[] k_Counters = new ProfilerCounterDescriptor[]
    {
        new ProfilerCounterDescriptor(GameStatistics.TankTrailParticleCountName, GameStatistics.TanksCategory),
        new ProfilerCounterDescriptor(GameStatistics.ShellExplosionParticleCountName, GameStatistics.TanksCategory),
        new ProfilerCounterDescriptor(GameStatistics.TankExplosionParticleCountName, GameStatistics.TanksCategory),
    };

    // Ensure that both ProfilerCategory.Scripts and ProfilerCategory.Memory categories are enabled when our module is active.
    static readonly string[] k_AutoEnabledCategoryNames = new string[]
    {
        ProfilerCategory.Scripts.Name,
        ProfilerCategory.Memory.Name
    };


    // Pass the auto-enabled category names to the base constructor.
    public TankEffectsProfilerModule() : base(k_Counters, autoEnabledCategoryNames: k_AutoEnabledCategoryNames) { }
}
Updating a counter’s value
To update the value of a counter, create a MonoBehaviour script that sets the value of a counter you have defined. For more information, see How to pass counter values to the Profiler.
Updating the counter’s value script example
This example MonoBehaviour script counts the number of trail particles that belong to an assigned GameObject every frame in the Update function. To do this, it uses the counter called TankTrailParticleCount.
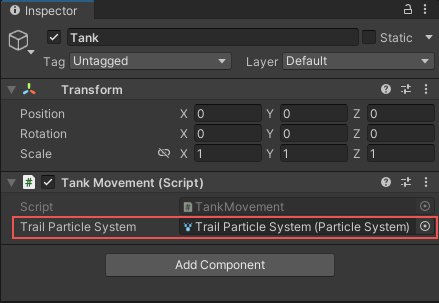
The following example script also creates a public property called Trail Particle System (m_TrailParticleSystem) in the Inspector:
 using UnityEngine;

 class TankMovement : MonoBehaviour
 {
    public ParticleSystem m_TrailParticleSystem;

    void Update()
    {
        GameStats.TankTrailParticleCount.Value += m_TrailParticleSystem.particleCount;
    }
 }

Using Profiler counters to profile a release build
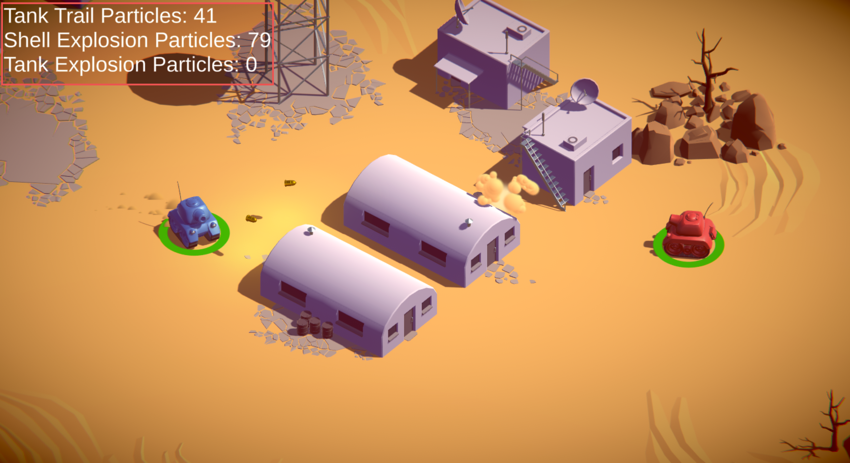
When you run your project in a release player, you don’t have access to the Profiler window. However, you can display counters as UI elements in a release player. This means you can include profiling tools in a released application. To do this, see Getting counter values in players in the Profiler counters API guide.
The following image displays counters in the top left of the scene using custom UI in a release player:
