Unity Test Runner
The Unity Test Runner is a tool that tests your code in both Edit mode and Play mode, and also on target platforms such as Standalone, Android, or iOS.
The Unity Test Runner can be accessed via Window > Test Runner.

The Unity Test Runner uses a Unity integration of the NUnit library, which is an open-source unit testing library for .Net languages. More information about NUnit can be found on the official NUnit website and the NUnit documentation on GitHub.
UnityTestAttribute is the main addition to the standard NUnit library for the Unity Test Runner. This is a type of unit test that allows you to skip a frame from within a test (which allows background tasks to finish). Execute UnityTestAttribute as a coroutine when running in Play mode and in the EditorApplication.update callback loop when running in Edit mode.
Known issues and limitations
The following are known issues and limitations of the Unity Test Runner:
UnityTestAttributeis not supported on WebGL and WSA platform.Test runner doesn’t currently support AOT platforms.
Parameterized tests are not supported for
UnityTest(except for ValueSource).Automated tests in platform players (for example Standalone, Android, or iOS) run from the command line are not currently supported.
When making EditMode tests, you must create a folder name Editor to store them in.
How to use Unity Test Runner
The documentation on this page assumes the reader has basic knowledge of unit testing and NUnit. If you are new to NUnit or would like more information, refer to the NUnit documentation on GitHub.
To use the Unity Test Runner, open the Test Runner window and navigate to Window > Test Runner.

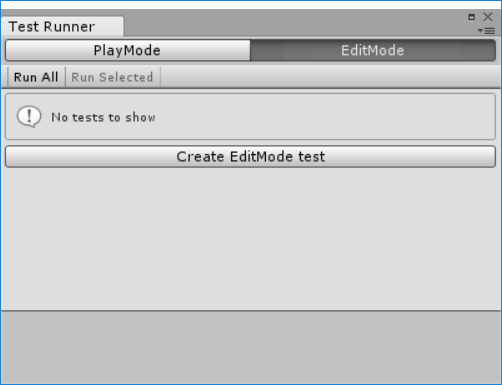
If no tests are present in your Project, you can click the Create EditMode test button to create a basic test script.
You can also create test scripts by navigating to Assets > Create > Testing, and selecting either EditMode Test C# Script or PlayMode Test C# Script.
Testing in Edit mode
When in Edit mode, tests run from the Test Runner window, as seen in the screenshot above.
Make sure the EditMode button is selected, and click the Create EditMode test button to create a basic test script. Open and edit this in MonoDevelop - or your preferred integrated development environment (IDE) - as required.
Execute UnityTestAttribute in the EditorApplication.update callback loop when running in Edit mode.
Testing in Play mode
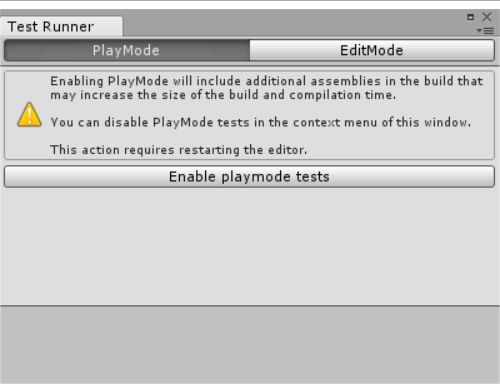
Before using the Unity Test Runner in Play mode, enable it from the Test Runner window.
To do this:
Navigate to Window > Test Runner.
Click the PlayMode button.
Click the Enable playmode tests button.

- In the resulting dialog box (seen in the screenshot below), click Enable.

- A dialog box tells you to restart the Editor. Click the Ok button and manually restart the Editor (make sure to save your Project before restarting).
Create PlayMode test scripts by selecting the PlayMode button in the Test Runner window and clicking the Create Playmode test with methods button. This creates a basic test script that you can open and edit in MonoDevelop - or your preferred IDE - as required.
Note that enabling Play mode testing includes additional assemblies in your Project’s build, which can increase your Project’s size as well as build time.
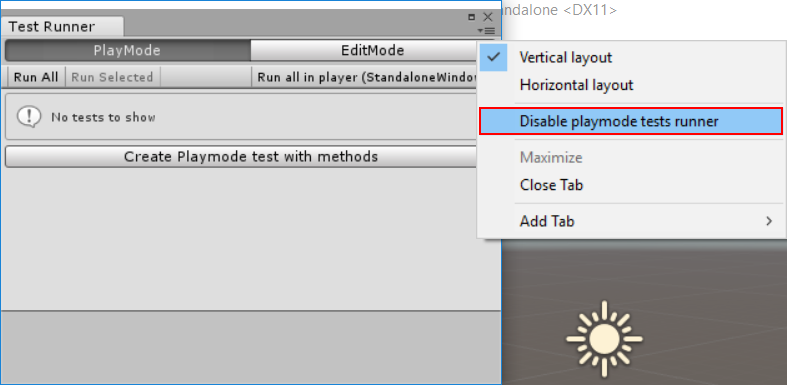
Disable testing in Play mode by clicking the context button at the top-right of the Test Runner window and then selecting Disable playmode tests runner from the drop-down menu.

Execute UnityTestAttribute as a coroutine when running in Play mode.
Writing and executing tests in Unity Test Runner
The Unity Test Runner tests your code in Edit mode and Play mode as well as on target platforms such as Standalone, Android, or iOS.
The documentation on this page discusses writing and executing tests in the the Unity Test Runner, and assumes the reader has knowledge of both scripting and the Unity Test Runner.
Note: UnityTestAttribute is not supported on WebGL and AOT platforms.
UnityTestAttribute
UnityTestAttribute requires you to return IEnumerator. In Play mode, execute the test as a coroutine. In Edit mode, you can yield null from the test, which skips the current frame.
Regular NUnit test (works in Edit mode and Play mode)
[Test]
public void GameObject_CreatedWithGiven_WillHaveTheName()
{
    var go = new GameObject("MyGameObject");
    Assert.AreEqual(“MyGameObject”, go.name);
}
Example in Play mode
[UnityTest]
public IEnumerator GameObject_WithRigidBody_WillBeAffectedByPhysics()
{
    var go = new GameObject();
    go.AddComponent<Rigidbody>();
    var originalPosition = go.transform.position.y;

    yield return new WaitForFixedUpdate();

    Assert.AreNotEqual(originalPosition, go.transform.position.y);
}
Example in Edit mode
[UnityTest]
public IEnumerator EditorUtility_WhenExecuted_ReturnsSuccess()
{
    var utility = RunEditorUtilityInTheBackgroud();

    while (utility.isRunning)
    {
        yield return null;
    }

    Assert.IsTrue(utility.isSuccess);
}
UnityPlatformAttribute
UnityPlatformAttribute is for filtering tests based on the the executing platform.
The behavior is as expected from the nunit PlatformAttribute.
[Test]
[UnityPlatform (RuntimePlatform.WindowsPlayer)]
public void TestMethod1()
{
   Assert.AreEqual(Application.platform, RuntimePlatform.WindowsPlayer);
}

[Test]
[UnityPlatform(exclude = new[] {RuntimePlatform.WindowsEditor })]
public void TestMethod2()
{
   Assert.AreNotEqual(Application.platform, RuntimePlatform.WindowsEditor);
}
UnityPlatform can also be used to only execute editor tests on a given platform.
PrebuildSetupAttribute
Use PrebuildSetupAttribute if you need to perform any extra setup before the test starts. To do this, specify the class type that implements the IPrebuildSetup interface. If you need run the setup code for the whole class (for example if you want to execute some code before the test starts, such as Asset preparation or setup required for a specific test), implement the IPrebuildSetup interface in the class for tests.
public class TestsWithPrebuildStep : IPrebuildSetup
{
    public void Setup()
    {
        // Run this code before the tests are executed
    }

    [Test]
    //PrebuildSetupAttribute can be skipped because it's implemented in the same class
    [PrebuildSetup(typeof(TestsWithPrebuildStep))]
    public void Test()
    {
        (...)
    }
}
Execute the PrebuildSetup code before entering Play mode or building a player. Setup can use UnityEditor namespace and its function, but in order to avoid compilation error, you must place it either in the “editor” folder or it must be guarded with #if UNITY_EDITOR directive.
LogAssert
A test fails if a message other than a regular log or warning message is logged. Use the LogAssert class to make a message expected in the log and prevent the test from failing.
If an expected message doesn’t appear, the test also reports as failed. The test also fails if any regular log or warning messages don’t appear.
Example
[Test]
public void LogAssertExample()
{
    //Expect a regular log message
    LogAssert.Expect(LogType.Log, "Log message");
    //A log message is expected so without the following line
    //the test would fail
    Debug.Log("Log message");
    //An error log is printed
    Debug.LogError("Error message");
    //Without expecting an error log, the test would fail
    LogAssert.Expect(LogType.Error, "Error message");
}
MonoBehaviourTest
MonoBehaviourTest is wrapper for writing MonoBehaviour tests, and also a coroutine. Yield MonoBehaviourTest from UnityTest to instantiate the specified MonoBehaviour and wait for it to finish executing. Implement the IMonoBehaviourTest interface to indicate when the test is done.
Example
[UnityTest]
public IEnumerator MonoBehaviourTest_Works()
{
    yield return new MonoBehaviourTest<MyMonoBehaviourTest>();
}

public class MyMonoBehaviourTest : MonoBehaviour, IMonoBehaviourTest
{
    private int frameCount;
    public bool IsTestFinished
    {
        get { return frameCount > 10; }
    }

     void Update()
     {
        frameCount++;
     }
}
Running tests on platforms
You can run tests on specific platforms in Play mode.
The target platform is the current Platform selected in build options.
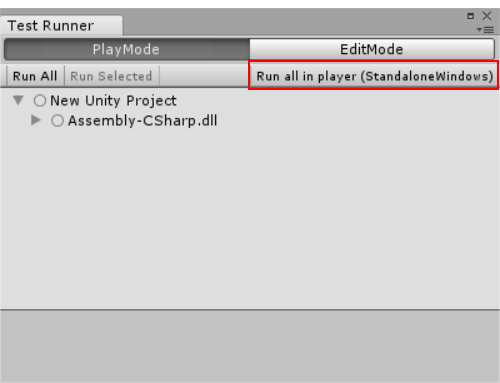
To do this, select the PlayMode button in the Test Runner window and then click the Run all in player button.
Note that your current platform displays in brackets on the button - for example, in the screenshot below the button reads Run all in player (StandaloneWindows) as the current platform is Windows.

Click the Run all in the player button to build and run your tests on the currently active target platform. Test results display following execution.

For the editor to get the test results from the platform to the Editor starting the test run, they need to be on same network.
If the connection is up and running, the application running on the platform will report back the test results, and it will show the tests executed, and shut down the test application running on the platform.
Some platforms do not allow to shut down the application with Application.Quit, they will keep running after reporting test results.
If the connection can not get instantiated, you can visually see the tests succeed in the running application. Note that running tests on platforms with arguments, in this state, would not get xml test results.
Running from the command line
To do this, run Unity with following arguments:
runTests- Executes tests in the Project.-
testPlatform- The platform you want to run tests on.-
Available platforms
If unspecified,
editmodetests execute by default.playmodeandeditmode.-
Platform/Type convention is from the BuildTarget enum. The tested and official supported platforms:
-
testResults- The path indicating where the result file should be saved. The result file is saved in Project’s root folder by default.
Example
>Unity.exe -runTests -projectPath PATH_TO_YOUR_PROJECT -testResults C:\temp\results.xml -testPlatform editmode
Note: This differs depending on your operating system - the above example shows a command line argument on Windows.
Tip:
On Windows, in order to read the result code of the executed command, run the following:
start /WAIT Unity.exe ARGUMENT_LIST.
2017–06–01 Page published with no editorial review
Updated feature in Unity 5.6
UnityPlatformAttribute added in Unity 2017.1 NewIn20171