Creating a New Animation Clip
To animate GameObjectsThe fundamental object in Unity scenes, which can represent characters, props, scenery, cameras, waypoints, and more. A GameObject’s functionality is defined by the Components attached to it. More info
See in Glossary in Unity, the object or objects need an Animator ComponentA component on a model that animates that model using the Animation system. The component has a reference to an Animator Controller asset that controls the animation. More info
See in Glossary attached. This Animator Component must reference an Animator ControllerControls animation through Animation Layers with Animation State Machines and Animation Blend Trees, controlled by Animation Parameters. The same Animator Controller can be referenced by multiple models with Animator components. More info
See in Glossary, which in turn contains references to one or more Animation ClipsAnimation data that can be used for animated characters or simple animations. It is a simple “unit” piece of motion, such as (one specific instance of) “Idle”, “Walk” or “Run”. More info
See in Glossary.
When using the Animation View to begin animating a GameObject in Unity, all these items will be automatically created, attached and set-up for you.
To create a new Animation Clip for the selected GameObject, and make sure the Animation Window is visible.
If the GameObject does not yet have any Animation Clips assigned, you will see the “Create” button in the centre of the Animation Window timelineGeneric term within Unity that refers to all features, windows, editors, and components related to creating, modifying, or reusing cut-scenes, cinematics, and game-play sequences. More info
See in Glossary area. Click the Create button. You will then be prompted to save your new empty Animation Clip somewhere in your AssetsAny media or data that can be used in your game or Project. An asset may come from a file created outside of Unity, such as a 3D model, an audio file or an image. You can also create some asset types in Unity, such as an Animator Controller, an Audio Mixer or a Render Texture. More info
See in Glossary folder.

Once you have saved this new empty Animation Clip, a number of things happen automatically:
- A new Animator Controller asset will be created
- The new clip being created will be added into the Animator Controller as the default state
- An Animator Component will be added to the GameObject being animated
- The Animator Component will have the new Animator Controller assigned to it
The result of this automatic sequence is that all the required elements of the animation system are set up for you, and you can now begin animating the objects.
Adding another Animation Clip
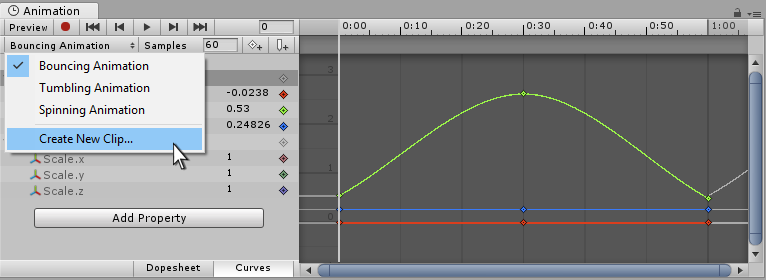
If the Game Object already has one or more Animation Clips assigned, the “Create” button will not be visible. Instead, one of the clips will be visible in the animation window. You can switch between which Animation Clip is visible in the window by using the menu in the top-left of the Animation window, just under the playback controls.
If you want to create a new Animation Clip on an object that already has animations, you must select “Create New Clip” from this menu. Again, you will be prompted to save your new empty Animation Clip before being able to work with it.

How it fits together
While the above steps automatically set up the relevant components and references, it can useful to understand which pieces must be connected together.
- A GameObject must have an Animator component
- The Animator component must have an Animator Controller asset assigned
- The Animator Controller asset must have one or more Animation Clips assigned
The diagram below shows how these pieces are assigned, starting from the new animation clip created in the Animation Window:

In the image below, you can see a GameObject selected (“Cube”) that is not yet animated. We have just a simple cube, with no Animator component. The Animation, Hierarchy, Project and InspectorA Unity window that displays information about the currently selected GameObject, Asset or Project Settings, alowing you to inspect and edit the values. More info
See in Glossary windows are arranged side-by-side for clarity.

By pressing the create button in the Animation view, a new animation clip is created. Unity will ask to pick the name & location to save this new Animation Clip. Unity also creates an Animator Controller asset with the same name as the selected GameObject, adds an Animator component to the GameObject, and connects the assets up appropriately.

In the new view above, you can see:
- The Animation Window (top left) now shows a timeline with a white playback head line, ready to record new keyframesA frame that marks the start or end point of a transition in an animation. Frames in between the keyframes are called inbetweens.
See in Glossary. The clip’s name is visible in the clip menu, just below the playback controls. - The Inspector (center) shows that the Cube GameObject now has an Animator Component added, and the “Controller” field of the component shows that an Animator Controller asset called “Cube” is assigned
- The Project Window (bottom right) shows that two new assets have been created - An Animator Controller asset called “Cube” and an Animation Clip asset called “Cube Animation Clip”
- The Animator WindowThe window where the Animator Controller is visualized and edited. More info
See in Glossary (bottom left) shows the contents of the Animator Controller - you can see that the Cube Animation Clip has been added to the controller, and that it is the “default state” as indicated by the orange color. Subsequent clips added to the controller would have a grey color, indicating they are not the default state.
- 2017–09–05 Page amended with limited editorial review