Creating and editing Terrains
To add a Terrain GameObject to your Scene, select GameObjectThe fundamental object in Unity scenes, which can represent characters, props, scenery, cameras, waypoints, and more. A GameObject’s functionality is defined by the Components attached to it. More info
See in Glossary > 3D ObjectA 3D GameObject such as a cube, terrain or ragdoll. More info
See in Glossary > Terrain from the menu. This also adds a corresponding Terrain Asset to the Project view. When you do this, the landscape is initially a large, flat plane. The Terrain’s Inspector window provides a number of tools you can use to create detailed landscape features.
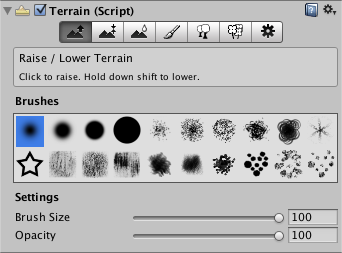
With the exception of the tree placement tool and the settings panel, all the tools on the toolbarA row of buttons and basic controls at the top of the Unity Editor that allows you to interact with the Editor in various ways (e.g. scaling, translation). More info
See in Glossary provide a set of “brushes” and settings for brush size and opacity. It is no coincidence that these resemble the painting tools from an image editor because detail in the terrain is created precisely that way, by “painting” detail onto the landscape. If you select the leftmost tool on the bar (Raise/Lower Terrain) and move the mouse over the terrain in the scene viewAn interactive view into the world you are creating. You use the Scene View to select and position scenery, characters, cameras, lights, and all other types of Game Object. More info
See in Glossary, you will see a cursor resembling a spotlight on the surface. When you click the mouse, you can paint gradual changes in height onto the landscape at the mouse’s position. By selecting different options from the Brushes toolbar, you can paint with different shapes. The Brush Size and Opacity options vary the area of the brush and the strength of its effect respectively.
The details of all of the tools will be given in subsequent sections. However, all of them are based around the concept of painting detail and with the exception of the tree placement tool, all have the same options for brushes, brush size and opacity. The tools can be used to set the height of the terrain and also to add coloration, plants and other objects.
Terrain Keyboard Shortcuts
You can use the following keyboard shortcuts in the terrain inspectorA Unity window that displays information about the currently selected GameObject, Asset or Project Settings, alowing you to inspect and edit the values. More info
See in Glossary:
- Press the keys from F1 to F6 to select the corresponding terrain tool (for example, F1 selects the Raise/Lower tool).
- The comma (,) and period (.) keys cycle through the available brushes.
- Shift-comma (<) and Shift-dot (>) cycle through the available objects for trees, Textures and details.
Additionally, the standard F keystroke works slightly differently for terrains. Normally, it frames the selection around the whole object when the mouse is over the sceneA Scene contains the environments and menus of your game. Think of each unique Scene file as a unique level. In each Scene, you place your environments, obstacles, and decorations, essentially designing and building your game in pieces. More info
See in Glossary view. However, since terrains are typically very large, pressing F will focus the scene view on the area of terrain where the mouse/brush is currently hovering. This provides a very quick and intuitive way to jump to the area of terrain you want to edit. If you press F when the mouse is away from the terrain object, the standard framing behaviour will return.
对文档有任何疑问,请移步至开发者社区提问,我们将尽快为您解答