Tile Palette
Create Palettes with selected Tiles in the Tile Palette window, which are used to paint on Tilemaps. Open the Tile Palette window from the menu: Window > 2D > Tile Palette.

Create a new Palette by selecting Create New Palette.
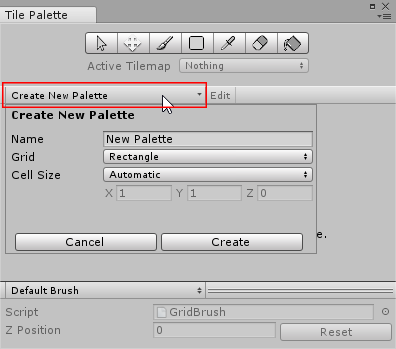
In the Create New Palette window are the following options.
| Property | Function |
|---|---|
| Name | Provide a name for the created Tile Palette Asset. |
| Grid | Select the Grid layout the created Tile Palette will be used to paint on. |
| Rectangle | Select this if creating a Palette for the default rectangular TilemapA GameObject that allows you to quickly create 2D levels using tiles and a grid overlay. More info See in Glossary. |
| Hexagon | Select this when creating a Palette for a Hexagonal Tilemap. |
| Isometric | Select this when creating a Palette for a Isometric Tilemap. Refer to Creating a Tile Palette for an Isometric Tilemap for more information. |
| Isometric Z as Y | Select this when creating a Palette for a Isometric Z as Y Tilemap. Refer to Creating a Tile Palette for an Isometric Tilemap for more information. |
| * Hexagon Type (only available when the Hexagon Grid type is selected) |
Select the type of Hexagonal Tilemap that the Palette will be used to paint on. Refer to the documentation on Hexagonal Tilemaps for more information. |
| Cell Size | The size of a cell that the Tiles are painted on. |
| Automatic | The Cell Size is automatically set in Unity unitsThe unit size used in Unity Projects. By default, 1 Unity unit is 1 meter. To use a different scale, set the Scale Factor in the Import Settings when importing Assets. See in Glossary and based on the size of the Sprite used to create the Tile Assets. If there are multiple Tiles, the Cell Size is adjusted to match the first Tile from the bottom left of the Palette, so that it fits exactly on a cell. |
| Manual | Select this option to input custom size values. |
Provide a name for the Palette and select the Create button. Select a folder to save the Palette. The newly created Palette is automatically loaded.
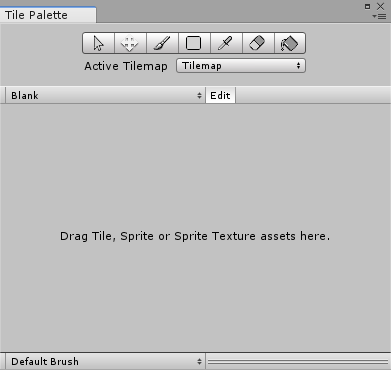
Drag and drop Textures or SpritesA 2D graphic objects. If you are used to working in 3D, Sprites are essentially just standard textures but there are special techniques for combining and managing sprite textures for efficiency and convenience during development. More info
See in Glossary from the AssetsAny media or data that can be used in your game or Project. An asset may come from a file created outside of Unity, such as a 3D model, an audio file or an image. You can also create some asset types in Unity, such as an Animator Controller, an Audio Mixer or a Render Texture. More info
See in Glossary folder onto the Tile Palette. Choose where to save the new Tile Assets. New Tile Assets are generated in the selected folder and the Tiles are placed on the Tile Palette.

Use the following shortcuts to navigate the Palette window.
| Shortcut | Function |
|---|---|
| Click a Tile | Selects the Tile |
| Drag over multiple Tiles | Selects multiple Tiles |
| Alt + Left button drag | Pan |
| Wheel button drag | Pan |
| Rotate the wheel button | Zoom in/out |
Z Position Editor
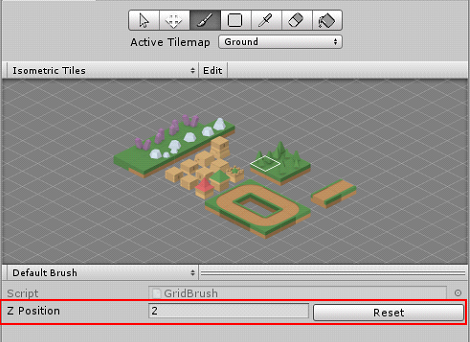
At the bottom of the Tile Palette window is the Z Position brush editor. This allows the editing of the Z-axis values of Tiles, which can be used to adjust Tile heights when painting on a Z as Y Tilemap. Refer to the documentation on Adjusting the Tile height in the Palette for more information.
Editing the Tile Palette
The Palette tools used to paint Tiles onto Tilemaps can also be used to edit the placement of Tiles in the Palette itself. Select a Palette from the drop-down menu, then click Edit to unlock the Palette for editing.

Refer to the documentation on Painting on Tilemaps for the shortcuts and functions of the Palette tools which can also be used to edit the Palette.
- Tilemaps added in 2017.2 NewIn20172
对文档有任何疑问,请移步至开发者社区提问,我们将尽快为您解答