Sprites
Sprites are 2D Graphic objects. If you are used to working in 3D, Sprites are essentially just standard textures but there are special techniques for combining and managing sprite textures for efficiency and convenience during development.
Unity provides a placeholder Sprite Creator, a built-in Sprite Editor, a Sprite RendererA component that lets you display images as Sprites for use in both 2D and 3D scenes. More info
See in Glossary and a Sprite PackerA facility that packs graphics from several sprite textures tightly together within a single texture known as an atlas. Unity provides a Sprite Packer utility to automate the process of generating atlases from the individual sprite textures. More info
See in Glossary
See Importing and Setting up Sprites below for information on setting up assets as Sprites in your Unity project.
Sprite Tools
Sprite Creator
Use the Sprite Creator to create placeholder sprites in your project, so you can carry on with development without having to source or wait for graphics.
Sprite Editor
The Sprite Editor lets you extract sprite graphics from a larger image and edit a number of component images within a single texture in your image editor. You could use this, for example, to keep the arms, legs and body of a character as separate elements within one image.
Sprite Renderer
Sprites are rendered with a Sprite Renderer component rather than the Mesh RendererA mesh component that takes the geometry from the Mesh Filter and renders it at the position defined by the object’s Transform component. More info
See in Glossary used with 3D objectsA 3D GameObject such as a cube, terrain or ragdoll. More info
See in Glossary. Use it to display images as Sprites for use in both 2D and 3D scenesA Scene contains the environments and menus of your game. Think of each unique Scene file as a unique level. In each Scene, you place your environments, obstacles, and decorations, essentially designing and building your game in pieces. More info
See in Glossary.
Sprite Packer
Use Sprite Packer to opimize the use and performance of video memory by your project.
Importing and Setting Up Sprites
Sprites are a type of AssetAny media or data that can be used in your game or Project. An asset may come from a file created outside of Unity, such as a 3D model, an audio file or an image. You can also create some asset types in Unity, such as an Animator Controller, an Audio Mixer or a Render Texture. More info
See in Glossary in Unity projects. You can see them, ready to use, via the ProjectIn Unity, you use a Project to design and develop a game. A Project stores all of the files that are related to a game, such as the Asset and Scene files. More info
See in Glossary view.
There are two ways to bring Sprites into your project:
-
In your computer’s Finder (Mac OS X) or File Explorer (Windows), place your image directly into your Unity Project’s Assets folder.
Unity detects this and displays it in your project’s Project view.
-
In Unity, go to Assets > Import New Asset to bring up your computer’s Finder (Mac OS X) or File Explorer (Windows).
From there, select the image you want, and Unity puts it in the Project view.
See Importing for more details on this and important information about organising your Assets folder.
Setting your Image as a Sprite
If your project mode is set to 2D, the image you import is automatically set as a Sprite. For details on setting your project mode to 2D, see 2D or 3D Projects.
However, if your project mode is set to 3D, your image is set as a TextureAn image used when rendering a GameObject, Sprite, or UI element. Textures are often applied to the surface of a mesh to give it visual detail. More info
See in Glossary, so you need to change the asset’s Texture Type:
- Click on the asset to see its Import Inspector.
- Set the Texture Type to Sprite (2D and UI):
For details on Sprite Texture Type settings, see Texture type: Sprite (2D and UI).
Sorting Sprites
Renderers in Unity are sorted by several criteria, such as their Layer order or their distance from the Camera. Unity’s GraphicsSettings (menu: Edit > Project SettingsA broad collection of settings which allow you to configure how Physics, Audio, Networking, Graphics, Input and many other areas of your Project behave. More info
See in Glossary, then select the Graphics category) provide a setting called Transparency Sort Mode, which allows you to control how Sprites are sorted depending on where they are in relation to the Camera. More specifically, it uses the Sprite’s position on an axis to determine which ones are transparent against others, and which are not.
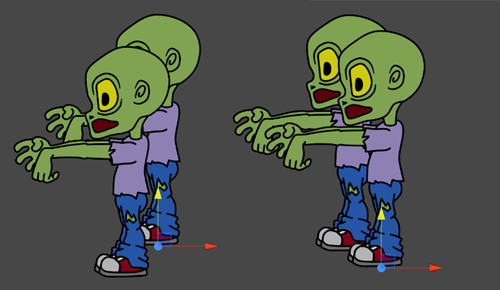
An example of when you might use this setting is to sort Sprites along the Y axis. This is quite common in 2D games, where Sprites that are higher up are sorted behind Sprites that are lower, to make them appear further away.
There are four Transparency Sort Mode options available:
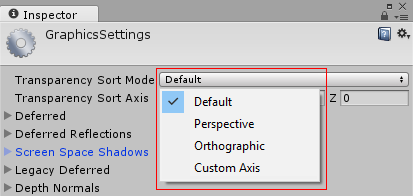
Default - Sorts based on whether the CameraA component which creates an image of a particular viewpoint in your scene. The output is either drawn to the screen or captured as a texture. More info
See in Glossary’s Projection mode is set to Perspective or OrthographicPerspective - Sorts based on perspective view. Perspective view sorts Sprites based on the distance from the Camera’s position to the Sprite’s center.
Orthographic - Sorts based on orthographic view. Orthographic view sorts Sprites based on the distance along the view direction.
Custom Axis - Sorts based on the given axis set in Transparency Sort Axis
If you have set the Transparency Sort Mode to Custom, you then need to set the Transparency Sort Axis:

If the Transparency Sort Mode is set to Custom Axis, renderers in the Scene viewAn interactive view into the world you are creating. You use the Scene View to select and position scenery, characters, cameras, lights, and all other types of Game Object. More info
See in Glossary are sorted based on the distance of this axis from the camera. Use a value between –1 and 1 to define the axis. For example: X=0, Y=1, Z=0 sets the axis direction to up. X=1, Y=1, Z=0 sets the axis to a diagonal direction between X and Y.
For example, if you want Sprites to behave like the ones in the image above (those higher up the y axis standing behind the Sprites that are lower on the axis), set the Transparency Sort Mode to Custom Axis, and set the Y value for the Transparency Sort Axis to a value higher than 0.
Sorting Sprites using script
You can also sort Sprites per camera through scriptsA piece of code that allows you to create your own Components, trigger game events, modify Component properties over time and respond to user input in any way you like. More info
See in Glossary, by modifying the following properties in Camera:
TransparencySortMode (corresponds with Transparency Sort Mode)
TransparencySortAxis (corresponds with Transparency Sort Axis)
For example:
var camera = GetComponent<Camera>();

camera.transparencySortMode = TransparencySortMode.CustomAxis;

camera.transparencySortAxis = new Vector3(0.0f, 1.0f, 0.0f);
2018–04–25 Page amended with limited editorial review
2017–05–24 Page amended with no editorial review
Transparancy Sort Mode added in 5.6
对文档有任何疑问,请移步至开发者社区提问,我们将尽快为您解答