Textures
Switch to ScriptingTextures are image or movie files that lay over or wrap around your GameObjectsThe fundamental object in Unity scenes, which can represent characters, props, scenery, cameras, waypoints, and more. A GameObject’s functionality is defined by the Components attached to it. More info
See in Glossary to give them a visual effect. This page details the properties you need to manage for your Textures.
Unity recognises any image or movie file in a 3D project’s Assets folder as a Texture (in 2D projects, they are saved as Sprites). As long as the image meets the size requirements specified below, it is imported and optimized for game use (although any Shaders you use for your GameObjects have specific Texture requirements). This extends to multi-layer Photoshop or TIFF files, which are automatically flattened on import so that there is no size penalty for your game. This flattening happens internally to Unity, not to the PSD file itself, and is optional, so you can continue to save and import your PSD files with layers intact.
Properties
The InspectorA Unity window that displays information about the currently selected GameObject, Asset or Project Settings, alowing you to inspect and edit the values. More info
See in Glossary window is split into two sections: the Texture Importer above, and the Preview below.
Texture Importer
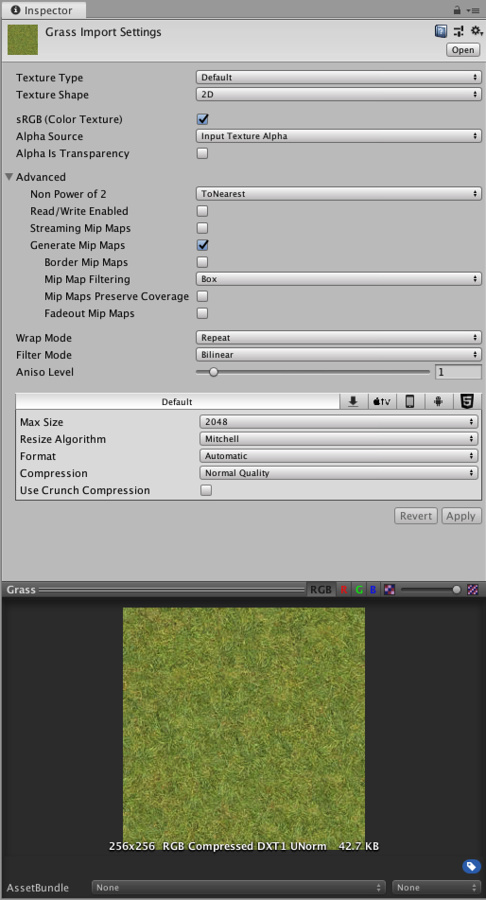
The Texture Importer defines how images are imported from your project’s Assets folder into the Unity Editor. To access the Texture Importer, select the image file in the Project window. The Texture Importer opens in the Inspector window.
Note that some of the less commonly used properties are hidden by default. Click Advanced in the Inspector window to view these.
Texture Type
The first property in the Texture Importer is the Texture Type. Use this to select the type of Texture you want to create from the source image file. See documentation on Texture types for more information on each type.
| Property: | Function: |
|---|---|
| Texture Type | Use this to define what your Texture is to be used for. The other properties in the Texture Importer change depending on which one you choose. |
| Default | This is the most common setting used for all Textures. It provides access to most of the properties for Texture importing. |
| Normal Map | Select this to turn the color channels into a format suitable for real-time normal mapping. See Importing Textures for more information on normal mapping. |
| Editor GUI | Select this if you are using the Texture on any HUD or GUI controls. |
| Sprite (2D and UI) | Select this if you are using the Texture in a 2D game as a SpriteA 2D graphic objects. If you are used to working in 3D, Sprites are essentially just standard textures but there are special techniques for combining and managing sprite textures for efficiency and convenience during development. More info See in Glossary. |
| Cursor | Select this if you are using the Texture as a custom cursor. |
| Cookie | Select this to set your Texture up with the basic parameters used for the Cookies of your SceneA Scene contains the environments and menus of your game. Think of each unique Scene file as a unique level. In each Scene, you place your environments, obstacles, and decorations, essentially designing and building your game in pieces. More info See in Glossary’s Lights. |
| Lightmap | Select this if you are using the Texture as a LightmapA pre-rendered texture that contains the effects of light sources on static objects in the scene. Lightmaps are overlaid on top of scene geometry to create the effect of lighting. More info See in Glossary. This option enables encoding into a specific format (RGBM or dLDR, depending on the platform) and a post-processing step on Texture data (a push-pull dilation pass). |
| Single Channel | Select this if you only need one channel in the Texture. |
Texture Shape
The second property in the Texture Importer is the Texture Shape. Use this to select and define the shape and structure of the Texture.
| Property: | Function: |
|---|---|
| Texture Shape | Use this to define the shape of the Texture. This is set to 2D by default. |
| 2D | This is the most common setting for all Textures; it defines the image file as a 2D Texture. These are used to map textures to 3D meshes and GUI elements, among other project elements. |
| Cube | This defines the Texture as a cubemapA collection of six square textures that can represent the reflections in an environment or the skybox drawn behind your geometry. The six squares form the faces of an imaginary cube that surrounds an object; each face represents the view along the directions of the world axes (up, down, left, right, forward and back). More info See in Glossary. You could use this for Skyboxes or Reflection ProbesA rendering component that captures a spherical view of its surroundings in all directions, rather like a camera. The captured image is then stored as a Cubemap that can be used by objects with reflective materials. More info See in Glossary, for example. Selecting Cube displays different mapping options. |
| Mapping | This setting is only available when Texture Shape is set to Cube. Use Mapping to specify how the Texture is projected onto your GameObject. This is set to Auto by default. |
| Auto | Unity tries to automatically work out the layout from the Texture information. |
| 6 Frames Layout (Cubic Environment) | The Texture contains six images arranged in one of the standard cubemap layouts: cross, or sequence (+x -x +y -y +z -z). The images can be orientated either horizontally or vertically. |
| Latitude Longitude (Cylindrical) | Maps the Texture to a 2D Latitude-Longitude representation. |
| Mirrored Ball (Sphere Mapped) | Maps the Texture to a sphere-like cubemap. |
| Convolution Type | Choose the type of pre-convolution (that is, filtering) that you want to use for this texture. The result of pre-convolution is stored in mips. This is set to None by default. |
| None | The Texture has no pre-convolution (no filtering). |
| Specular (Glossy Reflection) | Select this to use cubemaps as Reflection Probes. The Texture mip maps are pre-convoluted (filtered) with the engine BRDF. (See Wikipedia’s page on Bidirectional reflectance distribution function for more information.) |
| Diffuse (Irradiance) | The Texture is convoluted (filtered) to represent irradiance. This is useful if you use the cubemap as a Light ProbeLight probes store information about how light passes through space in your scene. A collection of light probes arranged within a given space can improve lighting on moving objects and static LOD scenery within that space. More info See in Glossary. |
| Fixup Edge Seams | This option is only available with the None or Diffuse convolution (filter). Use this on low-end platforms as a work-around for filtering limitations, such as cubemaps incorrectly filtered between faces. |
Advanced settings
The Advanced settings allow you to make finer adjustments to the way Unity handles your Texture. The order and availability of these settings might vary slightly depending on the Texture Type you choose.
| Property: | Description: |
|---|---|
| Non Power of 2 | If the Texture has a non-power of two (NPOT) dimension size, this defines a scaling behavior at import time. See documentation on Importing Textures for more information on non-power of two sizes. This is set to None by default. |
| None | Texture dimension size stays the same. |
| To nearest | The Texture is scaled to the nearest power-of-two dimension size at import time. For example, a 257x511 px Texture is scaled to 256x512 px. Note that PVRTCPowerVR Texture Compression (PVRTC) is a fixed-rate texture format that compresses textures to significantly reduce file sizes without causing a noticable reduction in image quality. More info See in Glossary formats require Textures to be square (that is width equal to height), so the final dimension size is upscaled to 512x512 px. |
| To larger | The Texture is scaled to the power-of-two dimension size of the largest dimension size value at import time. For example, a 257x511 px Texture is scaled to 512x512 px. |
| To smaller | The Texture is scaled to the power-of-two dimension size of the smallest dimension size value at import time. For example, a 257x511 px Texture is scaled to 256x256 px. |
| Read/Write Enabled | Check this box to enable access to the Texture data from script functions (such as Texture2D.SetPixels, Texture2D.GetPixels and other Texture2D functions). Note that a copy of the Texture data is made, doubling the amount of memory required for Texture AssetsAny media or data that can be used in your game or Project. An asset may come from a file created outside of Unity, such as a 3D model, an audio file or an image. You can also create some asset types in Unity, such as an Animator Controller, an Audio Mixer or a Render Texture. More info See in Glossary, so only use this property if absolutely necessary. This is only valid for uncompressed and DXT compressed Textures; other types of compressed textures cannot be read from. This property is disabled by default. |
| Streaming Mip Maps | Enable this checkbox to use Texture Streaming on this Texture. This setting is valid for any Texture in the 3D environment that Unity displays with a MeshThe main graphics primitive of Unity. Meshes make up a large part of your 3D worlds. Unity supports triangulated or Quadrangulated polygon meshes. Nurbs, Nurms, Subdiv surfaces must be converted to polygons. More info See in Glossary Renderer. Diffuse Textures, normal maps and light maps are all valid for Texture Streaming. |
| Mip Map Priority | Use this to set the priority of the mipmap. Unity uses this to determine which mipmaps to prioritize when assigning resources. Higher values represent a higher priority (for example, 3 is a higher priority than 1). This setting is only available when Streaming Mip Maps is enabled. The Mip Map Priority number is also a mipmap offset for the Memory Budget (set in the Quality Settings when Texture Streaming is enabled). For example, with a priority of 2, the Texture Streaming system tries to use a mipmap two mip levels higher than Textures with a priority of 0. One mip level higher is 2x in each axis and two levels higher is 4x in each axis, so two mip levels higher results in a texture 16x larger. If it can’t do this, it uses a lower mip level to fit the Memory Budget. Negative values are also valid. See Texture Streaming API for more details. |
| Generate Mip Maps | Check this box to enable mipmap generation. Mipmaps are smaller versions of the Texture that get used when the Texture is very small on screen. See documentation on Importing Textures for more information on mipmaps. |
| Border Mip Maps | Check this box to avoid colors bleeding out to the edge of the lower MIP levels. Used for light cookies (see below). This box is unchecked by default. |
| Mip Map Filtering | There are two ways of mipmap filtering available for optimizing image quality. The default option is Box. |
| Box | This is the simplest way to fade out mipmaps. The MIP levels become smoother as they go down in dimension size. |
| Kaiser | A sharpening algorithm runs on the mipmaps as they go down in dimension size. Try this option if your Textures are too blurry in the distance. (The algorothm is of a Kaiser Window type - see Wikipedia for further information.) |
| Mip Maps Preserve Coverage | Enable this checkbox if you want the alpha channel of generated mipmaps to preserve coverage during the alpha test. See TextureImporterSettings.mipMapsPreserveCoverage for more information. |
| Fadeout Mip Maps | Enable this to make the mipmaps fade to gray as the MIP levels progress. This is used for detail maps. The left-most scroll is the first MIP level to begin fading out. The right-most scroll defines the MIP level where the Texture is completely grayed out. |
| Wrap Mode | Select how the Texture behaves when tiled. The default option is Clamp. |
| Repeat | Repeats the Texture in tiles. |
| Clamp | Stretches the Texture’s edges. |
| Mirror | Mirrors the Texture at every integer boundary to create a repeating pattern. |
| Mirror Once | Mirrors The texture once, then clamps it to edge pixelsThe smallest unit in a computer image. Pixel size depends on your screen resolution. Pixel lighting is calculated at every screen pixel. More info See in Glossary. |
| Per-axis | Choose this to individually control how Unity wraps Textures at the U axis and V axis. |
| Filter Mode | Select how the Texture is filtered when it gets stretched by 3D transformations. The default option is Point (no filter). |
| Point (no filter) | The Texture appears blocky up close. |
| Bilinear | The Texture appears blurry up close. |
| Trilinear | Like Bilinear, but the Texture also blurs between the different MIP levels. |
| Aniso LevelThe anisotropic filtering (AF) level of a texture. Allows you to increase texture quality when viewing a texture at a steep angle. Good for floor and ground textures. More info See in Glossary |
Increases Texture quality when viewing the Texture at a steep angle. Good for floor and ground Textures. See documentation on Importing Textures for more information on Anisotropic filtering. |
Platform-specific overrides
The Texture Inspector window has a Platform-specific overrides panel.
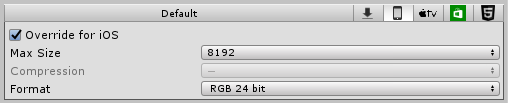
When building for different platforms, you need to think about the resolution, the file size with associated memory size requirements, the pixel dimensions, and the quality of your Textures for each target platform. Use the Platform-specific overrides panel to set default options (using Default), and then override them for a specific platform using the buttons along the top of the panel.
| Property: | Function: |
|---|---|
| Max Size | The maximum imported Texture dimensions in pixels. Artists often prefer to work with huge dimension-size Textures; use Max Size to scale the Texture down to a suitable dimension-size. |
| CompressionA method of storing data that reduces the amount of storage space it requires. See Texture Compression, Animation CompressionThe method of compressing animation data to significantly reduce file sizes without causing a noticable reduction in motion quality. Animation compression is a trade off between saving on memory and image quality. More info See in Glossary, Audio Compression, Build Compression. See in Glossary |
Choose the compression type for the Texture. This parameter helps the system choose the right compression format for a Texture. Depending on the platform and the availability of compression formats, different settings might end up with the same internal format (for example, Low Quality Compression has an effect on mobile platforms, but not on desktop platforms). |
| None | The Texture is not compressed. |
| Low Quality | The Texture is compressed in a low-quality format. This results in a lower memory usage compared with Normal Quality. |
| Normal Quality | The Texture is compressed with a standard format. |
| High Quality | The Texture is compressed in a high-quality format. This results in a higher memory usage compared with Normal Quality. |
| Format | This bypasses the automatic system to specify what internal representation is used for the Texture. The list of available formats depends on the platform and Texture type. See documentation on Texture formats for platform-specific overrides for more information. Note: Even when a platform is not overridden, this option shows the format chosen by the automatic system. The Format property is only available when overriding for a specific platform, and not as a default setting. |
| Use crunch compression | Use crunch compression, if applicable. Crunch is a lossy compression format on top of DXT or ETC Texture compression3D Graphics hardware requires Textures to be compressed in specialised formats which are optimised for fast Texture sampling. More info See in Glossary. Textures are decompressed to DXT or ETC on the CPU and then uploaded on the GPU at runtime. Crunch compression helps the Texture use the lowest possible amount of space on disk and for downloads. Crunch Textures can take a long time to compress, but decompression at runtime is very fast. |
| Compressor Quality | When using Crunch Texture compression, use the slider to adjust the quality. A higher compression quality means larger Textures and longer compression times. |
2017–09–18 Page amended with limited editorial review
Crunch compression format updated in 2017.3 NewIn20173
对文档有任何疑问,请移步至开发者社区提问,我们将尽快为您解答