Positioning clips
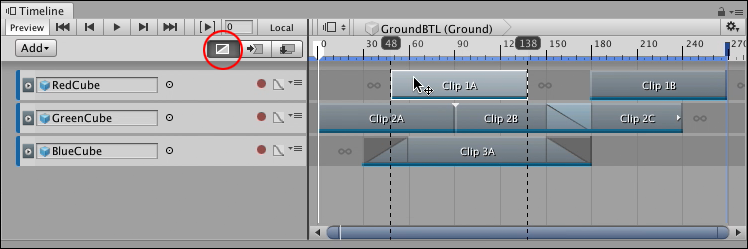
To position a clip, select Mix mode as the Clip Edit mode. Select a clip and hover over the middle of the clip. When the cursor changes to a position cursor, click and drag the clip to its new position.
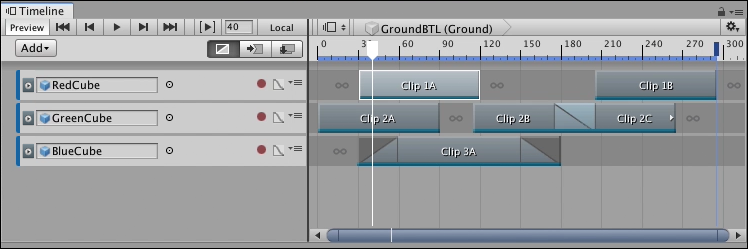
While dragging, black lines indicate the selection of clips being positioned. The TimelineGeneric term within Unity that refers to all features, windows, editors, and components related to creating, modifying, or reusing cut-scenes, cinematics, and game-play sequences. More info
See in Glossary ruler shows the start time and end time of the selected clips being positioned.
By default, when you drag to position clips, both Snap to Frame and Edge Snap are enabled in the Clips viewThe area in the Timeline Editor window where you add, position, and manipulate clips. More info
See in Glossary. You can change these snap settings in the Timeline Settings menu.
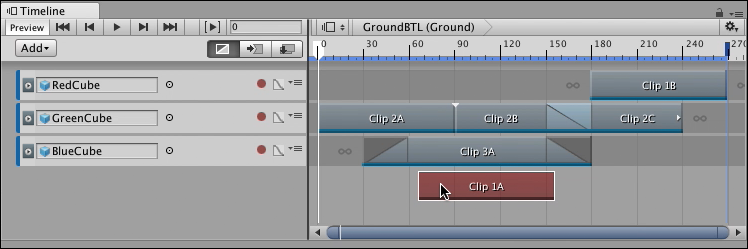
You can also move a clip to another track of the same type. Drag the clip off of its current track and a white ghost indicates where the clip will be moved. If you drag a clip to an area where the clip cannot be placed, the ghost changes to red indicating that you cannot release the clip in that area. For example, you cannot drag a clip where there is no track.
You can position a selection of clips on the same track, or on different tracks. You are not limited to positioning one clip at a time. The same edge snapping rules and invalid area restrictions apply when positioning a selection of clips on many tracks.
Positioning clips with the Inspector window
You can use the Inspector window to position clips. To position a clip with the InspectorA Unity window that displays information about the currently selected GameObject, Asset or Project Settings, alowing you to inspect and edit the values. More info
See in Glossary window, select a clip and use the Clip Timing properties in the Inspector window to change its Start property.
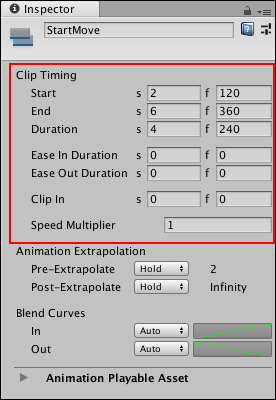
The effect that changing the Start value has on adjacent clips depends on the selected Clip Edit mode.
Positioning clips in different Clip Edit modes
You are not restricted to positioning clips with Mix mode as the selected Clip Edit mode. You can also position clips in Ripple mode and in Replace mode. The difference is the effect each Clip Edit mode has on adjacent clips on the tracks where clips are being moved:
Positioning clips in Mix mode creates blends between intersecting clips.
Positioning clips in Ripple mode ripples subsequent clips, respecting the gaps between clips.
Positioning clips in Replace mode cuts or replaces intersecting clips.
Positioning clips with the Timeline Playhead
You can position clips by inserting frames at the position of the Timeline Playhead. To do this, move the Timeline Playhead to where you want to insert frames.

Right-click the Timeline Playhead on the Timeline ruler above the Clips view, choose Insert > Frame, and a number of frames.
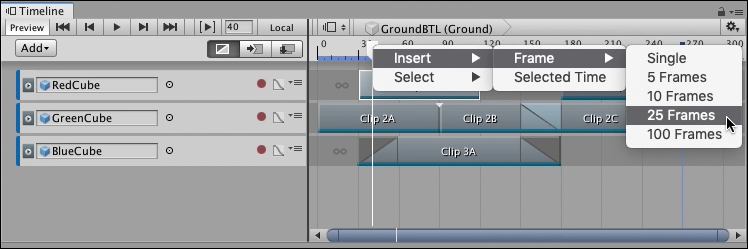
This inserts frames in the Timeline AssetRefers to the tracks, clips, and recorded animation that comprise a cinematic, cut-scene, game-play sequence, or other effect created with the Timeline Editor window. A Timeline Asset does not include bindings to the GameObjects animated by the Timeline Asset. The bindings to scene GameObjects are stored in the Timeline instance. The Timeline Asset is Project-based. More info
See in Glossary at the position of the Timeline Playhead. Inserting frames only repositions the clips that start after the position of the Timeline Playhead.
- 2019–08–20 Page published
Copyright © 2023 Unity Technologies
优美缔软件(上海)有限公司 版权所有
"Unity"、Unity 徽标及其他 Unity 商标是 Unity Technologies 或其附属机构在美国及其他地区的商标或注册商标。其他名称或品牌是其各自所有者的商标。
公安部备案号:
31010902002961