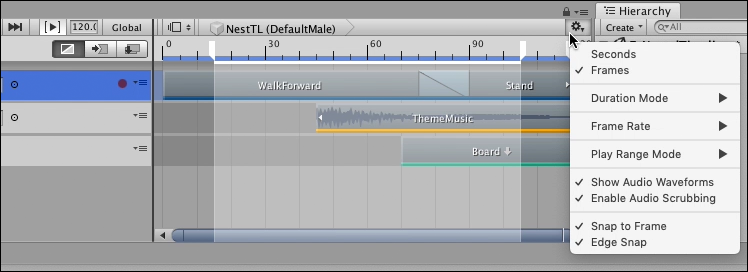
Timeline Settings
Use the TimelineGeneric term within Unity that refers to all features, windows, editors, and components related to creating, modifying, or reusing cut-scenes, cinematics, and game-play sequences. More info
See in Glossary Settings to choose the Timeline window and Timeline Asset settings such as the unit of measurement, the duration mode, audio waveform, and window snap settings.
Seconds or Frames
Select either Seconds or Frames to set the Timeline window to display time as either seconds or frames.
Duration Mode
Use the Duration Mode to set whether the duration of the Timeline AssetRefers to the tracks, clips, and recorded animation that comprise a cinematic, cut-scene, game-play sequence, or other effect created with the Timeline Editor window. A Timeline Asset does not include bindings to the GameObjects animated by the Timeline Asset. The bindings to scene GameObjects are stored in the Timeline instance. The Timeline Asset is Project-based. More info
See in Glossary extends to the end of the last clip (Based On Clips), or ends at a specific time or frame (Fixed Length). When the Duration Mode is set to Fixed Length, use one of the following methods to change the length of the Timeline Asset:
Select the Timeline Asset in the Project window and use the InspectorA Unity window that displays information about the currently selected GameObject, Asset or Project Settings, alowing you to inspect and edit the values. More info
See in Glossary window to set the Duration in seconds or frames.In the Timeline window, drag the blue marker on the timeline. The blue marker indicates the end of the Timeline Asset. A blue line indicates the duration of the Timeline Asset.
Frame Rate
Select one of the options under Frame Rate to set the unit of measurement for the Timeline ruler. Change the Frame Rate to align clips at precise frames but changing the Frame Rate is only visual and has no effect on play speed, keys, tracks, or clips. The following standard frame rates are listed: Film (24 fps), PAL (25 fps), NTSC (29.97 fps), 30, 50, or 60.
Timeline supports custom frame rates from 1e–6 to 1000. To set a custom frame rate, you must use the Frame Rate property in the Timeline Asset settings. When the Timeline Asset is set to a custom frame rate, the Custom menu item is enabled and is automatically selected for the Timeline instanceRefers to the link between a Timeline Asset and the GameObjects that the Timeline Asset animates in the scene. You create a Timeline instance by associating a Timeline Asset to a GameObject through a Playable Director component. The Timeline instance is scene-based. More info
See in Glossary. The Custom menu item shows the custom frame rate in parentheses.
Play Range Mode
Select one of the options under Play Range Mode to set the behaviour of the Timeline window when the Play Range button is enabled.
When Play Range Mode is set to Loop, the Timeline instance plays the defined Play Range repeatedly, until playback is interrupted.
When Play Range Mode is set to Hold, the Timeline instance plays the defined Play Range once and stops at the end of the Play Range.
You can only set a play range when previewing a Timeline instance within the Timeline window. Unity ignores the play range in Play Mode.
Show Audio Waveforms
Enable Show Audio Waveforms to draw the waveforms for all audio clipsA container for audio data in Unity. Unity supports mono, stereo and multichannel audio assets (up to eight channels). Unity can import .aif, .wav, .mp3, and .ogg audio file format, and .xm, .mod, .it, and .s3m tracker module formats. More info
See in Glossary on all audio tracks. For example, use an audio waveform as a guide when manually positioning an Audio clip of footsteps with the Animation clipAnimation data that can be used for animated characters or simple animations. It is a simple “unit” piece of motion, such as (one specific instance of) “Idle”, “Walk” or “Run”. More info
See in Glossary of a humanoid walking. Disable Show Audio Waveform to hide audio waveforms. Show Audio Waveforms is enabled by default.
Enable Audio Scrubbing
Enable Audio Scrubbing to play audio while dragging the Timeline PlayheadThe white marker and line that indicates the exact point in time being previewed in the Timeline Editor window. More info
See in Glossary.
Disable Enable Audio Scrubbing to stop playing audio while dragging the Timeline Playhead. When disabled, Timeline only plays audio when in Timeline Playback modeThe mode that previews the Timeline instance in the Timeline Editor window. Timeline Playback mode is a simulation of Play mode. Timeline Playback mode does not support audio playback. More info
See in Glossary.
Snap to Frame
Enable Snap to Frame to manipulate clips, preview Timeline instances, drag the Timeline Playhead, and position the Timeline Playhead using frames. Disable Snap to Frame to use subframes. Snap to Frame is enabled by default.
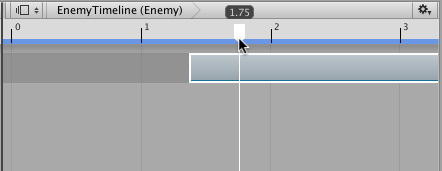
For example, when Snap to Frame is disabled and you drag the Timeline Playhead, it moves the playhead between frames. The format of Playhead Location displays differently depending on whether the Timeline window is set to Seconds or Frames:
When the Timeline window is set to Frames, the Playhead Location shows frames and subframes. For example, 8 frames and 34 subframes displays as 8.34.
When the Timeline window is set to Seconds, the Playhead Location shows seconds, frames, and subframes. For example, 6 seconds, 17 frames, and 59 subframes displays as 6:17 [.59].
Manipulating clips, previewing Timeline instances, and positioning the playhead at the subframes level is useful when attempting to synchronize animation and effects with audio. Many high-end audio processing software products create audio waveforms with subframe accuracy.
Edge Snap
Enable the Edge Snap option to snap clips when you position, trim, and create blends.
When enabled, the Timeline window snaps the start or end of a clip when dragged within 10 pixelsThe smallest unit in a computer image. Pixel size depends on your screen resolution. Pixel lighting is calculated at every screen pixel. More info
See in Glossary of the Timeline Playhead, the start or end of a clip on the same track, the start or end of a clip on another track, or the start or end of the entire Timeline instance. The start guide or end guide is redrawn in white to indicate that the clip has snapped to the edge of another clip or the Timeline Playhead.
Disable Edge Snap to create more accurate blends, ease-ins, or ease-outs. Edge Snap is enabled by default.
- 2019–08–20 Page published
Copyright © 2023 Unity Technologies
优美缔软件(上海)有限公司 版权所有
"Unity"、Unity 徽标及其他 Unity 商标是 Unity Technologies 或其附属机构在美国及其他地区的商标或注册商标。其他名称或品牌是其各自所有者的商标。
公安部备案号:
31010902002961