Outdoor lighting and Scene setup
At this stage, you should have meshes that are properly textured and an assembled Scene with proper tonemapped Unity render settings. But the Scene still needs a proper lighting setup. The advice in this section assumes you have set the Scene with a Realtime GI strategy and then lit with Realtime lightsLight components whose Mode property is set to Realtime. Unity calculates and updates the lighting of Realtime Lights every frame at runtime. No Realtime Lights are precomputed. More info
See in Glossary for instant feedback. The same advice and lighting principles also apply when baking.
For outdoor lighting and Scene setup, consider the following:
- Environment lighting
- Global IlluminationA group of techniques that model both direct and indirect lighting to provide realistic lighting results. Unity has two global illumination systems that combine direct and indirect lighting.: Baked Global Illumination, and Realtime Global Illumination (deprecated).
See in Glossary - Light Probes and Reflection Probes
- HDR Lighting Value
- Screen Space Ambient Occlusion and Screen Space Reflection
- Fog
Environment lighting
One of the main components in outdoor lighting is Environment lighting, which is also referred to as hemisphere lighting or skylight. Night sky has minimal contribution, while daytime sky has very bright contribution. Environment lighting settings can be found under the Lighting tab (Window > RenderingThe process of drawing graphics to the screen (or to a render texture). By default, the main camera in Unity renders its view to the screen. More info
See in Glossary > Lighting Settings).
A procedural SkyboxA special type of Material used to represent skies. Usually six-sided. More info
See in Glossary material is better than a HDRIhigh dynamic range image
See in Glossary cubemapA collection of six square textures that can represent the reflections in an environment or the skybox drawn behind your geometry. The six squares form the faces of an imaginary cube that surrounds an object; each face represents the view along the directions of the world axes (up, down, left, right, forward and back). More info
See in Glossary, for its simplicity and ease of use.
To create a procedural Skybox material:
Add a new material in the project and name it SkyMaterial.
In the InspectorA Unity window that displays information about the currently selected GameObject, Asset or Project Settings, alowing you to inspect and edit the values. More info
See in Glossary, set the material’s ShaderA small script that contains the mathematical calculations and algorithms for calculating the Color of each pixel rendered, based on the lighting input and the Material configuration. More info
See in Glossary to Skybox/ProceduralIn the Lighting window, on the SceneA Scene contains the environments and menus of your game. Think of each unique Scene file as a unique level. In each Scene, you place your environments, obstacles, and decorations, essentially designing and building your game in pieces. More info
See in Glossary tab, assign SkyMaterial to Environment > Skybox Material:

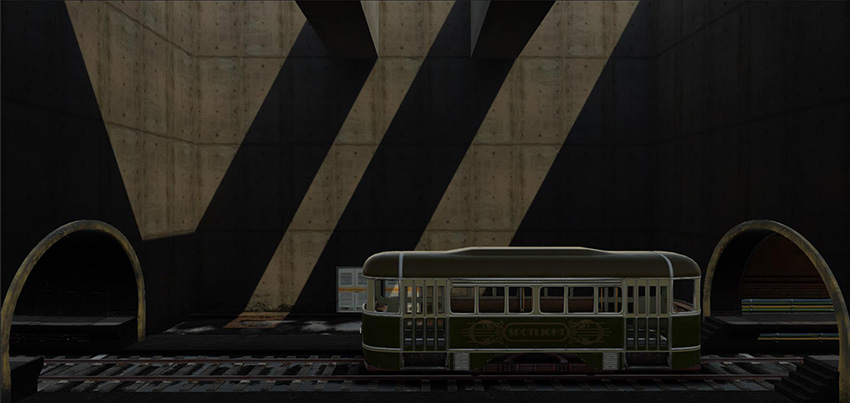
The Scene is now slightly lit. It has ambient lighting, but not proper environment lighting:

Directional Light
Typical sunlight or moonlight is usually represented by a directional light. This is due to the parallel nature of its light and shadow direction mimicking the light source at close to infinity distance.

Global Illumination (GI)
Directional and ambient lightLight that doesn’t come from any specific direction, and contributes equal light in all directions to the Scene. More info
See in Glossary alone don’t create believable lighting. Proper environment lighting requires occlusion of the skylight lighting, and sunlight requires indirect lighting bounce. In our example, the sky currently renders a single color value to the Scene, making it flat. This is where you need Realtime GI or Baked lighting to calculate occlusion and indirect bounce lighting. To achieve that, follow these steps:
-
To make sure all the relevant meshes contribute to the Realtime GI or baking, select the GameObjectsThe fundamental object in Unity scenes, which can represent characters, props, scenery, cameras, waypoints, and more. A GameObject’s functionality is defined by the Components attached to it. More info
See in Glossary in your Scene and, in the Inspector window in the Static drop-down menu, enable Contribute GI and Reflection ProbesA rendering component that captures a spherical view of its surroundings in all directions, rather like a camera. The captured image is then stored as a Cubemap that can be used by objects with reflective materials. More info
See in Glossary:
Note: You should generally apply this to all large static meshes.
Ensure that your Scene is set to use Realtime Global Illumination on the Lighting window > Scene > Realtime Lighting > Realtime Global Illumination.
At the bottom of the Lighting window, make sure Auto Generate is checked.
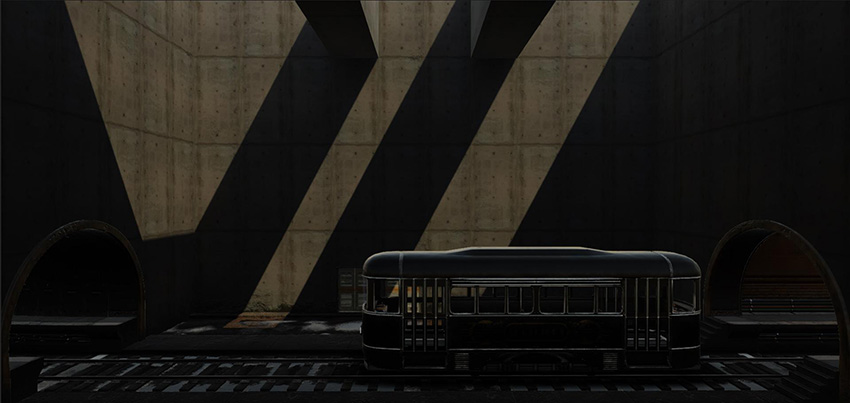
At this stage, the example Scene is now dark, and some elements of the Scene look out of place, such as the tram and the door on the background:
The static GameObjects in the Scene currently have proper occlusion for environment lighting (hemisphere lighting) and indirect bounce response from the directional light, but the rest of the GameObjects need a proper lighting setup.
Light Probes and Reflection Probes
For dynamic GameObjects and non-lightmap GameObjects to receive Realtime or Baked GI, you need to have Light Probes distributed in the Scene. Distribute Light Probe groupsA component that enables you to add Light Probes to GameObjects in your scene. More info
See in Glossary in the Scene efficiently, such as near dynamically-lit GameObjects or in areas where the player passes by. For more information on Light Probes group, see Light ProbesLight probes store information about how light passes through space in your scene. A collection of light probes arranged within a given space can improve lighting on moving objects and static LOD scenery within that space. More info
See in Glossary.
Because Auto Generate is checked in the Lighting window, the lighting refreshes whenever you make a change. With Light Probes now in the example Scene, the tram and the background door are grounded better, but reflections look out of place. Sky reflection is all over the place and shows up inside the tunnel:
Reflection Probes help resolve this issue. Place Reflection Probes efficiently, with proper coverage in the Scene as needed. In the Scene image above, one Reflection Probe for the entire room is sufficient. A 128 pixelsThe smallest unit in a computer image. Pixel size depends on your screen resolution. Pixel lighting is calculated at every screen pixel. More info
See in Glossary Cubemap Resolution using box projection is a good baseline for most cases, and is also useful for memory and reflection bake times.
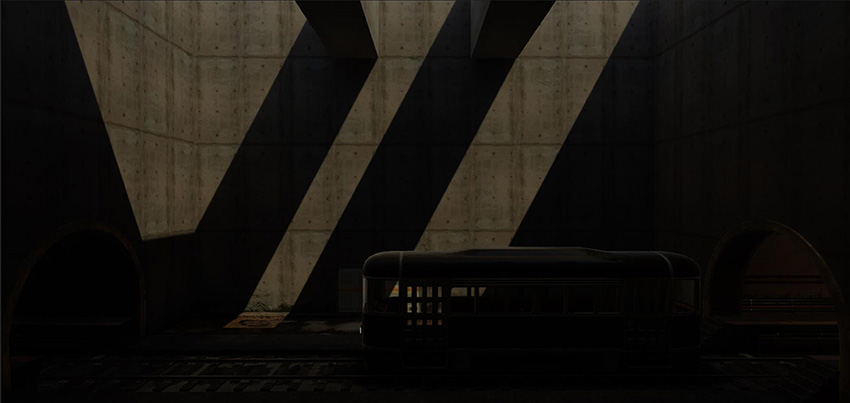
The example Scene now looks properly grounded and cohesive, which is an important part of a believable Scene. However, everything is even darker than before, and nowhere near believable quality:
For more information on Reflection Probes, see Reflection Probes.
HDR Lighting Value
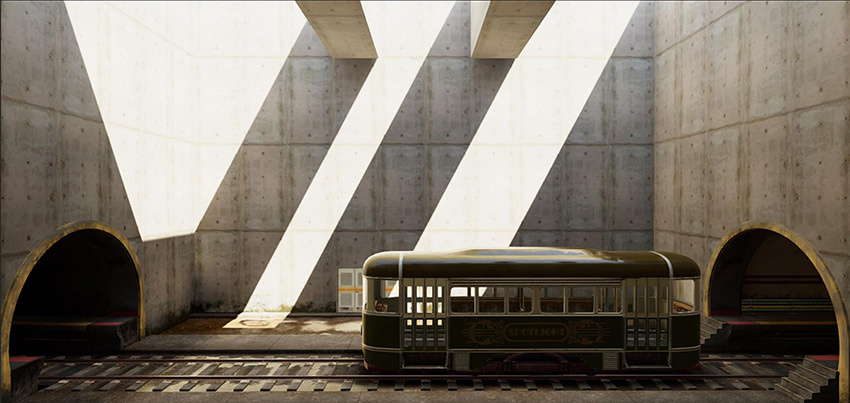
In reality, environment lighting and sunlights are very bright light sources. They’re much brighter than pixel value 1. This is where HDR lighting comes into play, because it can accommodate pixel values outside the 0–1 range. To give you a good idea of what environment lighting does to a Scene, let’s turn off the directional sunlight in our example Scene, and set the SkyMaterial > Exposure to 16:
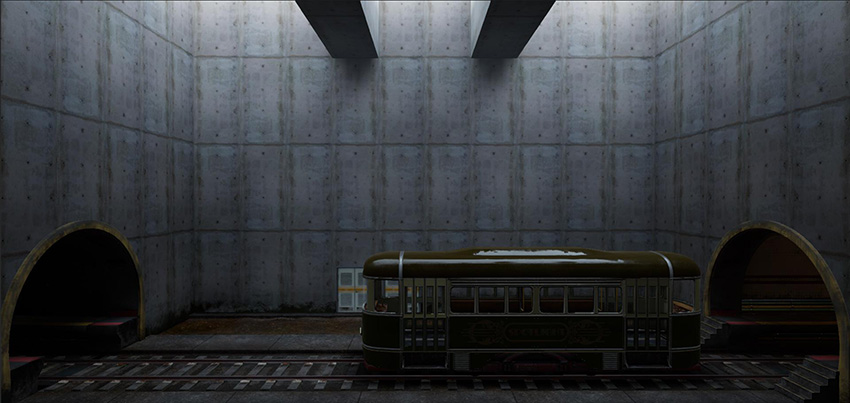
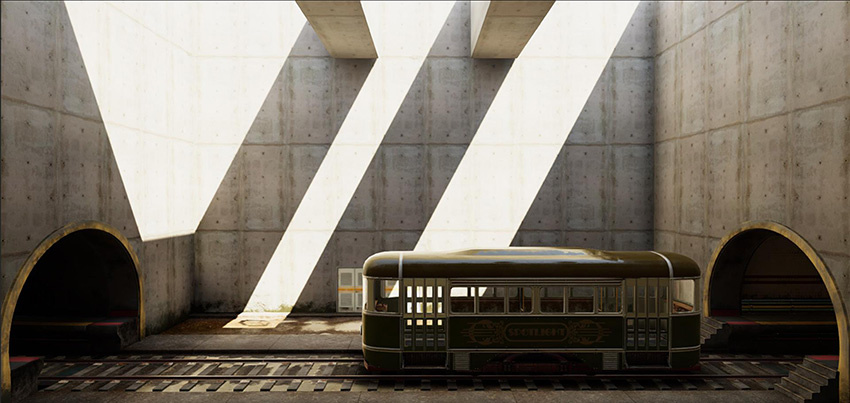
The Scene starts to look believable, as if it is a cloudy day when sunlight is completely diffused in the sky and directional light doesn’t show up. Now, let’s reintroduce sunlight back into the Scene at a much higher value by setting the Intensity to 5. Despite the sun looking nearly white, it is important that you choose color properly, because the impact of indirect color from a strong sun can dramatically change the look of the Scene.
Now the sun (directional light) looks like a high energy light, as expected from real life, and the Scene looks quite believable:
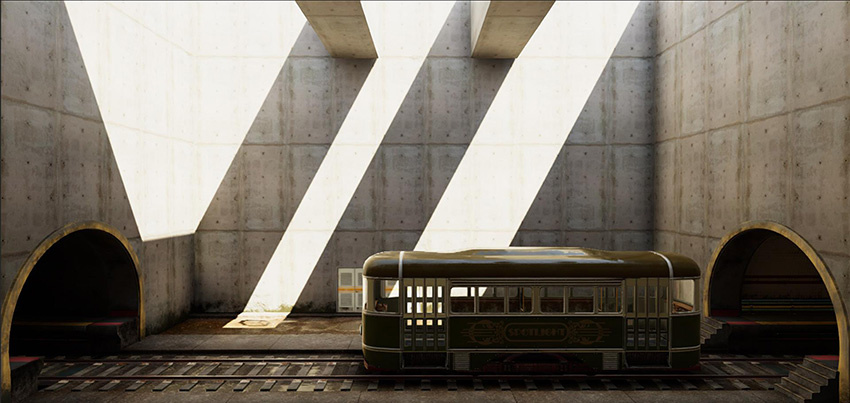
Screen Space Ambient Occlusion and Screen Space Reflection
While the Scene lighting looks pretty good at this point, you can add more details to make the Scene more believable. Baking detailed occlusion usually isn’t possible because of the limited resolution set in the Realtime GI for reasonable performance. This is where Screen Space Ambient Occlusion can help. Enable SSAO in the Post-Process Profile by checking Ambient OcclusionA method to approximate how much ambient light (light not coming from a specific direction) can hit a point on a surface.
See in Glossary. The sample Scene contains a post-processing profile called Rin_Post_Basic.asset, set to the following Ambient Occlusion settings:
- Intensity 0.5
- Radius 1
- Sample Count Medium
- Downsampling and Ambient Only checked
While SSAO takes care of extra ambient lighting occlusion, Screen Space Reflection improves the accuracy. When you enable the Screen Space Reflection in the post-processingA process that improves product visuals by applying filters and effects before the image appears on screen. You can use post-processing effects to simulate physical camera and film properties, for example Bloom and Depth of Field. More info post processing, postprocessing, postprocess
See in Glossary profile, the left side of the wet track no longer renders bright reflections, because SSR gives the Scene more accurate reflections for on-screen GameObjects:
Both of these post-processing options incur performance impacts at run time, so enable them wisely. Adjust the values so that they have a reasonable performance impact that fits your run-time requirements.
Fog
At this stage, our sample Scene has believable outdoor and indoor value separation on a fixed exposure. Reflection is visible in the dark indoor areas as strong highlights and not dim muddy values. However, the Scene foreground and background elements are not showing up, despite being strong perspective elements:
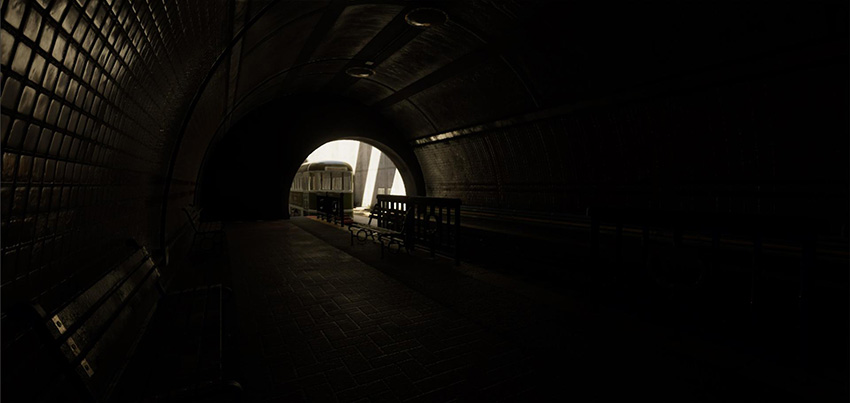
Adding a subtle fog to the Scene creates a massive difference in giving the Scene another dimension:
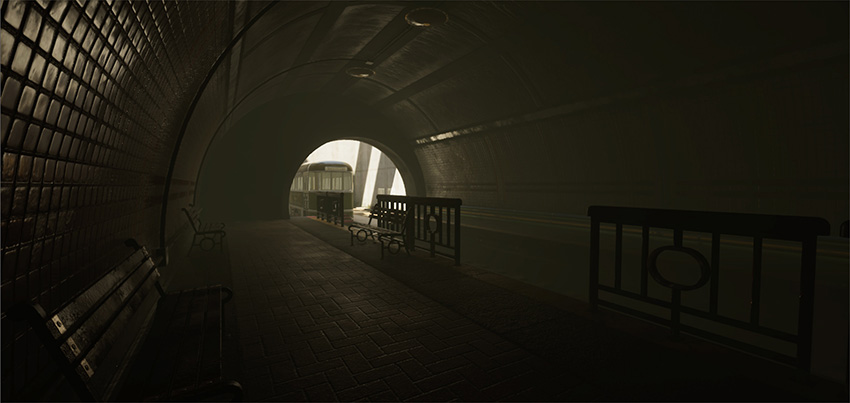
With fog added, the foreground railing is defined better compared to the zero fog Scene above.
To enable fog, open the Lighting window and go to Scene > Other Settings > Fog. In the provided Scene, FogA post-processing effect that overlays a color onto objects depending on the distance from the camera. Use this to simulate fog or mist in outdoor environments, or to hide clipping of objects near the camera’s far clip plane. More info
See in Glossary is set to use Color #6D6B4EFF, and it’s in Exponential mode with Density set to 0.025. In deferred rendering, you might need to enable fog in the post-processing profile if it is not activated automatically.
- 2018–08–21 Page published
- Making believable visuals Best Practice Guide added in Unity 2017.3
Copyright © 2023 Unity Technologies
优美缔软件(上海)有限公司 版权所有
"Unity"、Unity 徽标及其他 Unity 商标是 Unity Technologies 或其附属机构在美国及其他地区的商标或注册商标。其他名称或品牌是其各自所有者的商标。
公安部备案号:
31010902002961