Creating a Tile Palette for an Isometric Tilemap
To create a Tile Palette for painting an Isometric TilemapA GameObject that allows you to quickly create 2D levels using tiles and a grid overlay. More info
See in Glossary:
-
Open the Tile Palette window (menu: Window > 2D > Tile Palette):
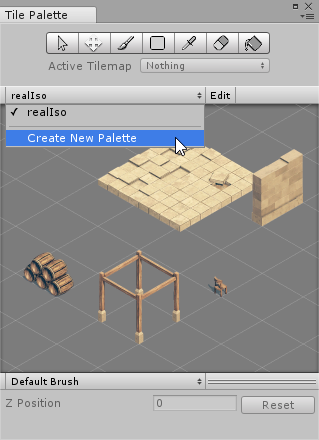
Select the Create New Palette to open its drop-down menu.
Set the Grid type to the same layout as the Isometric or Isometric Z As Y Tilemap you are painting.
-
Set Cell Size is to Manual. Leave X and Z at their default values, but set Y to the same value as the Y value of the Tilemap’s Cell Size. This value depends on the projection type of the Tilemap. Refer to the Creating an Isometric Tilemap page for more details.

-
Select Create to finalize your settings and create the new Tile Palette Asset.

To make any changes to the Tile Palette, double-click the Asset in the Asset Folder to open it as a PrefabAn asset type that allows you to store a GameObject complete with components and properties. The prefab acts as a template from which you can create new object instances in the scene. More info
See in Glossary and make your changes there.
Adjusting the Tile height in the Palette
When painting Tiles on an Isometric Z as Y Tilemap, define the Z position of the Grid you are painting on by setting the Z Position value. For this type of Tilemap, the Z position value translates into an offset along the Y-axis, and Tiles painted with different Z positions appear to have different heights on the Tilemap.
The Z Position editor is at the bottom of the Tilemap Palette:

Adjust the Z Position by entering the desired value (only whole numbers). Tiles are painted on a Grid with the set Z position until the value is changed or reset. To change the value back to the default of 0, select Reset .

In the Scene viewAn interactive view into the world you are creating. You use the Scene View to select and position scenery, characters, cameras, lights, and all other types of Game Object. More info
See in Glossary, the brush preview displays both the Tile at the Cell’s original position with a Z value of 0 as a blue outline, and its painted position with the Z-as-Y offset applied is displayed with a white outline.
With the Tile brush selected, use the following shortcut keys to quickly switch to different Z positions.
| Shortcut key: | Command: |
|---|---|
| - | Increase Z position by 1 |
| = | Decrease Z position by 1 |
To remove Tiles, set the Erase Brush to the same Z position as the target Tile to be removed. The Erase Brush does not erase Tiles painted on at a different Z position to it.
- Isometric Tilemaps added in 2018.3 NewIn20183
Copyright © 2023 Unity Technologies
优美缔软件(上海)有限公司 版权所有
"Unity"、Unity 徽标及其他 Unity 商标是 Unity Technologies 或其附属机构在美国及其他地区的商标或注册商标。其他名称或品牌是其各自所有者的商标。
公安部备案号:
31010902002961