Creating a Tile Palette
Place a selection of Tiles onto Tile Palettes so that you can pick Tiles from the Palette to paint on Tilemaps. To create a Tile Palette, open the Tile Palette window by going to Window > 2D > Tile Palette. If you do not have this option, then the 2D Tilemap Editor package may not be installed. If so, download the 2D Tilemap Editor package from the Package Manager.
The Tile Palette window is empty by default. Select the New Palette drop-down menu to open a list of Tile Palettes available in the Project, or for the option to create a new Palette. Select the Create New Palette option to create a new Palette.

Select the Create New Palette option from the drop-down menu.
After selecting the option to create a new Tile Palette, the Create New Palette dialog box becomes available. It contains the different property settings and options available when creating a new Palette:

Create New Palette options.

With expanded Grid options.
Create New Palette properties
| Property | Function |
|---|---|
| Name | Provide a name for the created Tile Palette Asset. |
| Grid | Select the Grid layout the created Tile Palette will be used to paint on. |
| Rectangle | Select this if creating a Palette for the default rectangular TilemapA GameObject that allows you to quickly create 2D levels using tiles and a grid overlay. More info See in Glossary. |
| Hexagon | Select this when creating a Palette for a Hexagonal Tilemap. |
| Isometric | Select this when creating a Palette for a Isometric Tilemap. Refer to Creating a Tile Palette for an Isometric Tilemap for more information. |
| Isometric Z as Y | Select this when creating a Palette for a Isometric Z as Y Tilemap. Refer to Creating a Tile Palette for an Isometric Tilemap for more information. |
| * Hexagon Type (only available when the Hexagon Grid type is selected) | Select the type of Hexagonal Tilemap that the Palette will be used to paint on. Refer to the documentation on Hexagonal Tilemaps for more information. |
| Cell Size | The size of a cell that the Tiles are painted on. |
| Automatic | The Cell Size is automatically set in Unity unitsThe unit size used in Unity projects. By default, 1 Unity unit is 1 meter. To use a different scale, set the Scale Factor in the Import Settings when importing assets. See in Glossary and based on the size of the SpriteA 2D graphic objects. If you are used to working in 3D, Sprites are essentially just standard textures but there are special techniques for combining and managing sprite textures for efficiency and convenience during development. More info See in Glossary used to create the Tile Assets. If there are multiple Tiles, the Cell Size is adjusted to match the first Tile from the bottom left of the Palette, so that it fits exactly on a cell. |
| Manual | Select this option to input custom size values. |
| Sort Mode | Determines the transparency sort mode of Renderers in the Tile Palette. |
| Default | The default transparency Sort Mode. This mode is determined by the Graphics Settings of the project. |
| Orthographic | Select this mode to sort Renderers based on the perpendicular distance from the cameraA component which creates an image of a particular viewpoint in your scene. The output is either drawn to the screen or captured as a texture. More info See in Glossary to a Renderer in the Tile Palette. |
| Perspective | Select this mode to sort Renderers based on the direct distance from the camera to a Renderer in the Tile Palette. |
| Custom Axis Sort | Select this mode to sort objects based on their distance along a custom axis. |
| Sort Axis | Set the XYZ values for the sorting axis, if the Sort Mode is set to Custom Axis Sort. |
Name the newly created Palette and select the desired settings, then select the Create button. Select the folder to save the Palette Asset file into when prompted. The newly created Palette is automatically loaded in the Tile Palette window.
![]()
A blank Tile Palette
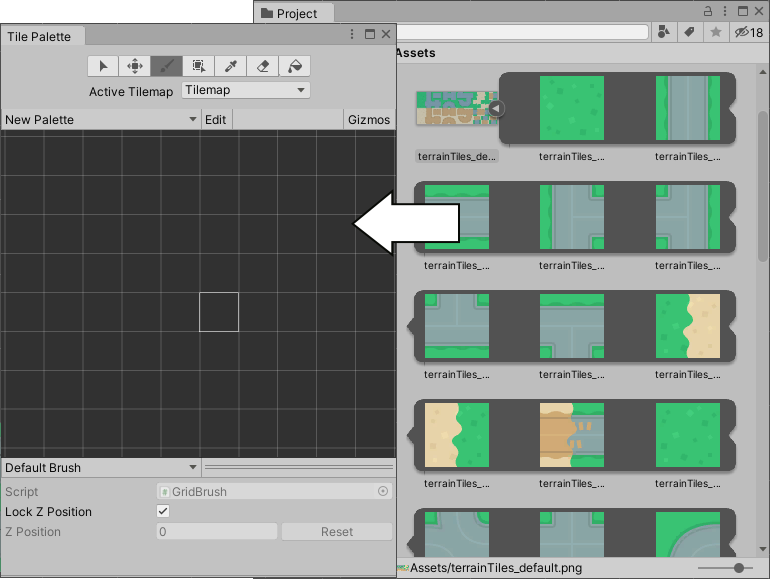
Drag and drop Textures or Sprites from the Assets folder onto the Tile Palette, and choose where to save the new Tile Assets when prompted. New Tile Assets are generated in the selected save location, and the Tiles are placed on the grid of the active Tile Palette window.
Use the following shortcuts and actions to navigate the Palette window and began picking Tiles to paint on the Tilemap in the Editor window.
| Shortcut/Action | Function |
|---|---|
| Click on a Tile | Selects the Tile |
| Select and drag the mouse over multiple Tiles | Selects multiple Tiles |
| Alt + Left button and drag | Pan |
| Click the wheel button and drag | Pan |
| Rotate the wheel button | Zoom in/out |
Active Brush inspector
The Active Brush inspectorA Unity window that displays information about the currently selected GameObject, asset or project settings, allowing you to inspect and edit the values. More info
See in Glossary is at the bottom of the Tile Palette window. You can use it to change the current active Brush and its properties. This is minimized by default. To expand it, drag the bottom toolbarA row of buttons and basic controls at the top of the Unity Editor that allows you to interact with the Editor in various ways (e.g. scaling, translation). More info
See in Glossary upwards.

Brush drop-down menu highlighted.
Use the Brush drop-down menu to change the active Brush from the ‘Default Brush’ to other Brushes, such as Scriptable Brushes.
| Property | Function |
|---|---|
| Script | Displays the currently assigned script Asset that provides a fixed set of APIs for Tilemap painting. The default is the GridBrush. Users may use or create their own Scriptable Brushes which become available from the drop-down menu. The Script property updates to reflect the current active Brush. |
| Flood Fill Contiguous Only | Enable this property to have the Flood Fill tool only affect Tiles on a Tilemap which are both the same as the targeted Tile and are contiguous to each other from the targeted position. When disabled, Flood Fill will change all Tiles which are the same as the targeted Tile on a Tilemap regardless of their position. This only affects the Default Brush. |
| Lock Z Position | Enable this property to change the z-position of the active Brush. Disable to prevent any changes to the current z-position of the active Brush. |
| Z Position | Only available when Can Change Z Position is enabled. Enter the desired z-axis value (only whole numbers) for this Brush when painting Tiles, which also adjusts the relative heights of Tiles on a Z as Y Isometric Tilemap . Refer to Adjusting the Tile height in the Palette for more information. |
Editing the Tile Palette
The tools for picking and painting with Tiles can also be used to edit the Tile Palette directly, allowing you to move and manipulate the Tiles currently placed on the Tile Palette. Select the Palette you want to edit from the ‘Palette’ drop-down menu, then click Edit to unlock the Palette for editing.

Refer to the documentation on Painting on Tilemaps for the shortcuts and functions of the Palette tools which are available for editing the Palette as well.
Creating Palette Assets from existing Grid Prefabs
You can convert an existing PrefabAn asset type that allows you to store a GameObject complete with components and properties. The prefab acts as a template from which you can create new object instances in the scene. More info
See in Glossary to a Palette Asset, so that you can use it in the Tile Palette window. To do this, the Prefab must not already be a Palette Asset, and it must have a Grid component on its topmost GameObjectThe fundamental object in Unity scenes, which can represent characters, props, scenery, cameras, waypoints, and more. A GameObject’s functionality is defined by the Components attached to it. More info
See in Glossary.
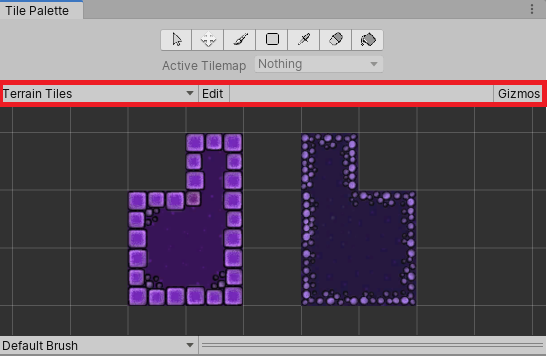
To convert a Prefab, drag and drop it onto the Tile Palette toolbar (highlighted in the image above). The Editor automatically converts it to a Palette Asset, and adds a Grid Palette Asset. The new Palette Asset has the same name as its source, and you can select it from the Palette drop-down menu.
Tile Palette Gizmos

The Tile Palette can display icons (GizmosA graphic overlay associated with a GameObject in a Scene, and displayed in the Scene View. Built-in scene tools such as the move tool are Gizmos, and you can create custom Gizmos using textures or scripting. Some Gizmos are only drawn when the GameObject is selected, while other Gizmos are drawn by the Editor regardless of which GameObjects are selected. More info
See in Glossary) over the current Palette Asset, to help you visualize specific criteria. For example, you can add a Gizmo that displays a special icon for Tiles that contain no Sprites.
To display the default Unity and the Palette Asset’s Gizmos on the Tile Palette, enable the Gizmos toggle (highlighted in the image above). The Tile Palette immediately displays any component with MonoBehaviour.OnDrawGizmos() in the Palette Asset.
To add a component with DrawGizmo to the Palette Asset:
Select the Palette Asset in the Project windowA window that shows the contents of your
Assetsfolder (Project tab) More info
See in Glossary.Open the Palette Asset in Prefab Mode.
Add the component while in Prefab Mode.
Save the Asset while in Prefab Mode.
Exit Prefab Mode.
Tile Palette contextual menu

Right-click on the Tile Palette toolbar to bring up a contextual menu listing several actions you can use to select and locate objects that the Tile Palette interacts with. The available actions are listed below:
| Action | Function |
|---|---|
| Select Paint Target | Selects the GameObject in the Hierarchy window that is the current Active Tilemap in the Tile Palette. |
| Select Palette Prefab | Selects the Palette Prefab Asset in the Project window that is currently active in the Tile Palette. |
| Select Tile Asset | Selects the currently selected Tile Asset in the Project window. |
| Unlock/Lock Palette Editing | Unlocks or locks the Tile Palette for editing. |
Copyright © 2023 Unity Technologies
优美缔软件(上海)有限公司 版权所有
"Unity"、Unity 徽标及其他 Unity 商标是 Unity Technologies 或其附属机构在美国及其他地区的商标或注册商标。其他名称或品牌是其各自所有者的商标。
公安部备案号:
31010902002961