Distributing your game with UDP
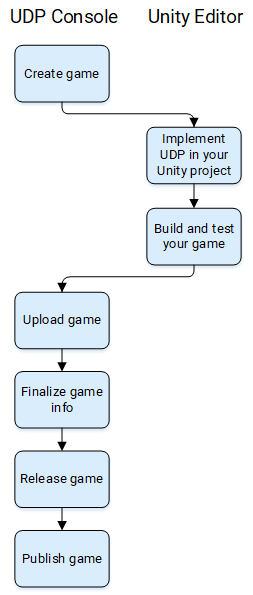
The steps below show the overall process to publish a game to app stores via UDP.
-
Creating a game in the UDP console.
- Entering your game info on the UDP console.
- Defining supported languages.
-
Implement UDP in your Unity project.
- Install the package.
- Link your project to the UDP client.
- Initialize the UDP SDK.
- Implement IAP (if applicable).
- Implement LicenceCheck for premium games (optional).
- Build and test your game
- Upload your game APK to the UDP console.
- Finalize the game information page in the UDP console.
- Verify testing was successful.
- Upload your app signing private key.
- Set a premium price (if applicable).
- Localize your game information for additional languages (if applicable).
- Release your game on UDP.
- Publish your game to stores.
The image below illustrates the overall workflow.

Creating a game in the UDP console
To create a new game in the UDP console:
- In the My Games tab, select Add Game.
- Add a title for your game and select Create New Game.
The Game Info page opens. - Select Save.
This is the minimum required to create a new game in the UDP console. The next step is to enter your game information.
When you create a new game in the UDP console it generates a UDP client and UDP client ID. You must link the UDP client to your game in the Unity Editor.
Entering game information on the UDP console
To edit your game information on the UDP console:
- In the My games tab, select your game’s card.
- In the Game Info page, select EDIT INFO to enter edit mode.
- Update your game information. Learn more about the requirements for the Game Info page.
To help complete this information, you can also import metadata from Google Play.
- Update your game information. Learn more about the requirements for the Game Info page.
- To save changes select SAVE. To discard your changes, select CANCEL.
If you intend to provide descriptions for your game in multiple languages, add your supported languages in the UDP console. Otherwise, implement UDP in your project.
Adding supported languages
When you add a language in the Game Info page, it copies the information from the default version. Therefore, to reduce duplication of work, add as much information as possible in the default version before you add more languages. To add languages:
- In the Game Info page, select EDIT INFO.
- In the language dropdown, select Manage languages.
- Select the languages you wish to support and select Save.
- In the Game Info page, select Save.
If you will use the bulk import feature to import IAP products, including descriptions in multiple languages, you should first add the languages in the UDP Console. Otherwise, the IAP descriptions would not be imported for those languages.
Implementing UDP in your project
Follow the steps to get started with the UDP package. This includes:
- Install the UDP package.
- Link your project to an existing UDP client ID.
- Initialize the SDK.
- If applicable, implement code in your game for:
- IAP
- Premium games