Filling in the package details
When you create a package draft, the Create new package window appears, containing several sections where you can fill out information about your package. These sections are also available every time you edit your package draft, but you must complete all required sections before submitting your package for approval.
The topics on this page provide instructions on how to fill out these sections:
Package Detail
The Package Detail section lets you set the version (with description), category, and price for your package.
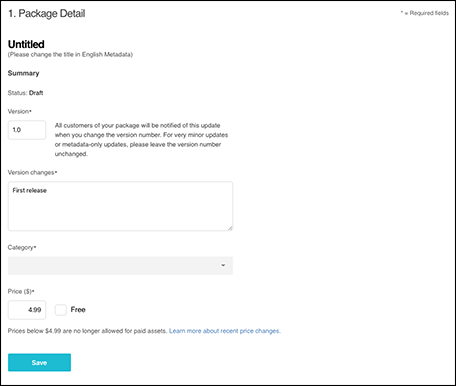
Note: Although the package title appears in the Package Detail section, you can only change it in the Metadata section.
| Information: | Description: |
|---|---|
| Status | Current status of the package (including Draft, Published, Declined, and Pending). |
| Version | The version number for your package (such as 1.5, 1.6, 1.7). New Asset Store packages should use the default version 1.0. When you release updates for your Assets, you can increment the version number here. For example, if you need to fix a bug, change the minor version number (1.3 to 1.4). If you introduce a big change, change the major version (1.3 to 2.0). |
| Version Changes | Describe any updates that triggered a version change, such as bug fixes, new Assets, or changes to match a new version of Unity. |
| Category | Choose a category that best fits your package, because when customers look for Assets on the Asset StoreA growing library of free and commercial assets created by Unity and members of the community. Offers a wide variety of assets, from textures, models and animations to whole project examples, tutorials and Editor extensions. More info See in Glossary, they can filter the list of packages by the category that you choose. If you’re not sure which category to choose, go to the main page of the Asset Store and see what types of Assets are available in similar categories. |
| Price USD | You can set a price of $4.99 or any higher amount in US dollars. For any lower price, enable Free instead. |
When you are finished, click Save.
Metadata & Artwork
The Metadata & Artwork section lets you set the name of the package, and provide marketing images, audio, and video to add branding for your package.
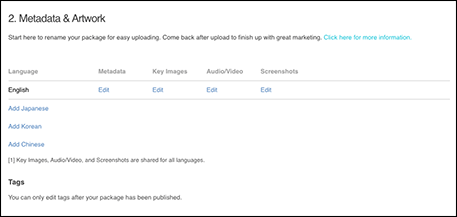
The artwork (key images, audio/video, and screenshots) are shared across all languages.
You must set an English name and description, but you can also specify a name and description in Japanese, Korean, and Chinese; to do this, click the links under the Language column. When you add a language, a new Edit link appears under the Metadata column for that language.
You can only edit Tags after your package has been accepted for publishing.
Metadata
Metadata includes the name, description, and keywords for your package: that is, anything to help customers find your package while they are browsing or searching the Asset Store.
To edit the name and description of your package:
-
In the Metadata & Artwork section, under Metadata, click the Edit button.
The Metadata page for a specific language appears:

Set the Title, Description, and Keywords on the English Metadata page Enter the Title of your package (required). The title shouldn’t begin with the word “Unity” if possible. For example, you can’t use “Unity Sculpting Tools”, but you could use “Sculpting Tools for Unity”.
-
Enter a package Description:
- If your package contains 3D Assets, include information about the polygon count, the Texture size, and which rendering pipeline is compatible.
- If your package contains scriptsA piece of code that allows you to create your own Components, trigger game events, modify Component properties over time and respond to user input in any way you like. More info
See in Glossary and tools, mention any dependencies needed for the Asset (for example, another Asset or third-party software), because you can’t add them to the Asset Store package and the user needs to import them separately.
You can decorate this text with any of the following HTML tags:
-
EM (for italics). For example:
This is for <EM>italicized</EM> text. -
STRONG (for bold). For example:
This is for <STRONG>bold</STRONG> text. -
A (for hyperlinks). For example:
This links <A HREF="http://www.example.com">here</A>. -
P (to define a paragraph). For example:
<P>This is a new paragraph</P>. -
BR (for a line break). For example:
This is the first line.</BR>This text appears on the next line.
You can optionally add a list of Keywords separated by whitespace to influence your Asset’s results in Asset Store searches. There is a limit of 255 characters.
Click Save when you are finished and then click OK when the dialog box appears.
To return to the Package window, click Go Back.
Key image
Key images should indicate what your Asset Store package does and help it stand out. You can set four different resolutions so that your key images appear as icons or thumbnails when customers browse or filter the list of packages available in the Asset Store, and as larger images on the main product page or on social media. These also might appear in promotional material.
Here are some general requirements for the images you upload in this section:
- The images cannot contain the following:
- The images must not be blurry, stretched, or cropped.
- The images cannot only be screenshots of the Unity Editor.
- You should make different designs for images of different sizes so that the objects or visuals in the icon and card images are legible and separate.
This table describes the different images, where they might appear on the Asset Store and specific requirements for each:
| Key Image Type: | Size (in pixels): | Description: |
|---|---|---|
| Icon | 160 x 160 | The Icon image is visible while users are browsing the Asset Store using the icon grid layout. This image should not contain text. Note: Icon images must be 160x160, even though the actual display size is 80x80. At 80x80, image text is not readable, but uploading the larger size lets the Asset Store display icons clearly at the smaller size. |
| Card | 420 x 280 | This is the main thumbnail visible on your Home page and the default view while browsing the Asset Store. This image can have only the following text: - Title of the Asset - Logo or name of the publisher Note: Like icon images, Card images must be uploaded at a larger size (420x280) than the size of image that ultimately appears on the Asset Store. |
| Cover | 1950 x 1300 | This is what customers see on the main product page for your package. This image can have only the following text: - Title of the Asset - Logo or name of the publisher - A tag line Note: Like icon images, images must be uploaded at a larger size (1950x1300) than the size of image that ultimately appears on the Asset Store. |
| Social Media | 1200 x 630 | The Unity community team might post these images to social media, or on the Asset Store home page. This image should not contain text. |
For more information, see the Asset Store FAQ.
To set one or more key images:
-
In the Metadata & Artwork section, under the Key Images column, click the Edit button.
The Key Images page appears:
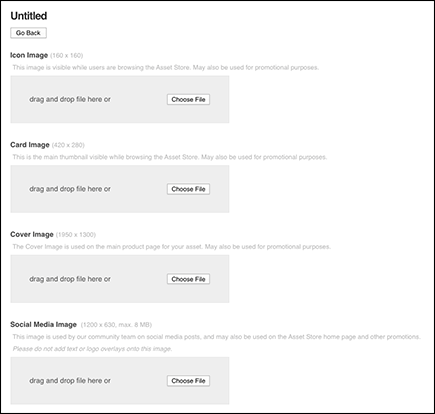
Set the Icon, Care, Cover, and Social Media images on the Key Images page -
To upload an image, click Choose File or drag and drop the image onto the gray box.
Note: The image must be the exact size as indicated.
The uploaded image appears with a Remove button under it, which you can click if you need to remove that image.
To return to the Package window, click Go Back.
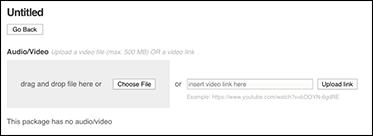
Audio/Video
You can upload audio or video files that demonstrate what your Asset Store package does or contains. These are available on your main product page (as thumbnails you can click on to play).
Note: If your package contains audio or video files, you must upload samples of your media Assets here. If your package contains tools, scripting, or other technical Assets, include a video tutorial explaining the setup process, and give an overview of your Asset’s functionality. If your package contains animations, include a video of all the available animations.
You can embed uploaded files in the show reel with the screenshots of your package. Audio and video files can come from either your local computer or device, or you can specify links to any of these services:
To set one or more key images:
-
In the Metadata & Artwork section, under the Audio/Video column, click the Edit button.
The Audio/Video page appears:
Add audio or video files or a link to online media on the Audio/Video page -
You can upload audio or video files using any of these methods:
- Drag-and-drop the file onto the gray box.
- Click Choose File to select the file from a file browser.
- Enter a link to an online file in the text box and click Upload link.
The uploaded image appears with a Remove button under it.
To return to the Package window, click Go Back.
Screenshots
You can upload screenshots of your package’s Assets in action. These are available on your main product page (as thumbnails you can click on to enlarge).
Screenshots are just as important as key images when trying to sell your package. Screenshots showcase your package, showing users how it works and what it can do. Users often use screenshots as a kind of package preview before they actually buy it. Asset Store curators prefer having screenshots for most Assets. For example, if it’s a Model, add images that display the Asset from different perspectives, both fully textured and in wireframe.
To set one or more screenshots:
-
Click the Edit button under the Screenshots section.
The Screenshots page appears:
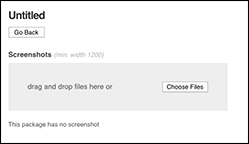
Add screenshots from your package on the Screenshots page -
You can upload one or more screenshots using either of these methods:
- Drag-and-drop the file onto the gray box.
- Click Choose File to select the file from a file browser.
The uploaded image appears with a red X icon (to remove it) under it.
To return to the Package window, click Go Back.
Package upload
The Package upload section lets you launch Unity directly after having created a package draft or editing package draft details.
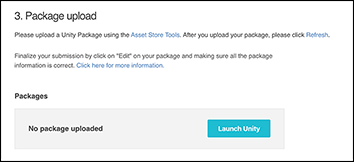
When you click the Launch Unity button, your Project appears in the Unity Editor if Unity is already open. If not, the Hub opens, allowing you to choose which Project to open.
If you have already uploaded Assets to your package draft, they appear in this section with the Remove and Edit buttons:
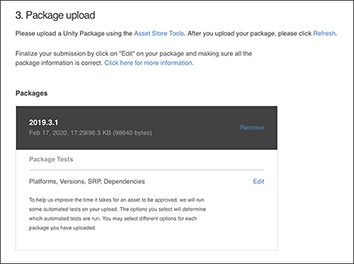
If you want to clear the Assets from your package, click the Remove button.
Before submitting the package for approval, click the Edit button.
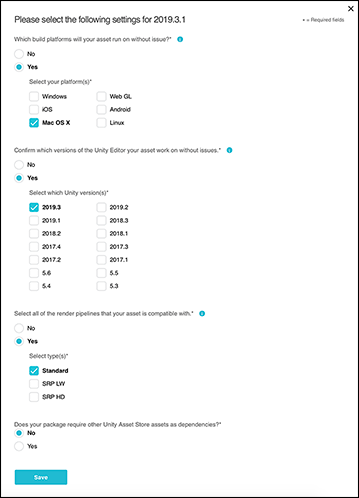
For each section, select Yes to display a question and a set of checkboxes. Then check or uncheck the options that answer the questions about your package. When you are finished, click Save to return to the Package upload section.
For more information about adding and uploading Assets into your package draft, see Uploading Assets to your package.
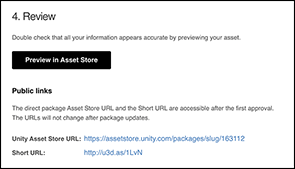
Review
Under the Review section, click Preview in Asset Store to see how your package will look in the Asset Store after publishing it. You can also see a preview of the URLs under Public links:
Submit package for approval
Under the Submit package for approval section, click Auto publish to indicate whether you want the package to appear in the Asset Store directly after Unity approval.
You also have to confirm whether you own the rights to sell the Assets.
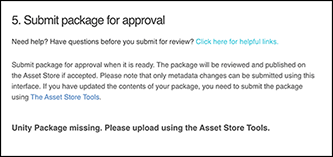
For detailed instructions, see Submitting your package for approval.
Copyright © 2023 Unity Technologies
优美缔软件(上海)有限公司 版权所有
"Unity"、Unity 徽标及其他 Unity 商标是 Unity Technologies 或其附属机构在美国及其他地区的商标或注册商标。其他名称或品牌是其各自所有者的商标。
公安部备案号:
31010902002961