Root Motion - how it works
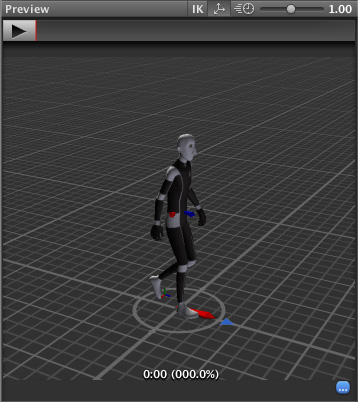
Body Transform
The Body Transform is the mass center of the character. It is used in Mecanim’s retargetingApplying animations created for one model to another. More info
See in Glossary engine and provides the most stable displacement model. The Body Orientation is an average of the lower and upper body orientation relative to the AvatarAn interface for retargeting animation from one rig to another. More info
See in Glossary T-PoseThe pose in which the character has their arms straight out to the sides, forming a “T”. The required pose for the character to be in, in order to make an Avatar.
See in Glossary.
The Body Transform and Orientation are stored in the Animation ClipAnimation data that can be used for animated characters or simple animations. It is a simple “unit” piece of motion, such as (one specific instance of) “Idle”, “Walk” or “Run”. More info
See in Glossary (using the Muscle definitionsThis allows you to have more intuitive control over the character’s skeleton. When an Avatar is in place, the Animation system works in muscle space, which is more intuitive than bone space. More info
See in Glossary set up in the Avatar). They are the only world-space curves stored in the Animation Clip. Everything else: muscle curves and IK goals (Hands and Feet) are stored relative to the body transform.
Root Transform
The Root Transform is a projection on the Y plane of the Body Transform and is computed at runtime. At every frame, a change in the Root Transform is computed. This change in transform is then applied to the Game Object to make it move.
Animation Clip Inspector
The Animation Clip Editor settings - Root Transform Rotation, Root Transform Position (Y) and Root Transform Position (XZ) - let you control the Root Transform projection from the Body Transform. Depending on these settings some parts of the Body Transform may be transferred to Root Transform. For example you can decide if you want the motion Y position to be part of the Root Motion (trajectory) or part of the pose (body transform), which is known as Baked into Pose.
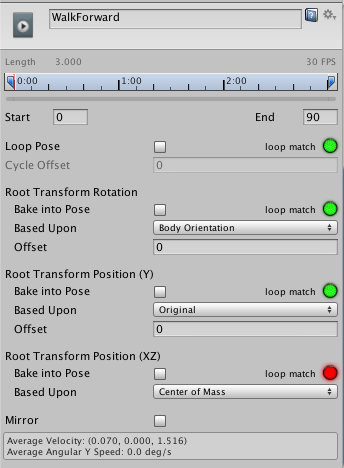
Root Transform Rotation
Bake into Pose: The orientation will stay on the body transform (or Pose). The Root Orientation will be constant and delta Orientation will be identity. This means that the Game Object will not be rotated at all by that AnimationClip.
Only AnimationClips that have similar start and stop Root Orientation should use this option. You will have a Green Light in the UI(User Interface) Allows a user to interact with your application. Unity currently supports three UI systems. More info
See in Glossary telling you that an AnimationClip is a good candidate. A suitable candidate would be a straight walk or a run.
Based Upon: This lets you set the orientation of the clip. Using Body Orientation, the clip will be oriented to follow the forward vector of body. This default setting works well for most Motion Capture (Mocap) data like walks, runs, and jumps, but it will fail with motion like strafing where the motion is perpendicular to the body’s forward vector. In those cases you can manually adjust the orientation using the Offset setting. Finally you have Original that will automatically add the authored offset found in the imported clip. It is usually used with Keyframed data to respect orientation that was set by the artist.
Offset: used to enter the offset when that option is chosen for Based Upon.
Root Transform Position (Y)
This uses the same concepts described in Root Transform Rotation.
Bake Into Pose: The Y component of the motion will stay on the Body Transform (Pose). The Y component of the Root Transform will be constant and Delta Root Position Y will be 0. This means that this clip won’t change the Game Object Height. Again you have a Green Light telling you that a clip is a good candidate for baking Y motion into pose.
Most of the AnimationClips will enable this setting. Only clips that will change the GameObjectThe fundamental object in Unity scenes, which can represent characters, props, scenery, cameras, waypoints, and more. A GameObject’s functionality is defined by the Components attached to it. More info
See in Glossary height should have this turned off, like jump up or down.
Note: the Animator.gravityWeight is driven by Bake Into Pose position Y. When enabled, gravityWeight = 1, when disabled = 0. gravityWeight is blended for clips when transitioning between states.
Based Upon: In a similar way to Root Transform Rotation you can choose from Original or Mass Center (Body). There is also a Feet option that is very convenient for AnimationClips that change height (Bake Into Pose disabled). When using Feet the Root Transform Position Y will match the lowest foot Y for all frames. Thus the blending point always remains around the feet which prevents floating problem when blending or transitioning.
Offset: In a similar way to Root Transform Rotation, you can manually adjust the AnimationClip height using the Offset setting.
Root Transform Position (XZ)
Again, this uses same concepts described in Root Transform Rotation and Root Motion Position (Y).
Bake Into Pose will usually be used for “Idles” where you want to force the delta Position (XZ) to be 0. It will stop the accumulation of small deltas drifting after many evaluations. It can also be used for a Keyframed clip with Based Upon Original to force an authored position that was set by the artist.
Loop Pose
Loop Pose (like Pose Blending in Blend Trees or Transitions) happens in the referential of Root Transform. Once the Root Transform is computed, the Pose becomes relative to it. The relative Pose difference between Start and Stop frame is computed and distributed over the range of the clip from 0–100%.
Generic Root Motion and Loop Pose
This works in essentially the same as Humanoid Root Motion, but instead of using the Body Transform to compute/project a Root Transform, the transform set in Root NodeA transform in an animation hierarchy that allows Unity to establish consistency between Animation clips for a generic model. It also enables Unity to properly blend between Animations that have not been authored “in place” (that is, where the whole Model moves its world position while animating). More info
See in Glossary is used. The Pose (all the bones which transform below the Root Motion bone) is made relative to the Root Transform.
Copyright © 2023 Unity Technologies
优美缔软件(上海)有限公司 版权所有
"Unity"、Unity 徽标及其他 Unity 商标是 Unity Technologies 或其附属机构在美国及其他地区的商标或注册商标。其他名称或品牌是其各自所有者的商标。
公安部备案号:
31010902002961