Creating models for animation
This page contains guidance on creating a model for use with Unity’s Animation System.
For general best practice guidance on creating all types of models, see Creating models for optimal performance. For information on importing a model with animations into Unity, see Importing a model with humanoid animations or Importing a model with non-humanoid (generic) animations.
There are two types of models that you can use with Unity’s Animation System:
- A Humanoid model is a specific structure, containing at least 15 bones organized in a way that loosely conforms to an actual human skeleton.
- A Generic model is everything else. This might be anything from a teakettle to a dragon.
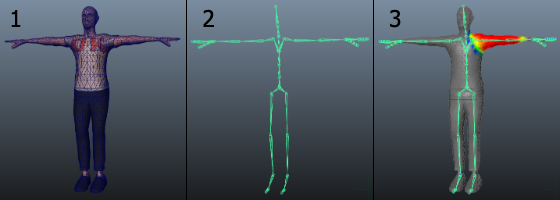
Both require a rigged, skinned model. The stages of creating such a model are:
-
Modeling: Creating the model. The model contains the meshThe main graphics primitive of Unity. Meshes make up a large part of your 3D worlds. Unity supports triangulated or Quadrangulated polygon meshes. Nurbs, Nurms, Subdiv surfaces must be converted to polygons. More info
See in Glossary, textures, and so on. -
Rigging: Creating the skeleton, also called the rig or jointA physics component allowing a dynamic connection between Rigidbody components, usually allowing some degree of movement such as a hinge. More info
See in Glossary hierarchy. This defines the bones inside the mesh, and their movement in relation to one another. - Skinning: Joining the mesh to the skeleton. This defines which parts of the character mesh move when a given joint is animated.
You usually perform all of these steps in 3D modeling software (such as Autodesk® 3ds Max®, Autodesk® Maya®, or Blender), export the resulting model, and import it into Unity.
Modeling
There are a few guidelines you can follow to ensure a model works well with animation in a Unity Project:
- Use a topology with a well-formed structure. Generally, you should consider how the vertices and triangles of the model distort as it animates. A good topology allows the model to move without distorting the mesh. Study existing character meshes to see how the topology is arranged and why.
- Check the scale of your mesh. Do a test import and compare the size of your imported Model with a “meter cube”. The standard Unity cube primitive has a side length of one unit, so it can be taken as a 1m cube for most purposes. Check the units your 3D modeling software uses and adjust the export settings so that the size of the Model is in correct proportion to the cube.
- While you are building, clean up your model. Where possible, cap holes, weld vertices, and remove hidden faces. This helps with skinning, especially automated skinning processes.
- If your character has feet, arrange the mesh so that they stand on the local origin or “anchor point” of the model. It makes walking much easier to handle if a character’s anchor point (that is, its transform position) is directly on the floor.
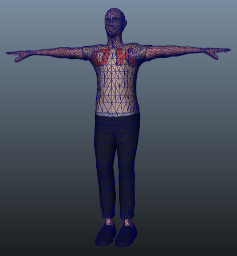
- If your character is a biped, model in a T-poseThe pose in which the character has their arms straight out to the sides, forming a “T”. The required pose for the character to be in, in order to make an Avatar.
See in Glossary. This gives you space to refine polygon detail where you need it (such as the underarms). This also makes it easier to position your rig inside the Mesh.
Rigging
3D modeling software provides a number of ways to create joints for your rig.
For a Humanoid model, there are specific requirements for the skeleton so that Unity can match it to a Humanoid Avatar:
- A minimum of 15 bones. Your skeleton needs to have at least the required bones in place.
- In order to improve your chances for finding a match to the AvatarAn interface for retargeting animation from one rig to another. More info
See in Glossary, name your bones in a way that reflects the body parts they represent. For example, “LeftArm” and “RightForearm” make it clear what these bones control. - The joint/bone hierachy should follow a natural structure for the character you are creating. Given that arms and legs come in pairs, you should use a consistent convention for naming them (for example, “arm_L” for the left arm, “arm_R” for the right arm). Possible structures for the hierarchy include:
- HIPS - spine - chest - shoulders - arm - forearm - hand
- HIPS - spine - chest - neck - head
- HIPS - UpLeg - Leg - foot - toe - toe_end

For a Generic model, the only requirement is that the skeleton contains a bone that you can designate as the Root nodeA transform in an animation hierarchy that allows Unity to establish consistency between Animation clips for a generic model. It also enables Unity to properly blend between Animations that have not been authored “in place” (that is, where the whole Model moves its world position while animating). More info
See in Glossary when you import the model. This effectively defines the model’s center of massRepresents the average position of all mass in a Rigidbody for the purposes of physics calculations. By default it is computed from all colliders belonging to the Rigidbody, but can be modified via script. More info
See in Glossary.
Skinning
The initial setup is typically automated. Skinning usually requires a fair amount of work and testing with animations in order to ensure satisfactory results for the skin deformation.

Some general guidelines for this process include:
- Use an automated process initially to set up some of the skinning (see the skinning tutorials available for your 3D modeling software).
- Create a simple animation for your rig or import some animation data to act as a test for the skinning. This should give you a quick way to evaluate whether or not the skinning looks good in motion.
- Incrementally edit and refine your skinning solution.
- For performance reasons, consider limiting the number of influences when using a soft bind to a maximum of four. This is the maximum number that Unity supports by default. If your Mesh uses more than four influences, you can choose either of these options:
- Increase the maximum number of influences using the Skin Weights property.
- Bake the deformation joints before exporting your Model from Maya, using the Bake Deformer tool (from Maya’s top menu: Skin > Bake Deformers to Skin Weights). For more information, see Bake deformers on a character in the Autodesk documentation.
Exporting and verifying your model
Unity imports a number of different generic and native 3D file formats, but the recommended file format is .fbx. For more information, see Model file formats.
When you use .fbx, you can:
- Export the Mesh with the skeleton hierarchy, normals, textures and animation.
- Re-import the Mesh into your 3D modeling software to verify your animated Model looks as expected.
- Export animations without the Mesh.
Copyright © 2023 Unity Technologies
优美缔软件(上海)有限公司 版权所有
"Unity"、Unity 徽标及其他 Unity 商标是 Unity Technologies 或其附属机构在美国及其他地区的商标或注册商标。其他名称或品牌是其各自所有者的商标。
公安部备案号:
31010902002961