Summary
The PSD Importer is an Asset importer that is specialized for importing Adobe Photoshop .psb files into Unity and generating a Prefab made of Sprites based on the source file. The .psb file format is functionally identical to the more common Adobe .psd format and can support much larger images than the .psd format (up to 300,000 by 300,000 pixels in size).
You can save or convert your Photoshop artwork files into the .psb format and import them into Unity with the PSD Importer. When you import .psb files with the PSD Importer, you can use features such as Mosaic to automatically generate a Sprite sheet from the imported layers; or Character Rig where Unity reassembles the Sprites of a character as they are arranged in their source files.
Non-importable Photoshop effects
The PSD Importer only supports two Texture Modes: Default and Sprite. Other Texture Modes might be supported in the future.
The following Photoshop features are not supported by the PSD Importer and it ignores the following layer effects and features while it generates Sprites:
Channels
Blend Modes
Layer Opacity
Effects
You can also add additional Textures to the Sprites with the Sprite Editor’s Secondary Textures module. Shaders can sample these Secondary Textures to apply additional effects to the Sprite, such as normal mapping. For more information, see documentation on Sprite Editor: Secondary Textures.
Inspector properties
After importing a .psb file into your Project, select the Asset file to find the following properties in its Inspector window.
Texture Type - Default
This is the default Texture Type that Unity uses when you import an image without a specific Texture Type selected. For more information, refer to the documentation on Texture Types.
Texture Type - Sprite (2D and UI)
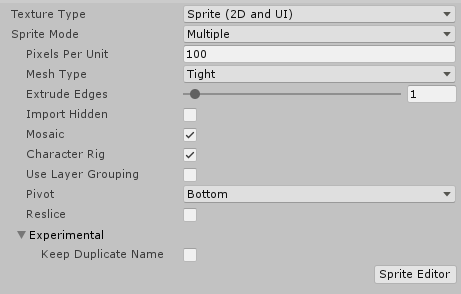
Importer Inspector properties
Set the Texture Type to Sprite (2D and UI) when you want to import a .psb file with character graphics on multiple layers. The following property settings are available:
| Property | Function |
|---|---|
| Texture Type | Select Sprite (2D and UI) to import the Texture as a Sprite. This is required to begin using the imported images with the 2D Animation package. |
| Sprite Mode | Use this property to specify how Unity extracts the Sprite graphic from the image. The default option is Multiple. |
| Single | Choose this option if the imported image contains a single element. |
| Multiple | This is the default option. Choose this option if the imported image contains multiple elements. Choose this option when importing artwork meant for animation with the 2D Animation package. |
| Pixels Per Unit | The number of pixels that equal to one Unity unit. |
| Mesh Type | This defines the Mesh type that Unity generates for the Sprite. This is set to Tight by default. |
| Full Rect | Unity maps the Sprite onto a rectangular Mesh. |
| Tight | Unity generates a Mesh based on the outline of the Sprite. If the Sprite is smaller than 32 x 32 pixels, Unity always maps it onto a Full Rect quad Mesh, even if you select Tight. |
| Extrude Edges | Use the slider to determine how much to extend the Mesh from the edge of the Sprite. |
| Import Hidden | Enable this property to include the hidden layers of the .psb file in the import. This produces the same import result as making all layers visible in the source file unhiding all layers in the source file before you importing it into Unity. Clear this option if you want to only import the visible layers in the .psb file. |
| Mosaic | This setting is only available if you set the Texture Type to Multiple. Enable this setting to make the PSD Importer generate Sprites from the imported layers and combine them into a single Texture in a Sprite sheet layout. |
| Character Rig | Enable this property to make the importer generate a Prefab based on the imported source file. The PSD Importer generates Sprites from the imported layers of the source file, and the Sprites’ hierarchy and positions are based on their layer hierarchy and their positions in the .psb file. |
| Use Layer Grouping | This setting is only available when you enable Character Rig. Enable this setting to make the importer generate a Prefab that follows the layer and grouping hierarchy of the imported .psb. file. |
| Pivot | Choose the pivot point of the Sprite. |
| Custom | Define the X and Y coordinates of a custom Pivot location. |
| Reslice | Available only when you enable Mosaic. Enable this setting to regenerate the Sprite from the imported layers and clear any changes you have made to the Sprite and its metadata. |
| Experimental | The following feature is experimental and might be changed or removed in the future. It is only available for the following Editor and package versions: - Unity 2019.2: 2D PSD Importer version 1.2.0-preview.4 or newer. - Unity 2019.3: 2D PSD Importer version 2.0.5 or newer. |
| Keep Duplicate Name | Enable this setting to make the PSD Importer generate Sprites from the source files with the exact same name as their source layers, even when there are multiple layers with the same name. |
Property details
Character Rig
The Character Rig setting makes the PSD Importer generate a Prefab that contains Sprites it generates from each layer of the imported source file. The PSD Importer automatically gives the Sprites an Order in Layer value that sorts them according to the layer hierarchy in the source file. This ensures that Unity recreates the character artwork in the correct order in the Prefab.
The name of each Sprite in the Prefab is the same as their respective source layer, unless a name collision error occurs, which is usually due to duplicate names in the source layers.
If the Sprite contains bone or weight data, the PSD Importer automatically adds the Sprite Skin component to it. This happens if the Sprite has been rigged with bones and weights in the Skinning Editor already and the source file is being reimported, or you have manually copied and pasted the bone and weight data onto the Sprites.
Refer to the examples below of a character designed in Photoshop with its various parts and limbs separated onto different layers.
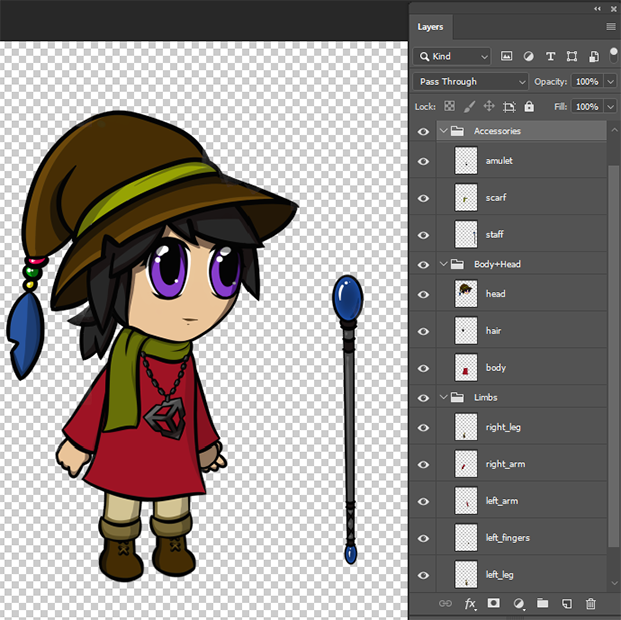
Character artwork in Photoshop with different parts separated into different Photoshop layers.
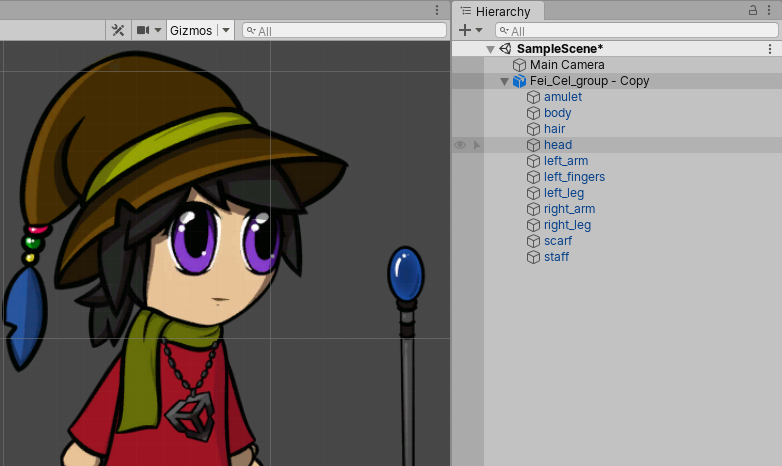
The generated Prefab with Sprites sorted according to the source file’s layer hierarchy.
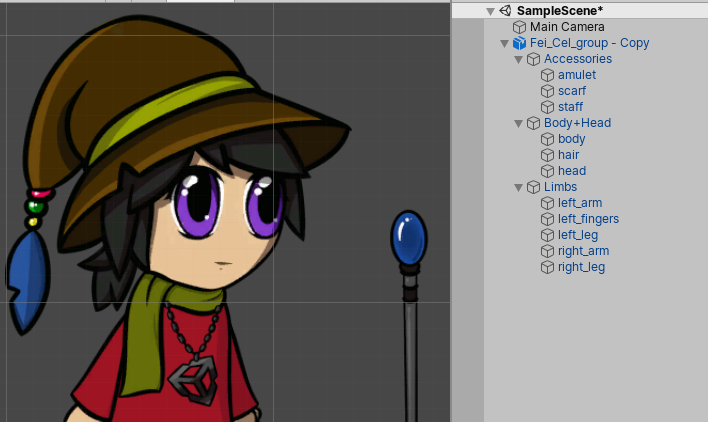
The Prefab with the Layer Grouping setting enabled.
Reslice
Enable this setting to discard all user modifications for the current set of SpriteRect data and regenerate all SpriteRects based on the current source file. Extra SpriteRect metadata (such as weights and bones data) persist if they remain valid with the regenerated SpriteRects.
How the PSD Importer uses SpriteRect data
The PSD Importer can store four separate sets of SpriteRect data, with a set for each of the four combinations of importer property settings below:
Sprite Mode set to Single.
Sprite Mode set to Multiple.
Sprite Mode set to Multiple, and Mosaic enabled.
Sprite Mode set to Multiple, and both Mosaic and Character Rig enabled.
Each set of data is persistent, and does not affect or overwrite the data of other sets. This means you can save different SpriteRect data for different importer settings for the same source file. The SpriteRect data persists even if you modify the dimensions and position of images in the source file, as long as the original Layer ID of the source layers remain the same.
Modifying the SpriteRect data
The SpriteRect defines the location of the Sprite on the Texture that Unity generates from the imported source file. You can modify the location and size of each SpriteRect in the Sprite Editor.
![]()
Original SpriteRect location of the ‘head’ Sprite on the combined Sprite sheet Texture.
![]()
Drag the corners of the SpriteRect to modify its dimensions and location, or enter the coordinates and dimensions in the Sprite panel.
A SpriteRect’s modified dimensions and location on the Texture is reflected for its respective Sprite in the Scene view.
| Original character prefab and its ‘head’ Sprite with unmodified SpriteRect data. | Character prefab with its ‘head’ Sprite’s SpriteRect data modified. |
When you enable the Mosaic importer setting, the PSD Importer arranges the different layers of the source file together to form a single combined Texture when you import it. The importer generates a SpriteRect for each of these imported layers, and follows the position of its associated layer wherever it is placed in the Mosaic Texture.
![]()
The SpriteRect of the ‘head’ layer. The SpriteRect has been moved from its original position.
![]()
The source file reimported after hiding several layers. The SpriteRect follows the ‘head’ layer’s placement in the new Texture.
However, a SpriteRect’s size and position remains the same if you change the image or canvas size of its source layer in the source file. You must manually edit the size and position of the SpriteRect in the Sprite Editor, or select and apply the Reslice option to regenerate it from the source file.
![]()
Original position and size of the SpriteRect for the generated ‘head’ Sprite.
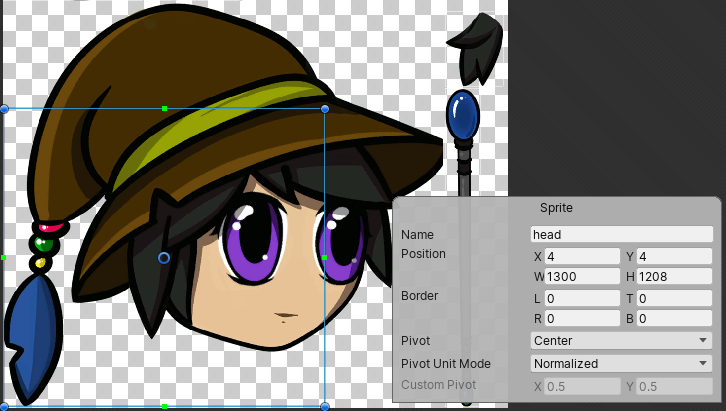
Position and size of the SpriteRect remains the same after increasing the image size of its source layer.
SpriteRect data persists until you manually delete the SpriteRect, or select the Reslice option and apply it in the importer settings. When you do this, Unity discards all user modifications for the current set of SpriteRect data and regenerates all the SpriteRects from the current source file.
Summary of source file modifications and their effects on SpriteRect data
| Modification to the source file | Effect on SpriteRect data |
|---|---|
| New layer added /layer visibility turned on | The PSD importer automatically generates a new Sprite from the new layer, or newly visible layer, with its associated SpriteRect. |
| Layer deleted /layer visibility turned off | The Sprite and SpriteRect that the PSD Importer generated from the deleted or previously visible layer are also deleted from the Project file. |
| Layer is renamed | By default, the SpriteRect copies the new name of its source layer. However if you rename the SpriteRect in the Sprite Editor, then it retains its modified name and does not copy the source layer’s new name. |
| Layer or canvas size changed | When a source layer is resized, the size and position of its related SpriteRect remains the same and does not reflect the changes made to its source layer. To make the SpriteRect reflect the changes made to its source layer, manually edit the SpriteRect’s dimensions in the Sprite Editor or select and apply the Reslice option in the PSD Importer settings. |
Name collision errors
A name collision error can happen due to the following :
Two or more layers in the imported source file have the same name. However, Photoshop group layers with the same names do not cause this issue.
A new layer that the PSD Importer creates in the source file has the same name as a SpriteRect you have created or modified.
A layer is renamed to the same name as a SpriteRect you have modified.
A previously hidden layer is made visible and imported, and it has the same name as an existing SpriteRect.
When a name collision occurs, one SpriteRect retains the original name while the other is appended with a running number. Which SpriteRect retains their original name is based on the following priority:
A SpriteRect you have created or modified.
The first layer in the source file, starting from the bottom of the layer stack.
Currently existing SpriteRects in the Project.
Experimental feature: Keep duplicate names
Unity’s default import behavior when there are duplicate names is to append "_[number]" to Sprites and SpriteRects it generates from source layers with identical names. Enable this experimental feature to instead have Unity give both Sprites/SpriteRects the exact same name as their source layer even if they have duplicate names.
PSD File Importer Override
It is possible to use PSDImporter to import files with 'psd' extensions. The following are the sample scripts that you can use.
PSDImporterOverride.cs
using UnityEngine;

namespace UnityEditor.U2D.PSD
{
    [AssetImporters.ScriptedImporter(1, new string[0],new[] {"psd"} )]
    internal class PSDImporterOverride : PSDImporter
    {
    }
}
PSDImporterOverrideEditor.cs
namespace UnityEditor.U2D.PSD
{
    [CustomEditor(typeof(UnityEditor.U2D.PSD.PSDImporterOverride))]
    internal class PSDImporterOverrideEditor : PSDImporterEditor
    {
    }

}
After implementing the above scripts, you will be able to switch the importer from a dropdown list in the Inspector.
