在 Unity 4 中创建 Asset Bundle
在早于 Unity 5 的 Unity 版本中,必须单独使用编辑器脚本选择资源并将其添加到 Bundle。(在 Unity 5 中,我们在编辑器中提供了工具,以方便将资源分配给特定的 Bundle)。本页面的信息适用于在 Unity 4 中处理旧版项目的用户,并假设使用的是 Unity 4。
要创建 Asset Bundle,必须使用 BuildPipeline 编辑器类。使用编辑器类的所有脚本必须放在名为 Editor 的文件夹中(可位于 Assets 文件夹内的任何位置)。以下是此类脚本的 C# 示例:
// 旧版 Unity 4 示例。不可用于 Unity 5 和更高版本
using UnityEngine;
using UnityEditor;

public class ExportAssetBundles {
    [MenuItem("Assets/Build AssetBundle")]
    static void ExportResource () {
        string path = "Assets/myAssetBundle.unity3d";
        Object[] selection = Selection.GetFiltered(typeof(Object), SelectionMode.DeepAssets);
        BuildPipeline.BuildAssetBundle(Selection.activeObject, selection, path,
                                       BuildAssetBundleOptions.CollectDependencies
                                     | BuildAssetBundleOptions.CompleteAssets);
    }
}
编辑器脚本不需要应用于游戏对象,而是由编辑器使用。前面的示例将在编辑器的“Assets”菜单中创建一个名为“Build AssetBundle”的新菜单项。
要使用此示例,请执行以下操作:
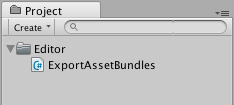
- 在 Project 视图中名为 Editor 的文件夹内创建一个名为 ExportAssetBundles.cs 的 C# 脚本文件。
- 在项目文件夹中选择要包含在 AssetBundle 中的一个或多个资源。
- 从 Assets 菜单中选择 Build AssetBundle。单击“Save”以创建 AssetBundle。
- ExportResource 函数的第一行将设置 AssetBundle 的路径。
- 下一行将需要包含在 AssetBundle 中的选定资源设置为在 Project 窗口中选择的对象。
BuildAssetBundle 函数行将创建 AssetBundle 并将其保存到指定位置。第一个参数指定 mainAsset,这是一种从 AssetBundle 加载资源时可直接使用 mainAsset 属性获取的特殊资源。设置主资源 (main Asset) 不是必须的,如果不使用这种资源,可对该参数使用 null 值。第二个参数是构成 AssetBundle 的对象数组。第三个参数指定磁盘上用于保存 AssetBundle 的位置。最后一个参数是构建 AssetBundle 时使用的构建标志或选项。这些 BuildAssetBundleOptions 可使用按位 OR 运算符加以组合。
构建 AssetBundle 应该是发布前执行的步骤,只需一次函数调用(例如使用一个构建所有 AssetBundle 的菜单项)进行一次即可。在开发应用程序时,应编写辅助脚本;通过脚本,只需单击一次或在批处理模式下无需用户干预,即可为目标平台构建所有 AssetBundle。
您可以使用三种类方法来构建 AssetBundle:
BuildPipeline.BuildAssetBundle 允许您构建任何资源类型的 AssetBundle。
当您仅希望包含进行流传输和加载的场景作为数据时,使用 BuildPipeline.BuildStreamedSceneAssetBundle。
BuildPipeline.BuildAssetBundleExplicitAssetNames 与 BuildPipeline.BuildAssetBundle 相同,但有一个额外的参数可为每个对象指定自定义字符串标识符(名称)。
如何构建 AssetBundle 的示例
构建 Asset Bundle 是通过编辑器脚本完成的。BuildPipeline.BuildAssetBundle 的脚本文档中提供了此过程的一个基本示例。
为了此示例的需要,请将以上链接中的脚本复制并粘贴到一个名为 ExportAssetBundles 的新 C# 脚本中。此脚本应放在名为 Editor 的文件夹中,以便它能在 Unity Editor 中运行。
现在,在 Assets 菜单中,应该会看到两个新的菜单选项。
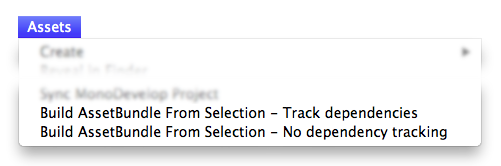
1.Build AssetBundle From Selection - Track dependencies。此选项可将当前对象构建到 Asset Bundle 中并包含其所有依赖项。例如,如果您有一个由多个层级结构层组成的预制件,则将以递归方式将所有子对象和组件添加到 Asset Bundle 中。
1.Build AssetBundle From Selection - No dependency tracking。此方法与前一种方法相反,仅会包含您选择的单个资源。
在此示例中,应创建一个新的预制件。首先通过 GameObject > 3D Object > Cube 创建新立方体(此操作将在 Hierarchy 视图中创建新的立方体)。然后,将立方体从 Hierarchy 视图拖动到 Project 视图中,此过程将创建该对象的预制件。
然后,应右键单击 Project 窗口中的立方体 (Cube) 预制件,并选择 Build AssetBundle From Selection - Track dependencies。 此时,您将看到一个窗口,用于保存“捆绑的”资源。如果您创建了一个名为“AssetBundles”的新文件夹并将立方体保存为 __Cube.unity3d__,Project 窗口现在将如下所示。
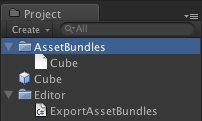
此时,您可以将 AssetBundle Cube.unity3d 移动到本地存储设备上的其他位置,或将其上传到您选择的服务器。
构建 Asset Bundle 时如何更改资源属性的示例
您可以使用 AssetDatabase.ImportAsset 强制在调用 BuildPipeline.BuildAssetBundle 之前重新导入资源,然后使用 AssetPostprocessor.OnPreprocessTexture 设置所需的属性。以下示例将向您展示如何在构建 Asset Bundle 时设置不同的纹理压缩。
// 旧版 Unity 4 示例。不可用于 Unity 5 和更高版本。
// 从 Project 视图中的选定对象构建 Asset Bundle,
// 并使用 AssetPostprocessor 更改纹理格式。

using UnityEngine;
using UnityEditor;

public class ExportAssetBundles {

    // 存储 TextureProcessor 的当前纹理格式。
    public static TextureImporterFormat textureFormat;

    [MenuItem("Assets/Build AssetBundle From Selection - PVRTC_RGB2")]
    static void ExportResourceRGB2 () {
        textureFormat = TextureImporterFormat.PVRTC_RGB2;
        ExportResource();
    }

    [MenuItem("Assets/Build AssetBundle From Selection - PVRTC_RGB4")]
    static void ExportResourceRGB4 () {
        textureFormat = TextureImporterFormat.PVRTC_RGB4;
        ExportResource();
    }

    static void ExportResource () {
        // 显示保存面板。
        string path = EditorUtility.SaveFilePanel ("Save Resource", "", "New Resource", "unity3d");

        if (path.Length != 0) {
            // 从当前所选项构建资源文件。
            Object[] selection = Selection.GetFiltered(typeof(Object), SelectionMode.DeepAssets);

            foreach (object asset in selection) {
                string assetPath = AssetDatabase.GetAssetPath((UnityEngine.Object) asset);
                if (asset is Texture2D) {
                    //强制通过 TextureProcessor 重新导入。
                    AssetDatabase.ImportAsset(assetPath);
                }
            }

            BuildPipeline.BuildAssetBundle(Selection.activeObject, selection, path, BuildAssetBundleOptions.CollectDependencies | BuildAssetBundleOptions.CompleteAssets);
            Selection.objects = selection;
        }
    }
}
// 旧版 Unity 4 示例。不可用于 Unity 5 和更高版本。
// 构建 Asset Bundle 时更改纹理格式。

using UnityEngine;
using UnityEditor;

public class TextureProcessor : AssetPostprocessor
{
    void OnPreprocessTexture() {
        TextureImporter importer = assetImporter as TextureImporter;
        importer.textureFormat = ExportAssetBundles.textureFormat;
    }
}
此外还可使用 AssetDatabase.ImportAssetOptions 控制资源的导入方式。
在测试环境中,有时需要测试更改,而此更改需要重新构建 AssetBundle。在此类情况下,建议在构建 AssetBundle 时使用 BuildAssetBundleOptions.UncompressedAssetBundle 选项。此选项可加快构建和加载 AssetBundle 的速度,但也会导致它们更大,因此下载时间更长。
在生产环境中构建 AssetBundle
首次使用 AssetBundle 时,似乎按照以上示例所示手动构建它们就足够了。但随着项目规模增大和资源数量增加,手动执行此过程的效率不高。更好的方法是编写一个为项目构建所有 AssetBundle 的函数。例如,您可以使用一个文本文件将资源文件映射到 AssetBundle 文件。
Copyright © 2023 Unity Technologies
优美缔软件(上海)有限公司 版权所有
"Unity"、Unity 徽标及其他 Unity 商标是 Unity Technologies 或其附属机构在美国及其他地区的商标或注册商标。其他名称或品牌是其各自所有者的商标。
公安部备案号:
31010902002961