- Unity User Manual (2018.3)
- Unity Services
- Unity Analytics
- Remote Settings
- Using Remote Settings in a Unity project
- Remote Settings component
Remote Settings component
Use the Remote Settings component to control the properties of other components in your Scene without writing any code. The Remote Settings component is part of the Remote Settings plug-in, which you can download from the Unity Asset Store.
Before using the Remote Settings component, you must enable Remote Settings in your project and should also create your Remote Settings key-value pairs using the Unity Analytics Dashboard.
You can place the Remote Settings component on the same GameObject as another component you want to control, or place it on a different GameObject. The only requirement is that both the Remote Settings component and any controlled components are active in the same Scene.
Using the Remote Settings component
To connect a remote setting to a component property or field:
Go to Window > Unity Analytics > Remote Settings to open the Remote Settings window.
Choose the configuration (Release or Development) that contains the setting you are going to connect.
Go to the Inspector window for the GameObject that you want to hold the Remote Settings component.
Click the Add Component button.
-
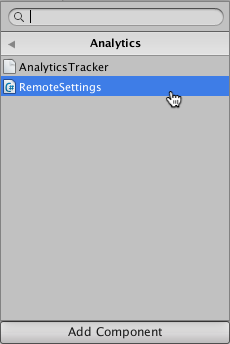
Find the Analytics > RemoteSettings script in the list.

-
Click Add Component to add the Remote Settings component to the GameObject.

To add a new parameter mapping, click the + icon at the bottom of the Remote Setting component’s Parameters list.
-
Drag the GameObject or the component that you want to remotely control to the parameter’s Object field.

Select the property or field you want to control in the parameter’s Field drop-down list.
-
Choose the Remote Setting Key that you want to use to control this component property or field.

Click the + icon to add additional parameters.
If no Remote Settings Key names appear in the list, open the Remote Settings window (menu: Window > Unity Analytics > Remote Settings) and click Refresh. If your remote settings still do not display in this window, check that you have an Internet connection and that your project is properly set up (see Enabling Remote Settings).
If the wrong keys appear in the list of key names, open the Remote Settings window (menu: Window > Unity Analytics > Remote Settings) and set the Active Configuration to the configuration containing the correct set of keys.
The Remote Settings component cannot set the variables of prefabs that Unity loads later in the Scene than the component itself. Similarly, a Remote Settings component that is loaded later in the Scene can only set variables of objects that are part of the same prefab. Use more than one Remote Settings component to handle these types of situations.
Setting non-primitive properties
You can use the Remote Settings component to set the primitive fields and properties of an object directly. However, to set the variables of an object’s non-primitive members, you do have to write some additional code. The easiest approach is to add primitive-type properties to an object that you can set using the Remote Settings component. Then, implement the setter functions of these properties to update the intended variables of the non-primitive objects.
Code example
In the example below, the class sets the base color of the Material assigned to a rendered GameObject. To do this, the class defines a primitive string-type property that takes an HTML-style color string. The setter for this property parses the string and sets the Material color accordingly.
using UnityEngine;

public class RemoteColorChanger : MonoBehaviour
{
    private string _colorString = "";
    public string ColorString {

        get {
            return _colorString;
        }

        set {
            Color colorObject;
            if (ColorUtility.TryParseHtmlString (value, out colorObject)) {
                _colorString = value;
                Renderer renderer = GetComponent<Renderer> ();

                if (renderer != null) {
                    MaterialPropertyBlock materialProperties = new MaterialPropertyBlock ();
                    renderer.GetPropertyBlock (materialProperties);
                    materialProperties.SetColor ("_Color", colorObject);
                    renderer.SetPropertyBlock (materialProperties);
                }
            } else {
                Debug.LogWarning ("Invalid color string: " + value);
            }
        }
    }
}
Using the code example
You can add this RemoteColorChanger script to any GameObject that has a Renderer component. You can then use the Remote Settings component to map a setting key to the ColorString property. In this example, the script is a component of a Cube object.

ColorString Remote Setting keyThe matching key-value pair on the Remote Settings page of your Analytics Dashboard looks like the following:

ColorString setting defined on the Analytics DashboardUse the same technique to set any non-primitive value.
2017–05–30 Page published with editorial review
2017–05–30 - Service compatible with Unity 5.5 onwards at this date but version compatibility may be subject to change.
New feature in Unity 2017.1