Player settings for the iOS platform
This page details the Player settings specific to iOS. For a description of the general Player settings, see Player settings.
Note: Unity iOS requires iOS 7.0 or higher. Unity does not support iOS 6.0 or earlier versions.

You can find documentation for the properties in the following sections:
- Icon
- Resolution and Presentation
- Splash Image
- Debugging and crash reporting
- Other Settings
- XR Settings
Icon
Use the Icon settings to customize the branding for your app on the Apple Store.

Note: If any icon textures are omitted, the icon texture with the nearest size is scaled accordingly (with a preference towards larger resolution textures).
| Setting | Function |
|---|---|
| Application icons | Assign the custom icon that you would like to appear on your app for each iOS device. |
| Spotlight icons | Assign the custom icon that you would like to appear in the Spotlight search results for your game for each iOS device. |
| Settings icons | Assign the custom icon that you would like to appear on the phone’s main Settings page for each iOS device. |
| Notification icons | Assign the custom icon that you would like to appear when sending notifications from your game for each iOS device. |
| Marketing icons | Assign the custom icon that you would like to appear for your game in the App Store for each iOS device. |
Resolution and Presentation
Use the Resolution and Presentation section to customize aspects of the screen’s appearance:
- Resolution Scaling
- Orientation
- Allowed Orientations for Auto Rotation
- Multitasking Support
- Status Bar
Resolution Scaling

The Resolution Scaling Mode allows you to set the scaling to be equal to or below the native screen resolution:
| Value | Function |
|---|---|
| FixedDPI | Allows you to scale the device’s screen resolution below its native resolution and show the Target DPI property. Use this to optimize performance and battery life or target a specific DPI setting. |
| Disabled | Ensures that scaling is not applied and the game renders to its native screen resolution. |
Set the Target DPI of the game screen. Unity downscales the game screen to match this setting if the device’s native screen DPI is higher than this value. The scale is calculated as min(Target DPI * Factor / Screen DPI, 1). The Factor is controlled by the Resolution Scaling Fixed DPI Factor on the Quality settings.
Note: This option only appears when the Resolution Scaling Mode is set to Fixed DPI.
Orientation
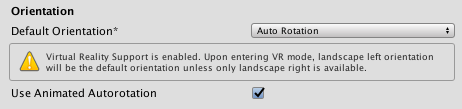
Choose the game’s screen orientation from the Default Orientation drop-down menu:
| Setting | Function |
|---|---|
| Portrait | Home button appears at the bottom. |
| Portrait Upside Down | Home button appears at the top. |
| Landscape Left | Home button appears on the right side. |
| Landscape Right | Home button appears on the left side. |
| Auto Rotation | Screen orientation changes with device orientation. This is the default. |
Note: This setting is shared between iOS and Android devices.
When you set the orientation to Auto Rotation, the Allowed Orientations for Auto Rotation section appears.
Enable the Use Animated Autorotation setting if you want orientation changes to animate the screen rotation rather than just switch. This is only visible when Default Orientation is set to Auto Rotation.
Allowed Orientations for Auto Rotation
This section is only visible when Default Orientation is set to Auto Rotation.
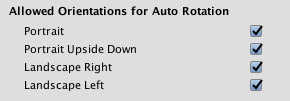
Because Auto Rotation changes screen orientation to match the device, you may want to limit the screen orientations allowed (for example, locking a device to landscape).
Enable each orientation you want to allow by checking its box in this section:
| Setting | Function |
|---|---|
| Portrait | Allow portrait orientation. |
| Portrait Upside Down | Allow portrait upside-down orientation. |
| Landscape Right | Allow landscape right orientation (home button on the left side). |
| Landscape Left | Allow landscape left orientation (home button is on the right side). |
Multitasking Support

Enable the Requires Fullscreen option if your game needs to run in Fullscreen mode.
Status Bar

| Setting | Function |
|---|---|
| Status Bar Hidden | Enable this option to hide the the status bar when the application launches. |
| Status Bar Style | Define the style of the status bar when the application launches. The options are Default, Black Translucent and Black Opaque. |
| Disable Depth and Stencil | Enable this option to disable the depth and stencil buffers. |
| Show Loading Indicator | Select how the loading indicator should appear. The options are Don’t Show, White Large, White, and Gray. |
Splash Image
Above the common Splash Screen settings, the Player settings allow you to specify splash images for the iOS platform.
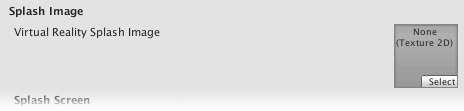
Use the Virtual Reality Splash Image property to select a custom splash image to be displayed in Virtual Reality displays.
Below the common Splash Screen settings, you can enable the Use Storyboard for Launch to show the Custom Storyboard button.

Click the button to select a storyboard to show when your game starts up on the device. For your storyboard to appear here, you first need to create the storyboard in Xcode and copy it to your Project.
Alternatively, you can leave the Use Storyboard for Launch option disabled and implement splash images with one of these methods: Launch Screens or Legacy Launch Images.
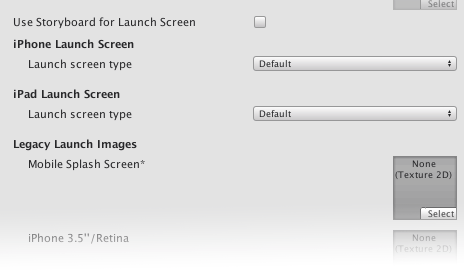
Launch Screens
A Launch Screen is an XIB file from which iOS creates a splash screen dynamically on the device. However, there are some limitations:
You can’t display different content depending on iPad device orientation.
All iPhones support landscape Launch Screens; however, due to a bug in iOS, Landscape Left is shown instead of Landscape Right on certain iOS versions.
Each the iPhone Launch Screen and iPad Launch Screen sections allow you to select the launch screen type from the Launch Screen type drop-down menu:
| Value | Function |
|---|---|
| Default | A launch screen that is very much like a launch image. One image is selected for portrait and landscape. The selection order: iPhone 6+ launch images, shared mobile launch image, default Unity launch image for iPhone 6+. The images are displayed using aspect-fill mode. |
| None | The behavior is as if only launch images are used. |
| Image and background (relative size) | Displays a center-aligned image, with the rest of area filled with solid color. The image size is user-specified percentage of the screen size, computed in the smaller dimension (vertical on landscape, horizontal in portrait orientations). User also specifies background color and images for portrait and landscape orientations. Image selection order: the user-specified image, shared mobile launch image, default Unity launch image for iPhone 6+. The images are displayed using aspect-fill mode. |
| Image and background (constant size) | Same as relative size option except that the size of the image is defined by user-specified number of points. |
| Custom XIB | A user-specified XIB file from any location. |
Note: With a Unity Personal subscription the Unity Splash Screen displays as soon as engine initializes, in addition to your chosen splash screen.
Legacy Launch Images
Launch Images are static splash screen images that occupy the entire screen. You can define them in an Asset catalog (Images.xcassets/LaunchImage). Always add a Launch Screen for each supported size and orientation combination:
| Setting | Function |
|---|---|
| Mobile Splash Screen | Specifies texture which should be used for iOS Splash Screen. Standard Splash Screen size is 320x480.(This is shared between Android and iOS.) |
| iPhone 3.5"/Retina | Specifies texture which should be used for iOS 3.5" Retina Splash Screen. Splash Screen size is 640x960. |
| iPhone 4"/Retina | Specifies texture which should be used for iOS 4" Retina Splash Screen. Splash Screen size is 640x1136. |
| iPhone 4.7"/Retina | Specifies texture which should be used for iOS 4.7" Retina Splash Screen. Splash Screen size is 750x1334. |
| iPhone 5.5"/Retina | Specifies texture which should be used for iOS 5.5" Retina Splash Screen. Splash Screen size is 1242x2208. |
| iPhone 5.5" Landscape/Retina | Specifies texture which should be used for iOS 5.5" Landscape/Retina Splash Screen. Splash Screen size is 2208x1242. |
| iPhone X\Retina | Specifies texture which should be used for iPhone X Retina Splash Screen. Splash Screen size is 1125x2436. |
| iPhone X Landscape\Retina | Specifies texture which should be used for iPhone X Landscape/Retina Splash Screen. Splash Screen size is 2436x1125. |
| iPad Portrait | Specifies texture which should be used as iPad Portrait orientation Splash Screen. Standard Splash Screen size is 768x1024. |
| iPad Landscape | Specifies texture which should be used as iPad Landscape orientation Splash Screen. Standard Splash Screen size is 1024x768. |
| iPad Portrait/Retina | Specifies texture which should be used as the iPad Retina Portrait orientation Splash Screen. Standard Splash Screen size is 1536x2048. |
| iPad Landscape/Retina | Specifies texture which should be used as the iPad Retina Landscape orientation Splash Screen. Standard Splash Screen size is 2048x1536. |
Only iPhone 6+ supports landscape orientation; other iPhones can only use portrait.
Launch Images are selected in the following order:
- The specific Launch Image override, if the texture is set
- Default Unity splash screen launch image, which is a solid blue-black color
You need to set all Launch Images for your build.
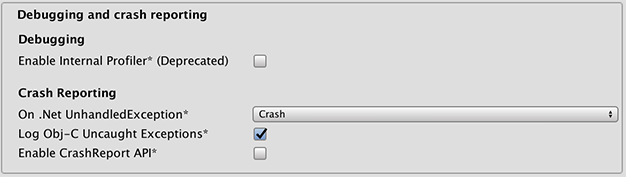
Debugging and crash reporting
| Setting | Function |
|---|---|
| Enable Internal Profiler (Deprecated) | Enables an internal profiler which collects performance data of the application and prints a report to the console. The report contains the number of milliseconds that it took for each Unity subsystem to execute on each frame. The data is averaged across 30 frames. |
| On .Net UnhandledException | The action taken on .NET unhandled exception. The options are Crash (the application crashes hardly and forces iOS to generate a crash report that can be submitted to iTunes by app users and inspected by developers), Silent Exit (the application exits gracefully). |
| Log Obj-C Uncaught Exceptions | Enables a custom Objective-C Uncaught Exception handler, which prints exception information to console. |
| Enable Crash Report API | Enables a custom crash reporter to capture crashes. Crash logs are available to scripts via CrashReport API. |
Other Settings
This section allows you to customize a range of options organized into the following groups:
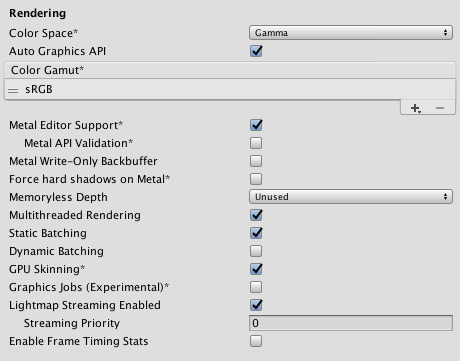
Rendering
Use these settings to customize how Unity renders your game for the iOS platform.
| Setting | Function | |
|---|---|---|
| Color Space | Choose which color space should be used for rendering: Gamma or Linear. See the Linear rendering overview for an explanation of the difference between the two. |
|
| Auto Graphics API | Disable this option to manually pick and reorder the graphics APIs. By default this option is enabled, and Unity includes Metal, and GLES2 as a fallback for devices where Metal is not supported. | |
| Color Gamut | You can add or remove color gamuts for the iOS platform to use for rendering. Click the plus (+) icon to see a list of available gamuts. A color gamut defines a possible range of colors available for a given device (such as a monitor or screen). The sRGB gamut is the default (and required) gamut. When targeting recent iOS devices with wide color gamut displays, use DisplayP3 to utilize full display capabilities. Use Metal Editor Support as a fallback for older devices. |
|
| Metal Editor Support | Enable this option to use the Metal API in the Unity Editor and unlock faster Shader iteration for targeting the Metal API. | |
| Metal API Validation | Enable this option when you need to debug Shader issues. Note: Validation increases CPU usage, so use it only for debugging. |
|
| Metal Write-Only Backbuffer | Allow improved performance in non-default device orientation. This sets the frameBufferOnly flag on the back buffer, which prevents readback from the back buffer but enables some driver optimization. | |
| Force hard shadows on Metal | Enable this option to force Unity to use point sampling for shadows on Metal. This reduces shadow quality, which should give better performance. | |
| Memoryless Depth | Choose when to use memoryless render textures. Memoryless render textures are temporarily stored in the on-tile memory when rendered, not in CPU or GPU memory. This reduces memory usage of your app but you cannot read or write to these render textures. Note: Memoryless render textures are only supported on iOS, tvOS 10.0+ Metal and Vulkan. Render textures are read/write protected and stored in CPU or GPU memory on other platforms. |
|
| Unused | Never use memoryless framebuffer depth. | |
| Forced | Always use memoryless framebuffer depth. | |
| Automatic | Let Unity decide when to use memoryless framebuffer depth. | |
| Multithreaded Rendering | Enable this option to use multithreaded rendering. This is only supported on Metal. | |
| Static Batching | Enable this option to use Static batching. | |
| Dynamic Batching | Enable this option to use Dynamic Batching on your build (enabled by default). Note: Dynamic batching has no effect when a Scriptable Render Pipeline is active, so this setting is only visible when nothing is set in the Scriptable Render Pipeline Asset Graphics setting. |
|
| GPU Skinning | Enable this option to use DX11/ES3 GPU skinning. To learn more about GPU skinning, see the Wikipedia page on skeletal animation. | |
| Graphics Jobs (Experimental) | Enable this option to instruct Unity to offload graphics tasks (render loops) to worker threads running on other CPU cores. This is intended to reduce the time spent in Camera.Render on the main thread, which is often a bottleneck. Note: This feature is experimental. It may not deliver a performance improvement for your project, and may introduce instability. Unity currently only supports Graphics Jobs when using Vulkan and this setting has no effect when using OpenGL ES. |
|
| Lightmap Streaming Enabled | Enable this option to load only the lightmap mip maps as needed to render the current game Cameras. This value applies to the lightmap textures as they are generated. Note: To use this setting, you must enable the Texture Streaming Quality setting. |
|
| Streaming Priority | Set the lightmap mip map streaming priority to resolve resource conflicts. These values are applied to the light map textures as they are generated. Positive numbers give higher priority. Valid values range from –128 to 127. |
|
| Enable Frame Timing Stats | Enable this option to gather CPU/GPU frame timing statistics. | |
Identification

| Setting | Function |
|---|---|
| Bundle Identifier | Enter the provisioning profile of the game or product you are building. The basic structure of the identifier is com.CompanyName.ProductName. This structure may vary internationally based on where you live, so always default to the string provided to you by Apple for your Developer Account. Your ProductName is set up in your provisioning certificates. This value appears as CFBundleIdentifier in the associated info.plist file. See the Apple developer documentation on CFBundleIdentifier to learn more. Note: This is shared between iOS, tvOS and Android. |
| Version | Enter the release-version-number string for the bundle (for example, 4.3.6). This appears as CFBundleShortVersionString in the associated info.plist file.See the Apple developer documentation on CFBundleShortVersionString to learn more. |
| Build | Enter the build number for this version of your app. This appears as CFBundleVersion in the associated info.plist file.See the Apple developer documentation on CFBundleVersion to learn more. |
| Signing Team ID | Enter your Apple Developer Team ID. You can find this on the Apple Developer website under Xcode Help. This sets the Team ID for the generated Xcode project, allowing developers to use the Build and Run functionality. An Apple Developer Team ID must be set here for automatic signing of your app. For more information, see Creating Your Team Provisioning Profile. |
| Automatically Sign | Enable this option to allow Xcode to automatically sign your build. |
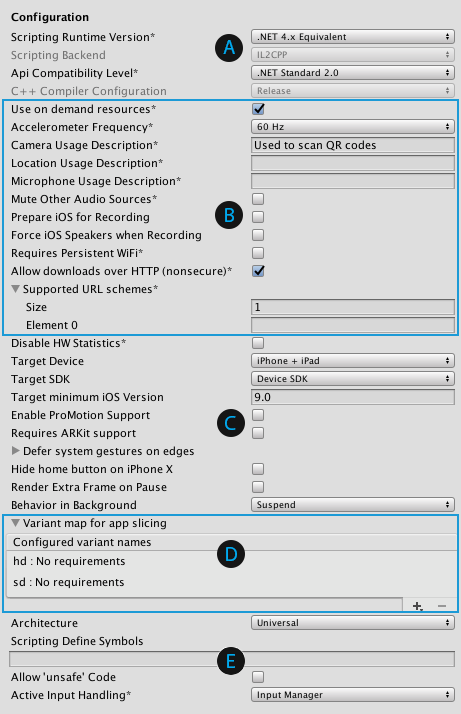
Configuration


API configuration settings

| Setting | Function | |
|---|---|---|
| Scripting Runtime Version | Choose which .NET runtime to use in your project. For more details, see Microsoft’s .NET documentation. | |
| .NET 3.5 Equivalent (Deprecated) | A .NET runtime which implements the .NET 3.5 API. This functionality is deprecated, and should no longer be used. Please use .NET 4. | |
| .NET 4.x Equivalent | A .NET runtime which implements the .NET 4 API. This API is newer than .NET 3.5, and as such, it offers access to more APIs, is compatible with more external libraries, and supports C# 6. This is the default scripting runtime. | |
| Scripting Backend | The scripting backend determines how Unity compiles and executes C# code in your Project. This setting is not enabled for iOS. | |
| Mono | To use incremental builds, choose the Append option after selecting Build from the Build Settings dialog. The Replace option will perform a clean build.Compiles C# code into .NET Common Intermediate Language (CIL) and executes that CIL using a Common Language Runtime. Warning: Mono builds are no longer accepted in the Apple App store and Mono is not supported by iOS 11 and above. Mono can only be selected when using the deprecated .NET 3.5 runtime. |
|
| IL2CPP | Compiles C# code into CIL, converts the CIL to C++ and then compiles that C++ into native machine code, which executes directly at run time. See IL2CPP for more information. Tip: The C++ code generated by the IL2CPP scripting backend can be updated incrementally, allowing incremental C++ build systems to compile only the changes source files. This can significantly lower iteration times. |
|
| API Compatibility Level | The compatibility level determines which .NET APIs you can use in your Project. This setting can affect compatibility with 3rd-party libraries. Tip: If you are having problems with a third-party assembly, you can try the suggestion in the API Compatibility Level section below. |
|
| .Net 2.0 | Maximum .net compatibility, biggest file sizes. Part of the deprecated .NET 3.5 runtime. | |
| .Net 2.0 Subset | Subset of full .net compatibility, smaller file sizes. Part of the deprecated .NET 3.5 runtime. | |
| .Net Standard 2.0 | Compatible with .NET Standard 2.0. Produces smaller builds and has full cross-platform support. | |
| .Net 4.x | Choose this option when using libraries that access APIs not included in .NET Standard 2.0. Compatible with the .NET Framework 4 (which includes everything in the .NET Standard 2.0 profile as well as additional APIs). Produces larger builds and any additional APIs available are not necessarily supported on all platforms. See Referencing additional class library assemblies for more information. |
|
| C++ Compiler Configuration | Choose the C++ compiler configuration used when compiling IL2CPP generated code. This setting is not enabled for iOS. | |
API Compatibility Level
You can choose your mono API compatibility level for all targets. Sometimes a 3rd-party .NET library uses functionality that is outside of your .NET compatibility level. In order to understand what is going on in such cases, and how to best fix it, try following these suggestions:
- Install Reflector for Windows.
- Drag the .NET assemblies for the API compatilibity level you are having issues with into Reflector. You can find these under
Frameworks/Mono/lib/mono/YOURSUBSET/. - Drag in your 3rd-party assembly.
- Right-click your 3rd-party assembly and select Analyze.
- In the analysis report, inspect the Depends on section. The report highlights anything that the 3rd-party assembly depends on, but that is not available in the .NET compatibility level of your choice in red.
Apple-specific information

| Setting | Function |
|---|---|
| Use on Demand Resource | Enable this option to use on-demand resources. When enabled, the Variant map for app slicing section appears. |
| Accelerometer Frequency | Define how often to sample the accelerometer. If you choose Disabled, then no samples are taken. Otherwise, you can choose from 15Hz, 30Hz, 60Hz and 100Hz frequencies. |
| Camera Usage Description | Enter the reason for accessing the camera on the iOS device. |
| Location Usage Description | Enter the reason for accessing the location of the iOS device. |
| Microphone Usage Description | Enter the reason for accessing the microphone on the iOS device. |
| Mute Other Audio Sources | Enable this option if you want your Unity application to stop Audio from applications running in the background. Otherise, Audio from background applications continues to play alongside your Unity application. |
| Prepare iOS for Recording | Enable this option to initialize the microphone recording APIs. This makes recording latency lower, though on iPhones it re-routes audio output via earphones only. |
| Force iOS Speakers when Recording | Enable this option to send the phone output through the internal speakers, even when headphones are plugged in and recording. |
| Requires Persistent WiFi | Enable this option to require a Wi-Fi connection. iOS maintains the active Wi-Fi connection while the application is running. |
| Allow downloads over HTTP (nonsecure) | Enable this option to allow downloading content over HTTP. Default and recommended is HTTPS. |
| Supported URL schemes | A list of supported URL schemes. To add new schemes, increase the value of the Size property and then set a reference to the Asset to load in the new Element box that appears. |
Device information

| Setting | Function | |
|---|---|---|
| Disable HW Statistics | Enable this option to instruct the application not to send information about the hardware to Unity. For more details, see Unity Hardware Statistics. | |
| Target Device | Select which devices the game targets. The choices are iPhone Only, iPad Only, and iPhone + iPad. | |
| Target SDK | Select which SDK the game targets. The choices are Device SDK and Simulator SDK. Note: Be sure to select the correct SDK. For example, if you select the Device SDK but then target the Simulator in Xcode then the build will fail with a lot of error messages. |
|
| Target minimum iOS Version | Defines the minimum version of iOS that the game works on. | |
| Enable ProMotion Support | Enable this option to allow high frequency refresh rates (120 Hz) on ProMotion displays. Enabling this setting might affect battery life. | |
| Requires ARKit support | Enable this option to restrict the app to iPhone 6s/iOS 11 or newer devices when publishing to the App Store. | |
| Defer system gestures on edges | Enable which edges that users must swipe twice to enact system gestures: Top Edge, Left Edge, Bottom Edge, and Right Edge | |
| Hide home button on iPhone X | Enable this option to hide the home button on iPhone X devices when the app is running. | |
| Render Extra Frame on Pause | Enable this option to issue an additional frame after the frame when the app is paused. This allows your app to show graphics that indicate the paused state when the app is going into the background. | |
| Behavior in Background | Choose what the application should do when the user presses the home button. | |
| Custom | You can implement your own behaviour with background processing. For an example, see the BackgroundFetch Bitbucket project. | |
| Suspend | Suspend the app but don’t quit. This is the default behavior. | |
| Exit | Instead of suspending, let the app quit when the user presses the home button. | |
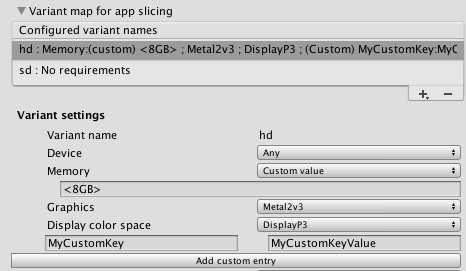
Variant map for app slicing section
Expand the Variant map for app slicing section to see the list of variant names configured in scripting. For more information on variants, see App slicing.
Note: If you don’t see the section, make sure the Use on Demand Resource property is enabled.
You can add and remove new variants with the plus (+) and minus (-) icons. You can also select a variant from the list and see or modify its settings under Variant settings:
| Setting | Function |
|---|---|
| Variant name | Displays the name of the variant from the loading script. For any of these settings, if you choose Custom value, an additional property appears underneath where you can enter your own value to use. |
| Device | Choose which device this variant targets. Options include Any (the default), iPhone, iPad, iWatch, and Custom value. |
| Memory | Choose the minimum memory required for this variant. Options include Any (the default), 1GB, 2GB, 3GB, 4GB, and Custom value. |
| Graphics | Choose the Metal framework to use. Options include Any (the default), Metal1v2, Metal2v2, Metal2v3, Metal3v1, Metal3v2, Metal4v1, and Custom value. |
| Display color space | Choose the color gamut to use. Options include Any (the default), sRGB, DisplayP3, and Custom value. |
You can also add your own setting. Click the Add custom entry button and a new pair of text boxes appear. Enter the name of the setting in the box displaying <key> and the value you want to use in the box displaying <value>.
Other configuration settings

| Setting | Function | |
|---|---|---|
| Architecture | Choose which architecture to target. | |
| Universal | Support all architectures. This is the recommended option. | |
| Armv7 | Support only the older 32-bit ARM architecture. | |
| Arm64 | Support only the newer 64-bit ARM architecture. You might want to consider selecting this option if your app is only for high-end devices. | |
| x86_64 | Support the x86_64 Intel architecture. This is the only architecture available for Simulator SDK. | |
| Scripting Define Symbols | Set custom compilation flags. For more details, see Platform dependent compilation. | |
| Allow ‘unsafe’ Code | Enable support for compiling ‘unsafe’ C# code in a pre-defined assembly (for example, Assembly-CSharp.dll). For Assembly Definition Files ( .asmdef), click on one of your .asmdef files and enable the option in the Inspector window that appears. |
|
| Active Input Handling | Choose how you want to handle input from users. | |
| Input Manager | Use the traditional Input settings. | |
| Input System (Preview) | Use the newer Input system. The Input System is under development. To try an early preview of the Input System, install the InputSystem package. If you select the Input System (Preview option without having that package installed, nothing happens except for some extra processing. | |
| Both | Use both systems side by side. | |
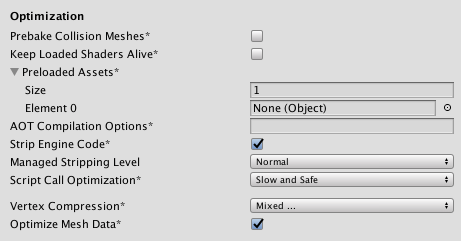
Optimization
| Setting | Function | |
|---|---|---|
| Prebake Collision Meshes | Enable this option to add collision data to Meshes at build time. | |
| Keep Loaded Shaders Alive | Enable this option to prevent shaders from being unloaded. | |
| Preloaded Assets | Set an array of Assets for the player to load on startup. To add new Assets, increase the value of the Size property and then set a reference to the Asset to load in the new Element box that appears. |
|
| AOT compilation options | Additional options for Ahead of Time (AOT) compilation. This helps optimize the size of the built iOS player. | |
| Strip Engine Code | Enable this tool if you want the Unity Linker tool to remove code for Unity Engine features that your Project does not use. This setting is only available with the IL2CPP Scripting Backend. Most games don’t use all necessary DLLs. With the Strip Engine Code option enabled, you can strip out unused parts to reduce the size of the built player on iOS devices. If your game is using classes that would normally be stripped out by the option you currently have selected, you’ll be presented with a Debug message when you make a build. |
|
| Managed Stripping Level | Choose how aggressively Unity strips unused managed (C#) code. When Unity builds your game or application, the Unity Linker process can strip unused code from the managed dynamically linked libraries used in the Project. Stripping code can make the resulting executable significantly smaller, but can sometimes mistakenly remove code that is actually used. This setting allows you to choose how aggressively Unity should remove unused code. |
|
| Normal | Remove unreachable managed code to reduce build size and .NET/IL2CPP build times. | |
| Aggressive | Remove code more aggressively than under the normal option. Code size is further reduced, but this additional reduction may have side effects. For example, some methods may no longer be visible in the debugger and code accessed through reflection can be stripped. You can create a custom link.xml file to preserve specific classes and methods. See Managed bytecode stripping with IL2CPP for more information. |
|
| Script Call Optimization | Choose how to optionally disable exception handling for a speed boost at runtime. See iOS Optimization for details. | |
| Slow and Safe | Use full exception handling (with some performance impact on the device when using the Mono scripting backend). | |
| Fast but no Exceptions | No data provided for exceptions on the device (the game runs faster when using the Mono scripting backend). Note: Using this option with the IL2CPP Scripting Backend does not impact performance; however, using it can avoid undefined behavior on release builds. |
|
| Vertex Compression | Set vertex compression per channel. For example, you can enable compression for everything except positions and lightmap UVs. Whole Mesh compression set per imported object overrides where vertex compression is set on objects. Everything else obeys these vertex compression settings. | |
| Optimize Mesh Data | Enable this option to remove any data from Meshes that is not required by the Material applied to them (such as tangents, normals, colors, and UVs). | |
Logging
Select what type of logging to allow in specific contexts.
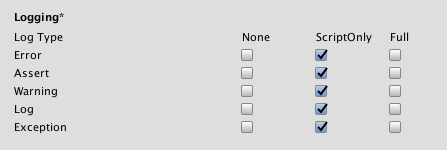
Check one box that corresponds to each Log Type (Error, Assert, Warning, Log, and Exception) when running scripts (ScriptOnly) , all the time (Full), or never (None).
Legacy
Enable the Clamp BlendShapes (Deprecated) option to clamp the range of Blend Shape weights in SkinnedMeshRenderers.

XR Settings

| Setting | Function | |
|---|---|---|
| Virtual Reality Supported | Enable this if your application is a virtual reality application, then add the required VR SDKs to the list. | |
| Virtual Reality SDKs | Add and remove Virtual Reality SDKs from the list. This list is only available available when the Virtual Reality Supported is enabled. To add an SDK to the list, click the plus (+) button. To remove an SDK from the list, select it and then click the minus (-) button. Some of the SDKs provide extra settings that appear here. For details, see XR SDKs. |
|
| Stereo Rendering Mode | Choose how you want to render for a virtual reality device. | |
| Multi Pass | This is the normal rendering mode. Unity renders the Scene twice: first to render the left-eye image; and then again for the right-eye image. | |
| Single Pass | Render both eye images at the same time into one packed Render Texture. This means that the whole Scene is only rendered once, which significantly reduces CPU processing time. | |
| Vuforia Augmented Reality Supported | Enable this option to use Vuforia Augmented Reality SDK, which is required when using the Vuforia Virtual Reality SDK. | |
XR Support Installers
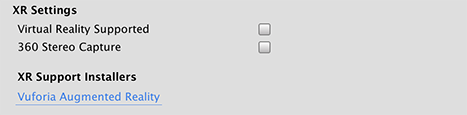
You can click the Vuforia Augmented Reality link to enable the Vuforia Software Development Kit. You must have a Vuforia Software License and agree to the terms of that license before the Vuforia Augmented Reality Supported property is enabled.
2018–08–16 Page amended with editorial review
Mute Other Audio Sources added in 5.5
iOS Player Settings documentation updated in Unity 2018.1
Allow ‘unsafe’ Code checkbox added in Unity 2018.1
.NET 4.x runtime added in 2018.1
.Net 3.5 scripting runtime deprecated in Unity 2018.3 NewIn20183
Minimum iOS version increased to 9 in Unity 2018.3 NewIn20183
Copyright © 2023 Unity Technologies
优美缔软件(上海)有限公司 版权所有
"Unity"、Unity 徽标及其他 Unity 商标是 Unity Technologies 或其附属机构在美国及其他地区的商标或注册商标。其他名称或品牌是其各自所有者的商标。
公安部备案号:
31010902002961