Creando Transiciones de Pantalla
La necesidad de hacer la transición entre múltiples pantallas de UI es bastante común. En esta página exploraremos una forma sencilla de crear y administrar esas transiciones utilizando animación y State Machines para controlar y controlar cada pantalla.
Visión General
La idea de alto nivel es que cada una de nuestras pantallas tendrá un Controlador animador con dos estados (Open y Closed) y un parámetro (Open). booleano . Para pasar de una pantalla a otra, solo tendrá que cerrar la pantalla abierta actualmente y abrir la deseada. Para facilitar este proceso, crearemos un pequeño ScreenManager de clase que hará un seguimiento y se encargará de cerrar cualquier pantalla ya abierta para nosotros. El botón que activa la transición solo tendrá que pedir al ScreenManager que abra la pantalla deseada.
Pensando acerca de la Navegación
Si usted planea soportar una navegación con controlador/teclado de elementos UI, entonces es importante tener unas cosas en mente. Es importante evitar tener elementos seleccionables afuera de la pantalla ya que esto permitiría a lo jugadores en seleccionar elementos que no estén en la pantalla, nosotros podemos hacer esto al desactivar cualquier jerarquía que sea afuera de la pantalla. Nosotros también necesitamos asegurarnos que cuando una nueva pantalla sea mostrada, nosotros configuremos un elemento de este como seleccionado, de lo contrario el jugador no sería capaz de navegar a una nueva pantalla. Nosotros nos aseguraremos de todo eso en la clase ScreenManager abajo.
Configurando el Animator Controller
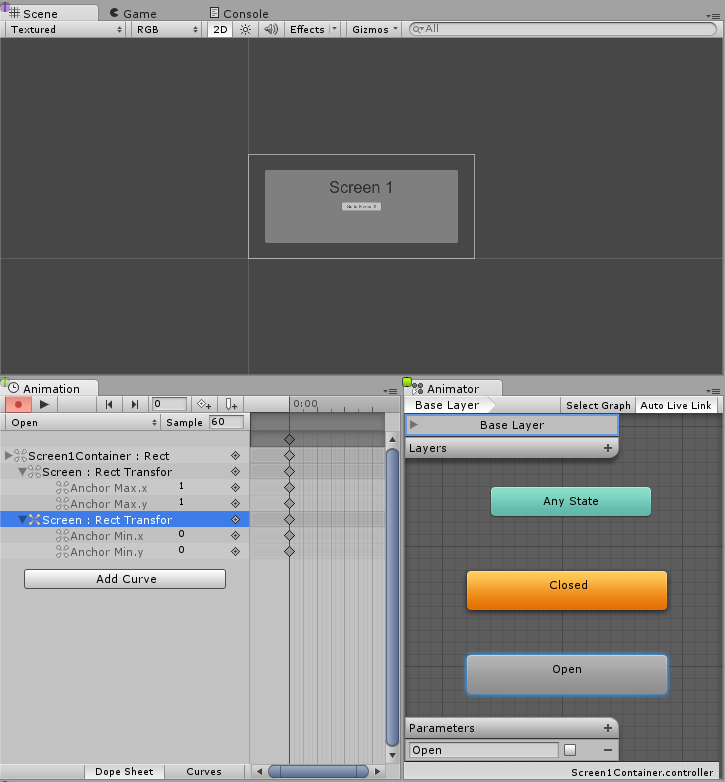
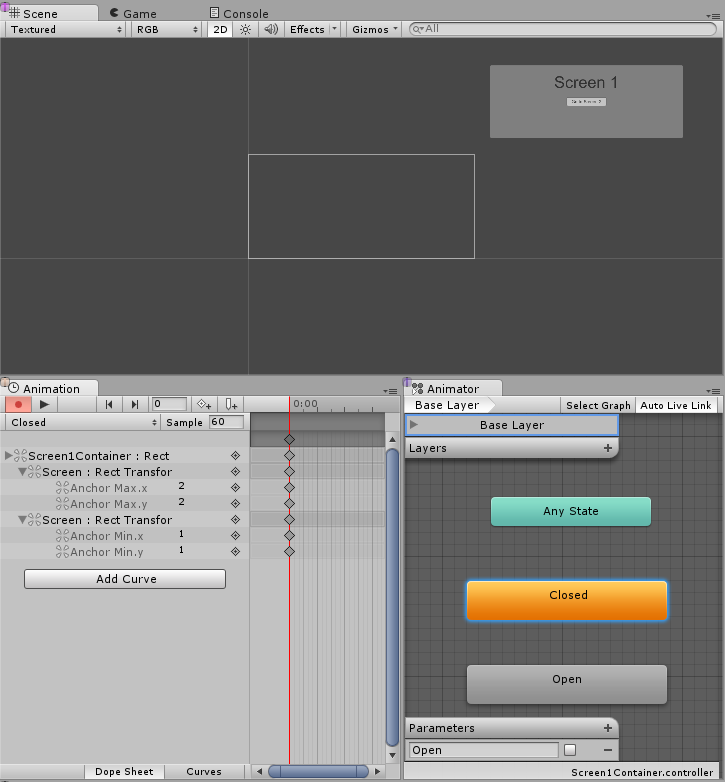
Echemos un vistazo a la configuración más común y minima para que haga el Animation Controller en una transición de pantalla. El controller va a necesitar un parámetro boolean (Open-abierto) y dos estados (Open y Closed (Abierto y Cerrado)), cada estado debería tener una animación con un solo keyframe, de esta manera nosotros dejamos que la State Machine (Maquina de estado) haga la mezcla de la transición por nosotros.
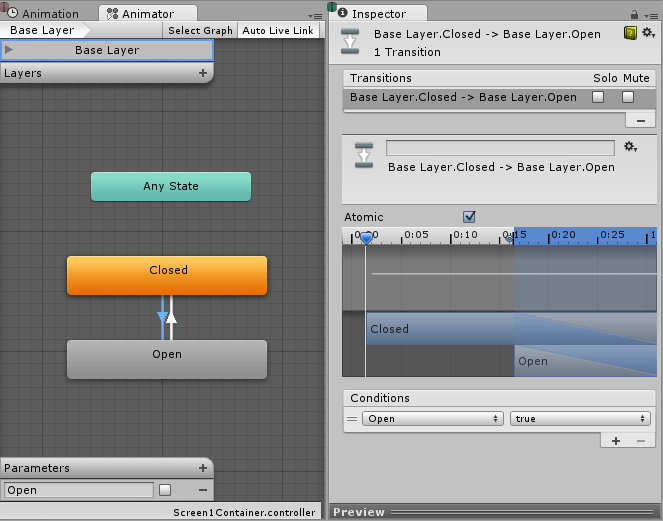
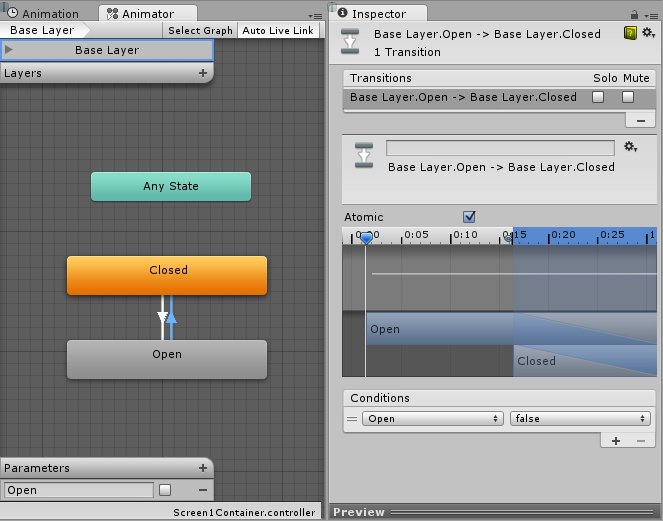
Ahora nosotros necesitamos crear la transition entre ambos estados, comencemos con la transición de Open (abierto) a Closed (cerrado) y configuremos su condición apropiadamente, nosotros queremos ir de Open (abierto) a Closed (cerrado) cuando el parámetro Open sea configurado a falso. Ahora nosotros creamos la transición de Closed (cerrado) a Open (abierto) y configure la condición para ir de Closed (cerrado) a Open (abierto) cuando el parámetro Open (abierto) sea verdad.
Manejando las pantallas
Con toda la configuración anterior, lo único que falta es que configuremos el parámetro Abrir en verdadero en las pantallas del Animador al que queremos hacer la transición y Abrir en falso en el Animador de las pantallas abiertas actualmente. Para ello, crearemos un pequeño script:
using UnityEngine;
using UnityEngine.UI;
using UnityEngine.EventSystems;
using System.Collections;
using System.Collections.Generic;

public class ScreenManager : MonoBehaviour {

    //Screen to open automatically at the start of the Scene
    public Animator initiallyOpen;

    //Currently Open Screen
    private Animator m_Open;

    //Hash of the parameter we use to control the transitions.
    private int m_OpenParameterId;

    //The GameObject Selected before we opened the current Screen.
    //Used when closing a Screen, so we can go back to the button that opened it.
    private GameObject m_PreviouslySelected;

    //Animator State and Transition names we need to check against.
    const string k_OpenTransitionName = "Open";
    const string k_ClosedStateName = "Closed";

    public void OnEnable()
    {
        //We cache the Hash to the "Open" Parameter, so we can feed to Animator.SetBool.
        m_OpenParameterId = Animator.StringToHash (k_OpenTransitionName);

        //If set, open the initial Screen now.
        if (initiallyOpen == null)
            return;
        OpenPanel(initiallyOpen);
    }

    //Closes the currently open panel and opens the provided one.
    //It also takes care of handling the navigation, setting the new Selected element.
    public void OpenPanel (Animator anim)
    {
        if (m_Open == anim)
            return;

        //Activate the new Screen hierarchy so we can animate it.
        anim.gameObject.SetActive(true);
        //Save the currently selected button that was used to open this Screen. (CloseCurrent will modify it)
        var newPreviouslySelected = EventSystem.current.currentSelectedGameObject;
        //Move the Screen to front.
        anim.transform.SetAsLastSibling();

        CloseCurrent();

        m_PreviouslySelected = newPreviouslySelected;

        //Set the new Screen as then open one.
        m_Open = anim;
        //Start the open animation
        m_Open.SetBool(m_OpenParameterId, true);

        //Set an element in the new screen as the new Selected one.
        GameObject go = FindFirstEnabledSelectable(anim.gameObject);
        SetSelected(go);
    }

    //Finds the first Selectable element in the providade hierarchy.
    static GameObject FindFirstEnabledSelectable (GameObject gameObject)
    {
        GameObject go = null;
        var selectables = gameObject.GetComponentsInChildren<Selectable> (true);
        foreach (var selectable in selectables) {
            if (selectable.IsActive () && selectable.IsInteractable ()) {
                go = selectable.gameObject;
                break;
            }
        }
        return go;
    }

    //Closes the currently open Screen
    //It also takes care of navigation.
    //Reverting selection to the Selectable used before opening the current screen.
    public void CloseCurrent()
    {
        if (m_Open == null)
            return;

        //Start the close animation.
        m_Open.SetBool(m_OpenParameterId, false);

        //Reverting selection to the Selectable used before opening the current screen.
        SetSelected(m_PreviouslySelected);
        //Start Coroutine to disable the hierarchy when closing animation finishes.
        StartCoroutine(DisablePanelDeleyed(m_Open));
        //No screen open.
        m_Open = null;
    }

    //Coroutine that will detect when the Closing animation is finished and it will deactivate the
    //hierarchy.
    IEnumerator DisablePanelDeleyed(Animator anim)
    {
        bool closedStateReached = false;
        bool wantToClose = true;
        while (!closedStateReached && wantToClose)
        {
            if (!anim.IsInTransition(0))
                closedStateReached = anim.GetCurrentAnimatorStateInfo(0).IsName(k_ClosedStateName);

            wantToClose = !anim.GetBool(m_OpenParameterId);

            yield return new WaitForEndOfFrame();
        }

        if (wantToClose)
            anim.gameObject.SetActive(false);
    }

    //Make the provided GameObject selected
    //When using the mouse/touch we actually want to set it as the previously selected and
    //set nothing as selected for now.
    private void SetSelected(GameObject go)
    {
        //Select the GameObject.
        EventSystem.current.SetSelectedGameObject(go);

        //If we are using the keyboard right now, that's all we need to do.
        var standaloneInputModule = EventSystem.current.currentInputModule as StandaloneInputModule;
        if (standaloneInputModule != null)
            return;

        //Since we are using a pointer device, we don't want anything selected.
        //But if the user switches to the keyboard, we want to start the navigation from the provided game object.
        //So here we set the current Selected to null, so the provided gameObject becomes the Last Selected in the EventSystem.
        EventSystem.current.SetSelectedGameObject(null);
    }
}
Ahora añadamos ese script, nosotros hacemos esto al crear un nuevo GameObject, nosotros le cambiamos el nombre a “ScreenManager” por ejemplo, y agregamos el componente de arriba a él. Usted puede asignar una pantalla inicial a él, esta pantalla va a abrir al principio de su escena.
Ahora para la parte final, hagamos que los UI buttons funcionen. Seleccione el botón que debería trigger (Activar/desactivar) la transición de la pantalla y agreguemos una nueva acción bajo la lista On Click () en el Inspector. Arrastre el GameObject ScreenManage que acabamos de crear al ObjectField (Campo de objeto), en el despegable seleccione ScreenManager->OpenPanel (Animator) y arrastre el panel que usted quiere abrir cuando el usuario hace click en el botón del campo de objeto.

Notas - Recomendaciones
Esta técnica solo requiere que cada pantalla tenga un AnimatorController con un parámetro Abrir y un estado Cerrado para que funcione, no importa cómo se construyan su pantalla o State Machine. Esta técnica también funciona bien con pantallas anidadas, lo que significa que solo necesita un ScreenManager para cada nivel anidado.
La máquina de estados que configuramos anteriormente tiene el estado predeterminado Cerrado, por lo que todas las pantallas que usan este controlador comienzan como cerradas. El ScreenManager proporciona una propiedad initialOpen para que pueda especificar qué pantalla se muestra primero.
Copyright © 2023 Unity Technologies
优美缔软件(上海)有限公司 版权所有
"Unity"、Unity 徽标及其他 Unity 商标是 Unity Technologies 或其附属机构在美国及其他地区的商标或注册商标。其他名称或品牌是其各自所有者的商标。
公安部备案号:
31010902002961