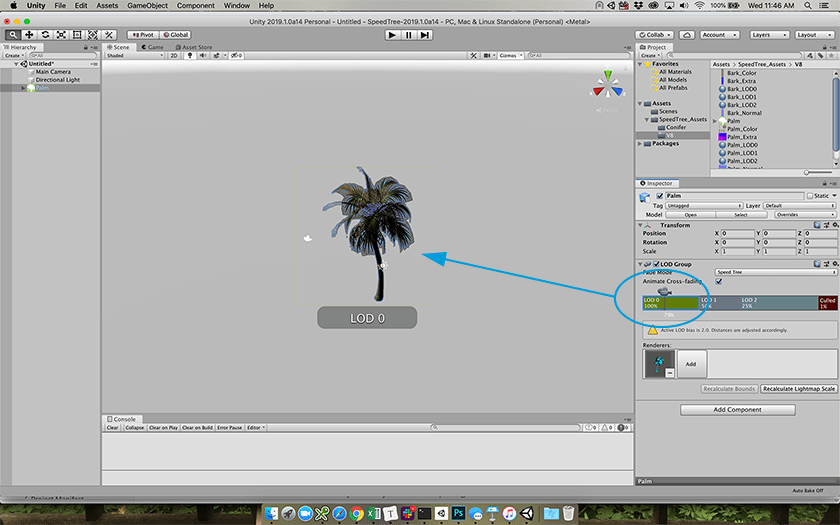
LOD Group
The LOD Group component manages level of detail (LOD) for GameObjects.

 Controls for transitioning between LOD levels
 LOD Group selection bar for switching between LOD levels and previewing LOD rendering
 Information about the Lod Bias Quality setting. This message appears if the Lod Bias property is set to anything other than 1.
 Fade Transition Width setting for the selected LOD level. This property only appears if you disable the Animate Cross-fading property: that is, when you choose to set a transition zone by width instead of time.
 Mesh Renderers set for the selected LOD level
In addition there are two buttons at the bottom of the component:
- Click Recalculate Bounds to recalculate the bounding volume of all LOD Mesh GameObjects after a new LOD level is added.
- Click Recalculate Lightmap Scale to update the Scale in Lightmap property on all LOD Mesh Renderers, based on the changes you made to the LOD level boundaries.
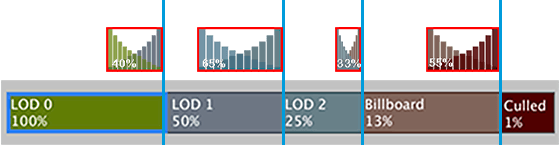
LOD Group selection bar
The LOD Group selection bar represents the different LOD levels as colored boxes.
The percentage that appears in each LOD level box represents the threshold at which that level becomes active, based on the ratio of the GameObject’s screen space height to the total screen height. For example, if the threshold for LOD 1 is set to 50%, then LOD 1 becomes active when the camera pulls back far enough that the GameObject’s height fills half of the view.

The playhead for the LOD preview. You can scrub the camera icon back and forth to test the LOD levels and their transitions. At the bottom of the playhead you can see the current percentage.
To select a level, click on the level box. For each LOD level you select, you can pick the Renderer to use or customize the transition zone.
To add and remove LOD levels from the selection bar, right-click the LOD level box and then choose Insert Before or Delete from the context menu.
Level adjustment control. To change the percentage value for the LOD level, drag the left border of the LOD level box’s boundary.
Note: If the Lod Bias property is not set to 1, the Camera position might not match the position where each LOD level actually transitions from the next. In this case, a warning message appears below the selection bar.

Previewing the LOD transitions
The Scene view displays a preview of the transitions between LOD levels when you move the camera icon on the LOD Group selection bar. The camera icon acts like a playhead which you can use to scrub back and forth to control the exact position to preview along the LOD Group selection bar. The preview shows what the Camera will render at each LOD level.
The LOD preview playhead shows the exact position as a percentage along the LOD Group selection bar from 100% on the left to 0% on the right. The percentage represents the ratio of the GameObject’s screen space height to the total screen height.
As you move through the levels, the Scene view displays the bounding box of the Tree Asset and the overlay indicates which LOD is active:

Renderers for LOD Meshes
When you select an LOD level box on the LOD Group selection bar, a Renderers panel appears.
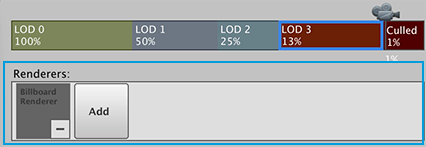
The ‘Renderers’ are actually GameObjects that hold the Mesh for that LOD level. Usually this is a child of the GameObject that has the LODGroup component.
To set a renderer Mesh for the current LOD level, click the Add box and choose the GameObject for that LOD level from the object picker.
You can choose any GameObject for the renderer, but if you choose a GameObject that isn’t already a child, Unity prompts you to parent it to the LODGroup GameObject.
Transitioning between LOD levels
Smooth transitions between LOD levels improves the player’s experience of your game. As the Camera moves closer or farther away, you don’t want players to see an obvious switchover (sometimes called popping) from the current LOD level to the next.
Smooth transitions take place inside transition zones, where Unity renders both the current and next LOD levels separately, and then cross-fades them together.
Cross-fading is the technique of rendering two levels at the same time, with a weighting of 1 to 0 for the current LOD level and 0 to 1 for the next LOD level:

Unity usually implements the cross-fading by using either screen-space dithering or transparency. For the last LOD level, there is no cross-fading: the current level just fades out.
To set up smooth transitions on your LOD levels:
-
Select the Fade Mode drop-down menu and choose Cross Fade:
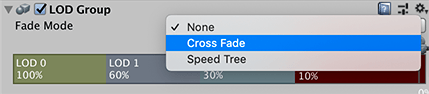
Fade Mode drop-down menu Note: If your Tree Asset was made with SpeedTree, choose the Speed Tree mode instead. For more information, see Working with SpeedTree Models.
-
By default, the Animate Cross-fading option is enabled, meaning that Unity performs a time-based transition. If you want to define your own transition zone based on the Camera’s position, disable the Animate Cross-fading option and set the Fade Transition Width property.
For more information, see Customizing the transition zone value.
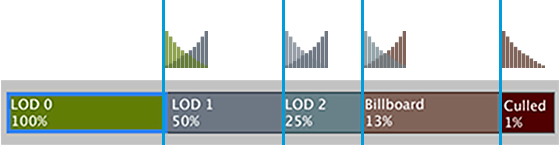
Customizing the transition zone
The transition between two LOD levels begins the moment the Model’s height ratio crosses the next LOD threshold. For example, if the LOD 1 threshold is set at 60%, the transition between the LOD 0 and LOD 1 levels always begins as soon as the height of the Model is 60%. The transition lasts for a short period of time:
This behavior is animated by time, so you don’t need to set any properties once you enable the Animate Cross-fading property. The exact duration of the cross-fade is the same for every LOD level.
Alternatively, you can manually define transition zones inside each LOD level by its position. Each zone begins and ends before the next LOD level’s threshold. You define what proportion of each LOD level to use as the transition zone; that is, you set how far before the next level’s threshold the transition begins:
Use the Fade Transition Width property to define the transition zone on each LOD level:
Disable the Animate Cross-fading option.
-
Click on the specific LOD level box that you want to set.
The Fade Transition Width property appears below the LOD Group selection bar.
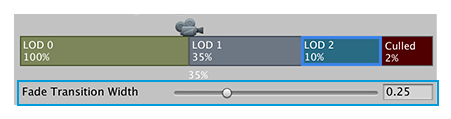
The Fade Transition Width property appears Set the Fade Transition Width property to define the width of the cross-fade transition zone as a proportion (between 0.0 and 1.0) of the current LOD level’s entire length. For example, specify a smaller value to delay the onset of the blending and create a faster transition.
Working with SpeedTree Models
SpeedTree geometries store the next LOD position for each vertex. Every vertex then knows how to interpolate between the current LOD position and the next LOD position. When Unity imports Models created in SpeedTree, it automatically sets them to the Speed Tree mode.

Unity only needs to render the current LOD geometry and provide a value from 0 to 1 to instruct each vertex to gradually move to the next LOD position. At the end of the transition, the geometries of the current LOD and the next LOD match perfectly.
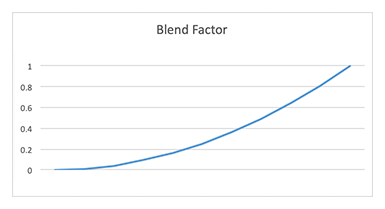
Blending between two LOD levels begins at 0 and ends at 1. Any point along this zone is the blend factor, which represents the weighting between the current LOD level and the next LOD level:
The Speed Tree mode uses the blend factor to interpolate the vertex positions between the current Mesh LOD level and the next Mesh LOD level, and then renders the geometry at that position.
Note: The Speed Tree mode is only used for blending between two Mesh LOD levels: that is, when both current and next LOD levels have a Mesh Renderer. When transitioning to a Billboard LOD level or when fading out entirely, Unity performs Cross Fade-style blending.
Blend Factors in Shader code
Unity doesn’t provide a default built-in technique to blend LOD geometries. You need to implement your own technique according to your game type and Asset production pipeline.
Unity calculates a blend factor from the GameObject’s screen size and passes it to your shader in the unity_LODFade.x uniform variable. Depending on the Fade Mode you choose, use either the LOD_FADE_PERCENTAGE or LOD_FADE_CROSSFADE keyword for GameObjects rendered with LOD fading.
For time-based (animated) transitions, you can set the exact duration of the transition globally for every LOD level with the LODGroup.crossFadeAnimationDuration member.
For information on LOD naming conventions, see Level of Detail.
- 2018–02–08 Page published
Copyright © 2023 Unity Technologies
优美缔软件(上海)有限公司 版权所有
"Unity"、Unity 徽标及其他 Unity 商标是 Unity Technologies 或其附属机构在美国及其他地区的商标或注册商标。其他名称或品牌是其各自所有者的商标。
公安部备案号:
31010902002961