Property Drawers
Los Property Drawers pueden ser usados para personalizar el aspecto de ciertos controles en la ventana del Inspector, mediante el uso de atributos en sus scripts, o controlando cómo un clase específica Serializable debería verse.
Los Property Drawers tienen dos usos:
- Personalizar el GUI de cada instancia de una clase Serializable.
Personalizar el GUI de miembros de script utilizando Atributos de Propiedad(Property Attributes)
Personalizar el GUI de una clase Serializable
Si usted tiene una clase Serializable personalizada, usted puede utilizar un Property Drawer para controlar cómo se ve en el Inspector. Considere el ingrediente de la clase Serializable en el script de abajo:
JavaScript (ejemplo):
enum IngredientUnit { Spoon, Cup, Bowl, Piece }

// Custom serializable class
class Ingredient extends System.Object {
    var name : String;
    var amount : int = 1;
    var unit : IngredientUnit;
}

var potionResult : Ingredient;
var potionIngredients : Ingredient[];

function Update () {
    // Update logic here...
}
C# (ejemplo):
using UnityEngine;
using System.Collections;

public enum IngredientUnit { Spoon, Cup, Bowl, Piece }

// Custom serializable class
[System.Serializable]
public class Ingredient : System.Object {
    string name;
    int amount = 1;
    IngredientUnit unit;
}

public class Recipe : MonoBehaviour {
    Ingredient potionResult;
    Ingredient[] potionIngredients;

    void Update() {
        // Update logic here...
    }
}
using UnityEngine;
using System.IO;

class Testing : MonoBehaviour{

    enum IngredientUnit { Spoon, Cup, Bowl, Piece }

    // Custom serializable class
    [System.Serializable]
    class Ingredient{
        string name;
        int amount = 1;
        IngredientUnit unit;
    }

    Ingredient potionResult;
    Ingredient[] potionIngredients;

    void Update () {
    // Update logic here...
    }
}
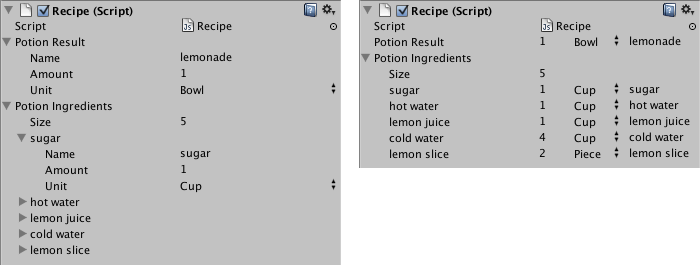
Utilizando un Property Drawer personalizado, cada apariencia de la clase del Ingrediente en el Inspector puede ser cambiada. Compare el aspecto de las propiedades del Ingrediente en el Inspector con y sin una Property Drawer Personalizado:
Usted puede adjuntar el Property Drawer a una clase Serializable utilizando el atributo CustomPropertyDrawer y pasar el tipo de la clase Serializable al cual es un drawer.
JavaScript (ejemplo):
@CustomPropertyDrawer(Ingredient)
class IngredientDrawer extends PropertyDrawer {

    // Draw the property inside the given rect
    function OnGUI (position : Rect, property : SerializedProperty, label : GUIContent) {
        // Using BeginProperty / EndProperty on the parent property means that
        // prefab override logic works on the entire property.
        EditorGUI.BeginProperty (position, label, property);

        // Draw label
        position = EditorGUI.PrefixLabel (position, GUIUtility.GetControlID (FocusType.Passive), label);

        // Don't make child fields be indented
        var indent = EditorGUI.indentLevel;
        EditorGUI.indentLevel = 0;

        // Calculate rects
        var amountRect = new Rect (position.x, position.y, 30, position.height);
        var unitRect = new Rect (position.x+35, position.y, 50, position.height);
        var nameRect = new Rect (position.x+90, position.y, position.width-90, position.height);

        // Draw fields - passs GUIContent.none to each so they are drawn without labels
        EditorGUI.PropertyField (amountRect, property.FindPropertyRelative ("amount"), GUIContent.none);
        EditorGUI.PropertyField (unitRect, property.FindPropertyRelative ("unit"), GUIContent.none);
        EditorGUI.PropertyField (nameRect, property.FindPropertyRelative ("name"), GUIContent.none);

        // Set indent back to what it was
        EditorGUI.indentLevel = indent;

        EditorGUI.EndProperty ();
    }
}
C# (ejemplo):
using UnityEngine;
using UnityEditor;
using System.Collections;

[CustomPropertyDrawer(typeof(Ingredient))]
public class IngredientDrawer : PropertyDrawer {

    // Draw the property inside the given rect
    void OnGUI(Rect position, SerializedProperty property, GUIContent label) {
        // Using BeginProperty / EndProperty on the parent property means that
        // prefab override logic works on the entire property.
        EditorGUI.BeginProperty(position, label, property);

        // Draw label
        position = EditorGUI.PrefixLabel(position, GUIUtility.GetControlID(FocusType.Passive), label);

        // Don't make child fields be indented
        int indent = EditorGUI.indentLevel;
        EditorGUI.indentLevel = 0;

        // Calculate rects
        Rect amountRect = new Rect(position.x, position.y, 30, position.height);
        Rect unitRect = new Rect(position.x+35, position.y, 50, position.height);
        Rect nameRect = new Rect(position.x+90, position.y, position.width-90, position.height);

        // Draw fields - passs GUIContent.none to each so they are drawn without labels
        EditorGUI.PropertyField(amountRect, property.FindPropertyRelative ("amount"), GUIContent.none);
        EditorGUI.PropertyField(unitRect, property.FindPropertyRelative ("unit"), GUIContent.none);
        EditorGUI.PropertyField(nameRect, property.FindPropertyRelative ("name"), GUIContent.none);

        // Set indent back to what it was
        EditorGUI.indentLevel = indent;

        EditorGUI.EndProperty();
    }
}
using UnityEngine;
using UnityEditor;
using System.Collections;


[CustomPropertyDrawer (Ingredient)]
class IngredientDrawer : PropertyDrawer {

    // Draw the property inside the given rect
    void OnGUI (Rect position, SerializedProperty property, GUIContent label) {
        // Using BeginProperty / EndProperty on the parent property means that
        // prefab override logic works on the entire property.
        EditorGUI.BeginProperty (position, label, property);

        // Draw label
        position = EditorGUI.PrefixLabel (position, GUIUtility.GetControlID (FocusType.Passive), label);

        // Don't make child fields be indented
        var indent = EditorGUI.indentLevel;
        EditorGUI.indentLevel = 0;

        // Calculate rects
        Rect amountRect = new Rect (position.x, position.y, 30, position.height);
        Rect unitRect = new Rect (position.x+35, position.y, 50, position.height);
        Rect nameRect = new Rect (position.x+90, position.y, position.width-90, position.height);

        // Draw fields - passs GUIContent.none to each so they are drawn without labels
        EditorGUI.PropertyField (amountRect, property.FindPropertyRelative ("amount"), GUIContent.none);
        EditorGUI.PropertyField (unitRect, property.FindPropertyRelative ("unit"), GUIContent.none);
        EditorGUI.PropertyField (nameRect, property.FindPropertyRelative ("name"), GUIContent.none);

        // Set indent back to what it was
        EditorGUI.indentLevel = indent;

        EditorGUI.EndProperty ();
    }
}
Personalizar el GUI de miembros de script utilizando Atributos de Propiedad(Property Attributes)
El otro uso de un Property Drawer es alterar la apariencia de miembros en un script que tienen Property Attributes personalizados. Digamos que usted quiere limitar floats o enteros en su script a un cierto rango y mostrarlos como deslizadores en el Inspector. Utilizando el PropertyAttribute integrado llamado RangeAttribute usted puede hacer justo eso:
JavaScript (ejemplo):
// Show this float in the Inspector as a slider between 0 and 10
@Range (0.0, 10.0)
var myFloat = 0.0;

//C# example.
[Range(0.0f, 10.0f)]
public float myFloat = 0.0f;
C# (ejemplo):
// Show this float in the Inspector as a slider between 0 and 10
[Range(0.0f, 10.0f)]
float myFloat = 0.0f;
Usted puede hacer su propio PropertyAttribute también. Nosotros utilizaremos el código para el RangeAttribute como un ejemplo. El atributo debe extender la clases PropertyAttribute. Si usted quiere, su propiedad puede tomar parámetros y almacenarlos como variables de miembro públicas.
JavaScript (ejemplo):
class RangeAttribute extends PropertyAttribute {
    var min : float;
    var max : float;

    function RangeAttribute (min : float, max : float) {
        this.min = min;
        this.max = max;
    }
}
C# (ejemplo):
using UnityEngine;
using System.Collections;


public class RangeAttribute : PropertyAttribute {
    public float min;
    public float max;

    public RangeAttribute (float min, float max) {
        this.min = min;
        this.max = max;
    }
}
using UnityEngine;
using System.Collections;

public class Testing : PropertyAttribute
{
        float min;
        float max;

        void RangeAttribute (float min, float max) {
            this.min = min;
            this.max = max;
        }
}
Ahora que usted tiene el atributo, usted necesitará hacer un Property Drawer que dibuje propiedades que tengan ese atributo. El Drawer debe extender la clase PropertyDrawer, y debe tener un atributo CustomPropertyDrawer para decirle qué atributo es un drawer.
La clase property drawer se debería colocar en un script del editor, dentro de una carpeta llamada Editor.
JavaScript (ejemplo):
// Tell the RangeDrawer that it is a drawer for properties with the RangeAttribute.
@CustomPropertyDrawer (RangeAttribute)
class RangeDrawer extends PropertyDrawer {

    // Draw the property inside the given rect
    function OnGUI (position : Rect, property : SerializedProperty, label : GUIContent) {

        // First get the attribute since it contains the range for the slider
        var range : RangeAttribute = attribute as RangeAttribute;

        // Now draw the property as a Slider or an IntSlider based on whether it's a float or integer.
        if (property.propertyType == SerializedPropertyType.Float)
            EditorGUI.Slider (position, property, range.min, range.max, label);
        else if (property.propertyType == SerializedPropertyType.Integer)
            EditorGUI.IntSlider (position, property, range.min, range.max, label);
        else
            EditorGUI.LabelField (position, label.text, "Use Range with float or int.");
    }
}
C# (ejemplo):
using UnityEngine;
using UnityEditor;
using System.Collections;

// Tell the RangeDrawer that it is a drawer for properties with the RangeAttribute.

[CustomPropertyDrawer(typeof(RangeAttribute))]
public class RangeDrawer : PropertyDrawer {

    // Draw the property inside the given rect
    void OnGUI (Rect position, SerializedProperty property, GUIContent label) {

        // First get the attribute since it contains the range for the slider
        RangeAttribute range  = attribute as RangeAttribute;

        // Now draw the property as a Slider or an IntSlider based on whether it's a float or integer.
        if (property.propertyType == SerializedPropertyType.Float)
            EditorGUI.Slider(position, property, range.min, range.max, label);
        else if (property.propertyType == SerializedPropertyType.Integer)
            EditorGUI.IntSlider(position, property, (int) range.min, (int) range.max, label);
        else
            EditorGUI.LabelField(position, label.text, "Use Range with float or int.");
    }
}
Tenga en cuenta que por razones de rendimiento, las funciones EditorGUILayout no son utilizables con Property Drawers.
Copyright © 2023 Unity Technologies
优美缔软件(上海)有限公司 版权所有
"Unity"、Unity 徽标及其他 Unity 商标是 Unity Technologies 或其附属机构在美国及其他地区的商标或注册商标。其他名称或品牌是其各自所有者的商标。
公安部备案号:
31010902002961