- Unity User Manual (2019.3)
- インポート
- モデルの Import Settings ウィンドウ
- SketchUp Import Settings window
SketchUp Import Settings window
SketchUp is software that is commonly used for architecture modeling. Unity reads SketchUp files directly and supports the following SketchUp features:
- テクスチャとマテリアル。Unity は Material タブの設定に従ってこれらをインポートします。
- コンポーネント定義とグループ。これらは、メッシュに変換され、シーンに配置できるゲームオブジェクトとしてインスタンス化されます。
- ファイルの各シーンのカメラデータ
Tip: For information on how to export an FBX file from SketchUp, see Using FBX files in other applications. For a list of known issues and limitations with importing from SketchUp, see the Limitations section below.

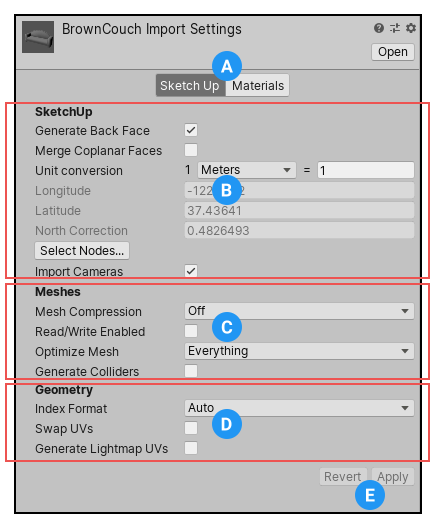
(A) You can switch between the Sketch Up tab and the Materials tab. SketchUp import settings for Materials work exactly the same way as for standard FBX Models. For reference documentation on properties on the Materials tab, see the Materials tab documentation.
(B) The SketchUp section provides settings that are specific to SketchUp Models.
(C) The Meshes section provides the same settings as those available for FBX Models.
(D) The Geometry section provides a subset of the settings available for FBX Models, dealing with indexing and UVs.
(E) Use the Revert button to cancel any changes you make on the SketchUp Import Settings window or Apply to accept the changes and continue.
SketchUp section
To import a SketchUp file directly into Unity, drag it into the Assets folder using the Finder (macOS) or the File Manager (Windows). Then select the Asset file from the Project view inside the Unity Editor.

| プロパティー | 機能 | |
|---|---|---|
| Generate Back Face | Unity で後ろ向きのポリゴンを生成します。デフォルトでは、SketchUpで後ろ向きのポリゴンに割り当てられたマテリアルがないかぎり、Unity は前向きのポリゴンのみをインポートしてポリゴンの数を減らします。 | |
| Merge Coplanar Faces | Unity でメッシュを生成するときに、同一平面上の面をマージします。 | |
| Unit Conversion | ユニット変換のための長さの計測 | |
| Unit drop-down box | 変換に使用する単位を選択します。デフォルトは Meters (メーター) です。 | |
| Value to convert | この値は、Scale Factor の計算方法を決定します (後述の ユニット変換 を参照してください)。 | |
| Longitude | 地理座標系の位置を特定するために使用する Geo Coordinate システムからの読み取り専用の値。 | |
| Latitude | 地理座標系の位置を特定するために使用する Geo Coordinate システムからの読み取り専用の値。 | |
| North Correction | Geo Coordinateシステムからの読み取り専用の値。北を Z 軸に回転させるために必要な角度を指定します。 | |
| Select Nodes | インポートするノードを指定するウィンドウを開きます。ノードは SketchUp のエンティティ、グループ、コンポーネントインスタンスを表します。例えば、1 つのファイルに複数の長椅子が含まれている場合は、インポートしたいものを選べます。詳細は、後述のSketchUpNode の選択 を参照してください。 | |
| Import Cameras | Import cameras from your .skp file. See Importing Cameras below for details. | |
Unit conversion
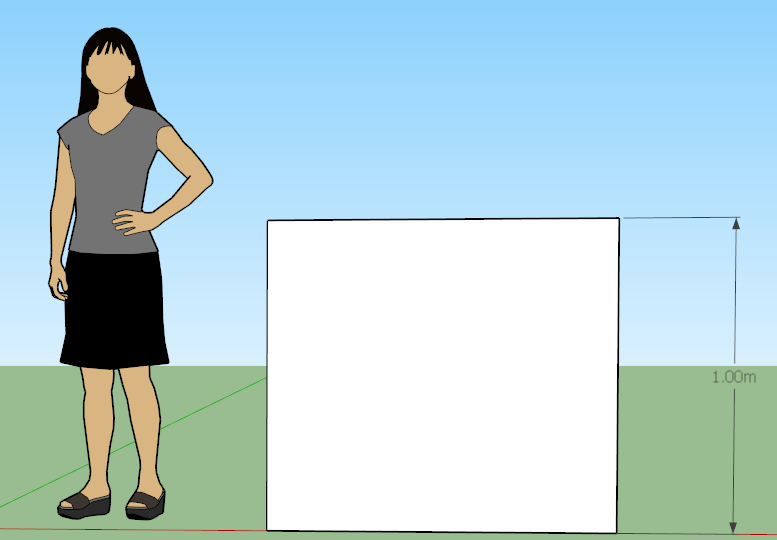
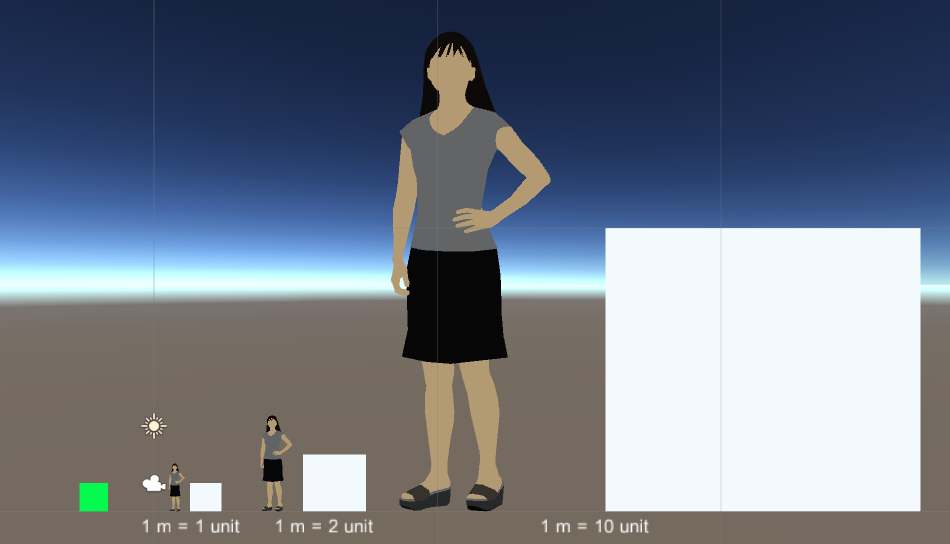
デフォルトでは、Unity は SketchUp モデルの 1 メートルを 1 ユニットにスケールします。

デフォルトの Unit Conversion の値を変更すると、インポートしたファイルのスケールに影響します。

Selecting SketchUp Nodes
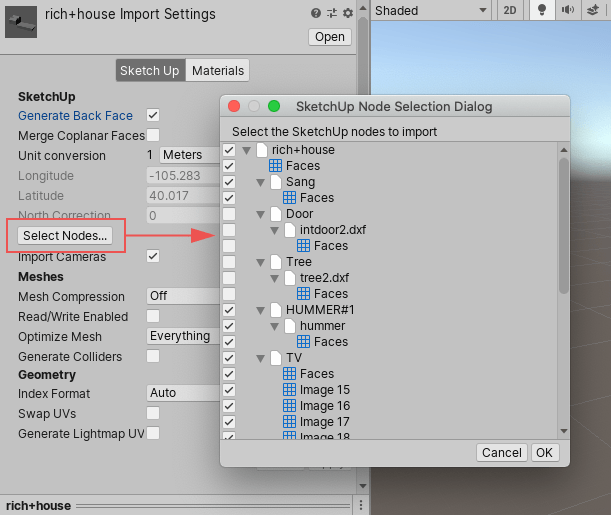
Unity supports the visibility setting in the SketchUp file for each node. If a node is hidden in the SketchUp file, Unity does not import the node by default. However, you can override this behavior by clicking the Select Nodes button to display the SketchUp node hierarchy in the SketchUp Node Selection Dialog window.

ファイル内の各グループとコンポーネントインスタンスは、ノードとして階層に表示され、選択/選択解除できます。加えるノードの選択が完了したら、OK ボタンをクリックして選択したノードのみをインポートします。
カメラのインポート
When Unity imports cameras from a .skp file, it converts these SketchUp camera types to the following:
| SketchUp Camera type: | Unity Camera: |
|---|---|
| Parallel Projection | Camera in orthographic mode |
| Perspective | Camera in perspective mode |
| Two Point | Physical Camera with a non-zero lens shift |
メッシュプロパティーセクション

| プロパティー | 機能 | |
|---|---|---|
| Mesh Compression | Set the level of compression ratio to reduce the file size of the Mesh. When you increase the compression ratio lowers the precision of the Mesh by using the mesh bounds and a lower bit depth per component to compress the mesh data. To optimize game size, turn Mesh Compression up as high as possible without the Mesh looking too different from the uncompressed version. |
|
| Off | 圧縮を使用しません。 | |
| Low | 低圧縮率を使用します。 | |
| Medium | 中程度の圧縮率を使用します。 | |
| High | 高い圧縮率を使用します。 | |
| Read/Write Enabled | When you enable this option, Unity uploads the Mesh data to GPU-addressable memory, but also keeps it in CPU-addressable memory. This means that Unity can access the Mesh data at run time, and you can access it from your scripts. For example, you might want to do this if you’re generating a Mesh procedurally, or if you want to copy some data from a Mesh. When this option is disabled, Unity uploads the Mesh data to GPU-addressable memory, and then removes it from CPU-addressable memory. By default, this option is enabled. In most cases, to save runtime memory usage, disable this option. For information on when to enable Read/Write Enabled, see the Mesh.isReadable API documentation. |
|
| Optimize Mesh | Determine the order in which triangles are listed in the Mesh for better GPU performance. | |
| Nothing | No optimization. | |
| Everything | Let Unity reorder the vertices and indices for both polygons and vertices. This is the default. | |
| Polygon Order | Reorder only the polygons. | |
| Vertex Order | Reorder only the vertices. | |
| Generate Colliders | Enable this option to import your Meshes with Mesh Colliders automatically attached. This is useful to quickly generate a collision Mesh for environment geometry, but is not suitable for geometry you are moving. | |
Geometry プロパティーセクション

| プロパティー | 機能 | |
|---|---|---|
| Index Format | Define the size of the Mesh index buffer. Note: For bandwidth and memory storage size reasons, you generally want to keep 16-bit indices as default, and only use 32-bit when necessary, which is what the Auto option uses. |
|
| Auto | Let Unity decide whether to use 16-bit or 32-bit indices, depending on the Mesh vertex count when it imports a Mesh. This is the default setting. | |
| 16 bit | Use 16-bit indices when importing a Mesh. If the Mesh is larger, then it is split into <64k vertex chunks. | |
| 32 bit | Use 32-bit indices when importing a Mesh. If you are using GPU-based rendering pipelines (for example with compute shader triangle culling), using 32-bit indices ensures that all Meshes use the same index format. This reduces shader complexity, because they only need to handle one format. | |
| Swap UVs | これを有効にすると、メッシュの UV チャンネルを入れ替えます。ディフューズテクスチャがライトマップからの UV を使用している場合は、この設定を使用してください。Unity は最大 8 つの UV チャンネルをサポートしますが、すべての 3D アプリケーションが 2 つ以上の UV をエクスポートするわけではありません。 | |
| Generate Lightmap UVs | これを有効にすると、ライトマップに使用する 2 番目の UV チャンネルを作成します。詳しくは ライトマップ を参照してください。 | |
制限
- Unity does not support GIF Textures.
- Unity imports only limited data from SketchUp Scenes.
- Unity は SketchUp の以下をサポート/インポートしません。
- 2D コンポーネント(テキスト、面)
- Animation settings
- Attributes
- Drawing Styles
- Dynamic components
- Layers
- Lines
- Section Planes
- Shadow settings
- Camera import fully supported starting in 2019.1 NewIn20191