Create an Editor Window
Custom Editor windows allow you to extend Unity by implementing your own editors and workflows. This guide covers creating an Editor window through code, reacting to user input, making the UI resizable and handling hot-reloading.
In this tutorial, you will create a sprite browser, which finds and displays all sprites inside the project, and shows them as a list. Selecting a sprite in the list will display the image on the right side of the window.
You can find the completed example in the Editor window script section.
要件
このガイドは、Unity を使い慣れていて、UI Toolkit を使い慣れてはいない開発者のためのものです。Unity と C# スクリプティングについて基本的な知識があることが推奨されます。
このガイドでは、以下の概念も参照しています。
コンテンツ
Controls used in this guide:
このガイドでは、以下を行います。
- Create the Editor window script.
- Create a menu entry to open the window.
- Add UI controls to the window.
- Write code to respond to user selections.
- Make the UI resizable.
- Support hot-reloading in the Editor.
Create the Editor window script
| Tip |
|---|
You can generate the necessary code to create an Editor window script in the Unity Editor. From the Project window, right-click and select Create > UI Toolkit > Editor Window. For this guide please disable the UXML and USS checkboxes. You might also have to add additional using directives at the top of the file, as shown below. |
You can create Editor windows through C# scripts in your project. A custom Editor window is a class that derives from the EditorWindow class.
Create a new script file MyCustomEditor.cs under the Assets/Editor folder. Paste the following code into the script:
using System.Collections.Generic;
using System.Linq;
using UnityEditor;
using UnityEngine;
using UnityEngine.UIElements;

public class MyCustomEditor : EditorWindow
{
}
| 注意 |
|---|
This is an Editor-only window that includes the UnityEditor namespace, so the file must be placed under the Editor folder, or inside an Editor-only Assembly Definition. |
ウィンドウを開くためのメニュー項目を作成する
To open the new Editor window, you must create an entry in the Editor menu.
Add the MenuItem attribute to a static method. In this example, the name of the static method is ShowMyEditor().
Inside ShowMyEditor(), call the EditorWindow.GetWindow() method to create and display the window. It returns an EditorWindow object. To set the window title, change the EditorWindow.titleContent property.
Add the following function inside the MyCustomEditor class created in the previous step.
[MenuItem("Tools/My Custom Editor")]
public static void ShowMyEditor()
{
  // This method is called when the user selects the menu item in the Editor
  EditorWindow wnd = GetWindow<MyCustomEditor>();
  wnd.titleContent = new GUIContent("My Custom Editor");
}
Test your new window by opening it via the Unity Editor menu Tools > My Custom Editor.

ウィンドウにUIコントロールを追加する
UI Toolkit uses the CreateGUI method to add controls to Editor UI, and Unity calls the CreateGUI method automatically when the window needs to display. This method works the same way as methods such as Awake or Update.
You can add UI controls to the UI by adding visual elements to the visual tree. The VisualElement.Add() method is used to add children to an existing visual element. The visual tree of an Editor window is accessed via the rootvisualElement property.
To get started, add a CreateGUI() function to your custom Editor class and add a ‘Hello’ label:
public void CreateGUI()
{
  rootVisualElement.Add(new Label("Hello"));
}

| 注意 |
|---|
To present a list of sprites, use AssetDatabase functions to find all sprites in a project. |
Replace the code inside CreateGUI() with the code below to enumerate all sprites inside the project.
public void CreateGUI()
{
  // Get a list of all sprites in the project
  var allObjectGuids = AssetDatabase.FindAssets("t:Sprite");
  var allObjects = new List<Sprite>();
  foreach (var guid in allObjectGuids)
  {
    allObjects.Add(AssetDatabase.LoadAssetAtPath<Sprite>(AssetDatabase.GUIDToAssetPath(guid)));
  }
}
For the sprite browser, the top-level visual element will be a TwoPaneSplitView. This control splits the available window space into two panes: one fixed-size and one flexible-size. When you resize the window, only the flexible pane resizes, while the fixed-size pane remains the same size.
For the TwoPaneSplitView control to work, it needs to have exactly two children. Add code inside CreateGUI() to create a TwoPaneSplitview, then add two child elements as placeholders for different controls.
// Create a two-pane view with the left pane being fixed with
var splitView = new TwoPaneSplitView(0, 250, TwoPaneSplitViewOrientation.Horizontal);

// Add the view to the visual tree by adding it as a child to the root element
rootVisualElement.Add(splitView);

// A TwoPaneSplitView always needs exactly two child elements
var leftPane = new VisualElement();
splitView.Add(leftPane);
var rightPane = new VisualElement();
splitView.Add(rightPane);
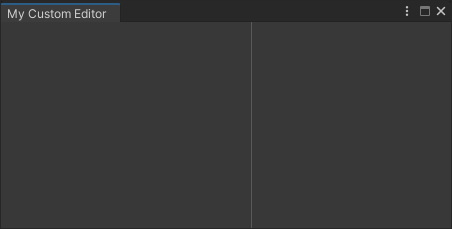
下の画像は、カスタムウィンドウに2つの空のパネルを配置したものです。仕切りバーは移動できます。
For the sprite browser, the left pane will be a list containing the names of all sprites found in the project. The ListView control derives from VisualElement, so it’s easy to modify the code to use a ListView instead of a blank VisualElement.
Modify the code inside the CreateGUI() function to create a ListView control for the left pane instead of a VisualElement.
public void CreateGUI()
{
  ...
  var leftPane = new ListView();
  splitView.Add(leftPane);
  ...
}
The ListView control displays a list of selectable items. It’s optimized to create only enough elements to cover the visible area, and pool and recycle the visual elements as you scroll the list. This optimizes performance and reduces the memory footprint, even in lists that have many items.
To take advantage of this, the ListView must be properly initialized with the following:
- An array of data items.
- A callback function to create an individual visual list entry in the list.
- A bind function that initializes a visual list entry with an item from the data array.
You can create complex UI structures for each element in the list, but this example uses a simple text label to display the sprite name.
Add code to the bottom CreateGUI() function that initializes the ListView.
public void CreateGUI()
{
  ...
  // Initialize the list view with all sprites' names
  leftPane.makeItem = () => new Label();
  leftPane.bindItem = (item, index) => { (item as Label).text = allObjects[index].name; };
  leftPane.itemsSource = allObjects;
}
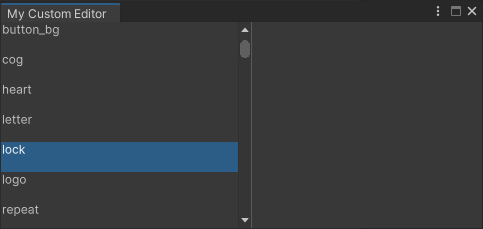
The image below shows the Editor window with a scrollable list view and selectable items.
参考までに、以下は、 CreateGUI() 関数の現在のコードをそのまま掲載しています。
public void CreateGUI()
{
  // Get a list of all sprites in the project
  var allObjectGuids = AssetDatabase.FindAssets("t:Sprite");
  var allObjects = new List<Sprite>();
  foreach (var guid in allObjectGuids)
  {
    allObjects.Add(AssetDatabase.LoadAssetAtPath<Sprite>(AssetDatabase.GUIDToAssetPath(guid)));
  }

  // Create a two-pane view with the left pane being fixed with
  var splitView = new TwoPaneSplitView(0, 250, TwoPaneSplitViewOrientation.Horizontal);

  // Add the panel to the visual tree by adding it as a child to the root element
  rootVisualElement.Add(splitView);

  // A TwoPaneSplitView always needs exactly two child elements
  var leftPane = new ListView();
  splitView.Add(leftPane);
  var rightPane = new VisualElement();
  splitView.Add(rightPane);

  // Initialize the list view with all sprites' names
  leftPane.makeItem = () => new Label();
  leftPane.bindItem = (item, index) => { (item as Label).text = allObjects[index].name; };
  leftPane.itemsSource = allObjects;
}
Add callbacks
When you select a sprite from the list in the left pane, its image must display on the right pane. To do this you need to provide a callback function that the ListView can call when the user makes a selection. The ListView control has an onSelectionChange property for this purpose.
コールバック関数は、ユーザーが選択したアイテムを含むリストを受け取ります。 ListView を複数選択できるように設定することも可能ですが、デフォルトでは選択モードは1つのアイテムに限定されています。
Add a callback function when the user changes the selection from the list in the left pane.
public void CreateGUI()
{
  ...

  // React to the user's selection
  leftPane.onSelectionChange += OnSpriteSelectionChange;
}

private void OnSpriteSelectionChange(IEnumerable<object> selectedItems)
{
}
| 注意 |
|---|
| If you lose your window and the menu doesn’t reopen, close all floating panels through the menu under Window > Panels > Close all floating panels, or reset your window layout. |
To display the image of the selected sprite on the right side of the window, the function needs to be able to access the right-hand pane of the TwoPaneSplitView. You can make this control a member variable of the class to be able to access it inside the callback function.
Turn the rightPane created inside CreateGUI() into a member variable.
private VisualElement m_RightPane;

public void CreateGUI()
{
  ...

  m_RightPane = new VisualElement();
  splitView.Add(m_RightPane);

  ...
}
With a reference to the TwoPaneSplitView, you can access the right pane via the flexedPane property.
Before creating a new Image control on the right pane, use VisualElement.Clear() to remove the previous image. This method removes all children from an existing visual element.
Clear the right pane from all previous content and create a new Image control for the selected sprite.
private void OnSpriteSelectionChange(IEnumerable<object> selectedItems)
{
  // Clear all previous content from the pane
  m_RightPane.Clear();

  // Get the selected sprite
  var selectedSprite = selectedItems.First() as Sprite;
  if (selectedSprite == null)
    return;

  // Add a new Image control and display the sprite
  var spriteImage = new Image();
  spriteImage.scaleMode = ScaleMode.ScaleToFit;
  spriteImage.sprite = selectedSprite;

  // Add the Image control to the right-hand pane
  m_RightPane.Add(spriteImage);
}
| 注意 |
|---|
Make sure to include using System.Linq; at the top of your file to use the First() method on the selectedItems parameter. |
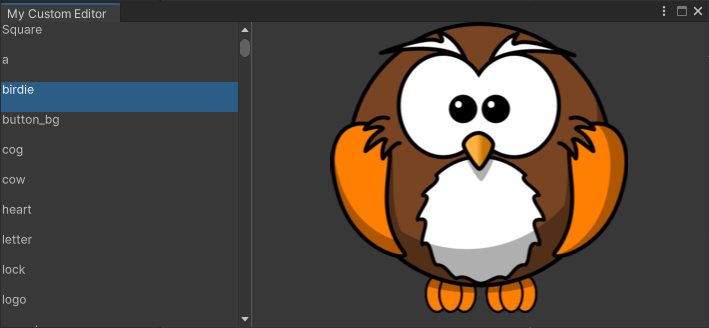
Test your sprite browser in the Editor. The image below shows the custom Editor window in action.
UIをリサイズ可能にする
エディターウィンドウは、最小と最大の許容寸法内でサイズ変更が可能です。これらの寸法は、C#でウィンドウを作成する際に、EditorWindow.minSize およびEditorWindow.maxSize プロパティに書き込むことで設定できます。ウィンドウのサイズが変わらないようにするには、両方のプロパティに同じ寸法を割り当てます。
Limit the size of your custom editor window by adding the following lines to the bottom of the ShowMyEditor() function:
[MenuItem("Tools/My Custom Editor")]
public static void ShowMyEditor()
{
  // This method is called when the user selects the menu item in the Editor
  EditorWindow wnd = GetWindow<MyCustomEditor>();
  wnd.titleContent = new GUIContent("My Custom Editor");

  // Limit size of the window
  wnd.minSize = new Vector2(450, 200);
  wnd.maxSize = new Vector2(1920, 720);
}
For situations where the window dimensions are too small to display the entire UI, you must use a ScrollView element to provide scrolling for the window, or the content might become inaccessible.
The ListView on the left pane is using a ScrollView internally, but the right pane is a regular VisualElement. Changing this to a ScrollView control automatically displays scrollbars when the window is too small to fit the entire image in its original size.
Exchange the right pane VisualElement for a ScrollView with bidirectional scrolling.
public void CreateGUI()
{
  ...

  m_RightPane = new ScrollView(ScrollViewMode.VerticalAndHorizontal);
  splitView.Add(m_RightPane);

  ...
}
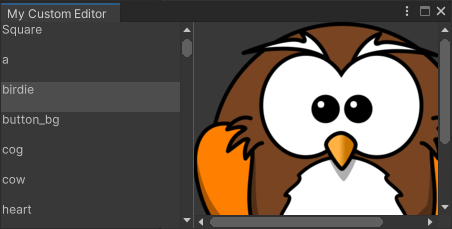
下の画像は,スプライトブラウザのウィンドウにスクロールバーをつけたものです.
Close and reopen your custom Editor window to test out the new size limits.
| 注意 |
|---|
In Unity 2021.2 and up, Unity doesn’t respect the minSize and maxSize properties when the window is docked. This allows the user to resize dock areas without limitations. Consider creating a ScrollView as one of your top-level elements and place all UI inside of it to make your UI as responsive as possible. |
エディターでのホットリロードのサポート
A proper Editor window must work with the hot-reloading workflow that happens in the Unity Editor. A C# domain reload occurs when scripts recompile or when the Editor enters Play mode. You can learn more about this topic on the Script Serialization page.
To see this in action in the Editor window you just created, open the sprite browser, select a sprite, and then enter Play mode. The window resets, and the selection disappears.
Since VisualElement objects aren’t serializable, the UI must be recreated every time a reload happens in Unity. This means that the CreateGUI() method is invoked after the reload has completed. This lets you restore the UI state before the reload by storing necessary data in your EditorWindow class.
Add a member variable to save the selected index in the sprite list.
public class MyCustomEditor : EditorWindow
{
    [SerializeField] private int m_SelectedIndex = -1;

    ....
}
When you make a selection, the new selection index of the list view can be stored inside this member variable. You can restore the selection index during creation of the UI inside the CreateGUI() function.
Add code to the end of the CreateGUI() function to store and restore the selected list index.
public void CreateGUI()
{
  ...

  // Restore the selection index from before the hot reload
  leftPane.selectedIndex = m_SelectedIndex;

  // Store the selection index when the selection changes
  leftPane.onSelectionChange += (items) => { m_SelectedIndex = leftPane.selectedIndex; };
}
Select a sprite from the list and enter Play mode to test hot-reloading.
Editor window script
The code below is the final script of the Editor window created during this guide. You can paste the code directly into a file called MyCustomEdtior.cs inside the Assets/Editor folder to see it in the Unity Editor.
using System.Collections.Generic;
using System.Linq;
using UnityEditor;
using UnityEngine;
using UnityEngine.UIElements;

public class MyCustomEditor : EditorWindow
{
  [SerializeField] private int m_SelectedIndex = -1;
  private VisualElement m_RightPane;

  [MenuItem("Tools/My Custom Editor")]
  public static void ShowMyEditor()
  {
    // This method is called when the user selects the menu item in the Editor
    EditorWindow wnd = GetWindow<MyCustomEditor>();
    wnd.titleContent = new GUIContent("My Custom Editor");

    // Limit size of the window
    wnd.minSize = new Vector2(450, 200);
    wnd.maxSize = new Vector2(1920, 720);
  }

  public void CreateGUI()
  {
    // Get a list of all sprites in the project
    var allObjectGuids = AssetDatabase.FindAssets("t:Sprite");
    var allObjects = new List<Sprite>();
    foreach (var guid in allObjectGuids)
    {
      allObjects.Add(AssetDatabase.LoadAssetAtPath<Sprite>(AssetDatabase.GUIDToAssetPath(guid)));
    }

    // Create a two-pane view with the left pane being fixed with
    var splitView = new TwoPaneSplitView(0, 250, TwoPaneSplitViewOrientation.Horizontal);

    // Add the panel to the visual tree by adding it as a child to the root element
    rootVisualElement.Add(splitView);

    // A TwoPaneSplitView always needs exactly two child elements
    var leftPane = new ListView();
    splitView.Add(leftPane);
    m_RightPane = new ScrollView(ScrollViewMode.VerticalAndHorizontal);
    splitView.Add(m_RightPane);

    // Initialize the list view with all sprites' names
    leftPane.makeItem = () => new Label();
    leftPane.bindItem = (item, index) => { (item as Label).text = allObjects[index].name; };
    leftPane.itemsSource = allObjects;

    // React to the user's selection
    leftPane.onSelectionChange += OnSpriteSelectionChange;

    // Restore the selection index from before the hot reload
    leftPane.selectedIndex = m_SelectedIndex;

    // Store the selection index when the selection changes
    leftPane.onSelectionChange += (items) => { m_SelectedIndex = leftPane.selectedIndex; };
  }

  private void OnSpriteSelectionChange(IEnumerable<object> selectedItems)
  {
    // Clear all previous content from the pane
    m_RightPane.Clear();

    // Get the selected sprite
    var selectedSprite = selectedItems.First() as Sprite;
    if (selectedSprite == null)
      return;

    // Add a new Image control and display the sprite
    var spriteImage = new Image();
    spriteImage.scaleMode = ScaleMode.ScaleToFit;
    spriteImage.sprite = selectedSprite;

    // Add the Image control to the right-hand pane
    m_RightPane.Add(spriteImage);
  }
}
Copyright © 2023 Unity Technologies
优美缔软件(上海)有限公司 版权所有
"Unity"、Unity 徽标及其他 Unity 商标是 Unity Technologies 或其附属机构在美国及其他地区的商标或注册商标。其他名称或品牌是其各自所有者的商标。
公安部备案号:
31010902002961