タイルパレットの作成
選択したタイル群を Tile Palette (タイルパレット) に置くと、パレットからタイルを選んで タイルマップ をペイントできます。タイルパレット を作成するには、Window > 2D > Tile Palette の順に移動し Tile Palette ウィンドウを開きます。このオプションがない場合は、2D Tilemap Editor パッケージがインストールされていない可能性があります。その場合は、Package Manager から 2D Tilemap Editor パッケージをダウンロードしてください。
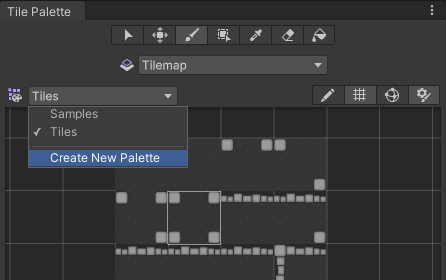
Tile Palette ウィンドウは、デフォルトでは何も表示されません。New Palette ドロップダウンをクリックして、プロジェクトで利用可能なタイルパレットのリストを開くか、または新しいパレットを作成するオプションを表示します。新しいパレットを作成するには、Create New Palette オプションを選択します。

Select the Create New Palette option from the dropdown menu.
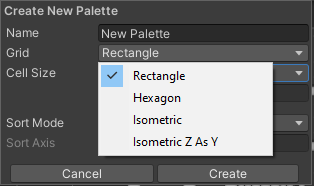
新しいタイルパレットを作成するオプションを選択すると、Create New Palette のダイアログボックスが開きます。このダイアログボックスには、新しいパレットを作成する際に利用できるさまざまなプロパティ設定やオプションが含まれています。

The Create New Palette options.

The expanded Grid options.
Create New Palette のプロパティ
| プロパティ | 機能 | |
|---|---|---|
| Name | 作成したタイルパレットアセットの名前を入力します。 | |
| Grid | 作成したタイルパレットを使用してペイントする グリッド のレイアウトを選択します。 | |
| Rectangle | デフォルトの矩形のタイルマップのパレットを作成します。 | |
| Hexagon | 六角形タイルマップ のパレットを作成します。 | |
| Isometric | 等角タイルマップ のパレットを作成します。詳細は、等角タイルマップのタイルパレットの作成 を参照してください。 | |
| Isometric Z as Y | Isometric Z as Y Tilemap (アイソメトリック Z As Y) のパレットを作成します。詳細は、等角タイルマップのタイルパレットの作成 を参照してください。 | |
| Hexagon Type (only available when the Hexagon Grid type is selected) | ペイントのためにパレットが使用される六角形タイルマップのタイプを選択します。詳細は、六角タイルマップ のドキュメントを参照してください。 | |
| Cell Size | タイルがペイントされるセルのサイズ | |
| Automatic | Cell Size は Unity のユニットで自動的に設定され、タイルアセットの作成に使用されるスプライトのサイズに基づきます。複数のタイルがある場合、セルサイズは、パレットの左下から最初のタイルに一致するように調整され、セルに正確に収まるようにします。 | |
| Manual | カスタムサイズの値を入力するには、このオプションを選択します。 | |
| Sort Mode | タイルパレットのレンダラーの 透明度のソートモード を決定します。 | |
| デフォルト | デフォルトの透明度のソートモードです。このモードは、プロジェクトの Graphics Settings で決定されます。 | |
| Orthographic | これを選択すると、カメラからタイルパレットのレンダラーまでの垂直方向の距離に基づいてレンダラーをソートします。 | |
| Perspective | これを選択すると、カメラからタイルパレット内のレンダラーまでの直線距離に基づいてレンダラーをソートします。 | |
| Custom Axis Sort | これを選択すると、カスタム軸に沿った距離に基づいてオブジェクトをソートします。 | |
| Sort Axis | Sort Mode が Custom Axis Sort に設定されている場合、ソート軸の XYZ 値を設定します。 | |
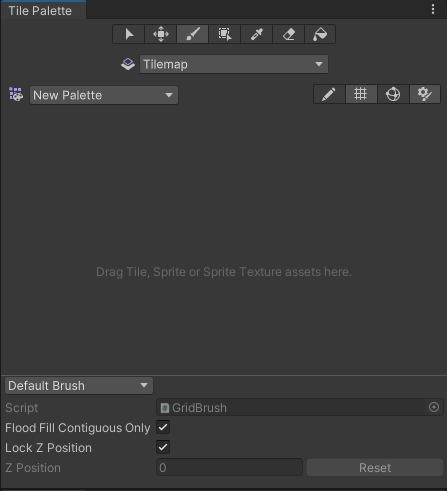
新しく作成したパレットに名前を付け必要な設定を選択してから、Create ボタンを選択します。パレットのアセットファイルを保存するフォルダを選択します。新しく作成されたパレットは、自動的に Tile Palette ウィンドウにロードされます。

A blank Tile Palette
Drag and drop Textures or Sprites from the Assets folder onto the Tile Palette, and choose where to save the new Tile Assets when prompted. New Tile Assets are generated in the selected save location, and the Tiles are placed on the grid of the active Tile Palette window.

Drag and drop directly onto the Tile Palette window.
Use the following shortcuts and actions to navigate the Palette window and begin picking Tiles to paint on the Tilemap in the Editor window.
| ショートカット/アクション | 機能 |
|---|---|
| Click on a Tile | タイルを選択 |
| Select and drag the mouse over multiple Tiles | 複数のタイルを選択 |
| Alt + Left button and drag | パン |
| Click the wheel button and drag | パン |
| Rotate the wheel button | ズームイン/ズームアウト |
アクティブブラシのインスペクター
The Active Brush inspector is at the bottom of the Tile Palette window and is minimized by default. To expand it, drag the bottom toolbar upwards. Use inspector to change the current active Brush and its properties.

Brush dropdown menu set to the Default Brush.
Use the Brush dropdown menu to change the active Brush from the Default Brush to other Brushes, such as Scriptable Brushes.
| プロパティ | 機能 |
|---|---|
| スクリプト | Displays the currently assigned script Asset that provides a fixed set of APIs for painting on Tilemaps. The default is the GridBrush. Users may use or create their own Scriptable Brushes which become available from the dropdown menu. The Script property updates to reflect the current active Brush. |
| Flood Fill Contiguous Only | Enable this property to have the Flood Fill tool only affect Tiles on a Tilemap which are both the same as the targeted Tile and are contiguous to each other from the targeted position. When disabled, Flood Fill will change all Tiles which are the same as the targeted Tile on a Tilemap regardless of their position. This only affects the Default Brush. |
| Lock Z Position | これを有効にすると、アクティブなブラシの Z ポジションを変更できます。無効にすると、アクティブなブラシの現在の Z ポジションを変更できません。 |
| Z Position | Can Change Z Position が有効な場合のみ使用できます。タイルをペイントする際に、このブラシに必要な Z 軸の値 (整数のみ) を入力します。これは、Z as Y Isometric Tilemap 上のタイルの相対的な高さを調整することにもなります。詳細は、パレットでタイルの高さを調整する を参照してください。 |
| Reset | Select to reset the z-position value back to zero. |

Expand or contract the inspector with the highlighted toggle.
Tile Palette の編集
The tools for picking and painting with Tiles can also be used to edit the Tile Palette directly, allowing you to move and manipulate the Tiles currently placed on the Tile Palette. Select the Palette you want to edit from the Palette dropdown menu (the default Palette is named ‘New Palette’), then select Edit to unlock the Palette for editing.

The Tile Palette Edit toggle.
Refer to Painting on Tilemaps for the shortcuts and functions of the Palette tools, which can also be used to edit the Palette.
既存のグリッドプレハブからのパレットアセットの作成
You can convert an existing Prefab to a Palette Asset, so that you can use it in the Tile Palette window. To do this, the Prefab must not already be a Palette Asset, and it must have a Grid component on its topmost GameObject.

The Tile Palette toolbar
To convert a Prefab, drag and drop it onto the Tile Palette toolbar (highlighted in the image above). The Editor automatically converts it to a Palette Asset, and adds a Grid Palette Asset. The new Palette Asset has the same name as its source, and it becomes available in the Palette dropdown menu.
Tile Palette Grid visibility toggle

The Tile Palette Grid toggle.
Switch the visibility of the Grid on the Tile Palette on or off by selecting the toggle highlighted above.
Tile Palette Gizmos visibility toggle
The Tile Palette can display Gizmos over the currently selected Palette Asset, to help you visualize specific criteria. For example, you can add a Gizmo that displays a special icon for Tiles that contain no Sprites.

The Tile Palette Gizmos toggle.
To display the default Unity and the Palette Asset’s Gizmos on the Tile Palette, enable the Gizmos toggle (highlighted above). The Tile Palette immediately displays any component with MonoBehaviour.OnDrawGizmos() in the Palette Asset.
To add your own custom gizmos to a Palette Asset, add a component with DrawGizmo to the Palette Asset:
- Select the Palette Asset in the Project window.
- プレハブモード でパレットアセットを開きます。
- プレハブモードでコンポーネントを追加します。
- プレハブモードでアセットを保存します。
- プレハブモードを終了します。
タイルパレットのコンテクストメニュー

The expanded context menu.
Right-click on the Tile Palette toolbar to bring up a contextual menu listing several actions you can use to select and locate objects that the Tile Palette interacts with. The available actions are:
| アクション | 機能 | |
|---|---|---|
| Select Paint Target | Selects the GameObject in the Hierarchy window that is the current target of the Active Tilemap in the Tile Palette. | |
| Select Palette Prefab | Selects the currently active Palette Prefab Asset in the Project window. | |
| Select Tile Asset | Project ウィンドウで現在選択されているタイルアセットを選択します。 | |
| Unlock/Lock Palette Editing | タイルパレットを編集可能/不可能に設定します。 | |
| Open Window as | The style of window. | |
| Dockable | Opens the window as a dockable window, which can be docked in the Editor. | |
| Floating | Opens the window as a floating window, which displays on top of the Editor. | |