- Unity User Manual 2023.2 (beta)
- オーディオ
- Native audio plug-in SDK
Native audio plug-in SDK
The native audio plug-in SDK is the built-in native audio plug-in interface of Unity. This page walks you through both basic concepts and complex use cases.
Prerequisite
You must first download the newest audio plug-in SDK.
概要
The native audio plug-in system consists of two parts:
The native DSP (Digital Signal Processing) plug-in which should be implemented as a .dll (Windows) or .dylib (OSX) in C or C++. Unlike scripts, this must be compilable by any platform that you want to support, possibly with platform-specific optimizations.
The GUI which is developed in C#. The GUI is optional, so you always start out plug-in development by creating the basic native DSP plug-in, and let Unity display a default slider-based UI for the parameter descriptions that the native plug-in exposes. This is the recommended approach to initiate any project.
You can initially prototype the C# GUI as a .cs file that you just drop into the Editor’s Assets folder much like any other Editor script. You can move this into a proper Visual Studio project later as your code starts to grow, and needs better modularization and better IDE support. This also enables you to compile it into a .dll, making it easier for the user to drop into the project and also to protect your code.
Both native DSP and GUI DLLs can contain multiple plug-ins, and binding happens only through the names of the effects in the plug-ins regardless of what the DLL file is called.
File types
The native side of the plug-in SDK consists of one file (AudioPluginInterface.h). However, to add multiple plug-in effects within the same .dll, Unity provides additional code to handle the effect definition and parameter registration in a unified manner (AudioPluginUtil.h and AudioPluginUtil.cpp). Note that the NativePluginDemo project contains several example plug-ins to get you started and display a variety of different plug-in types that are useful in a game context. This code is available in the public domain so anyone can use this code as a starting point to their own creations.
Develop a plug-in
To start developing a plug-in, define the parameters for your plug-in. Although, you don’t need to have a detailed plan of all the parameters that the plug-in should include, it’s useful to have a rough idea of the user experience and the various components to which you’d like to refer.
The example plug-ins that Unity provides come package with utility functions that’s easy to start with. As an example, use the Ring Modulator example plug-in, which is a simple plug-in. It multiplies the incoming signal by a sine wave, which gives a nice radio-noise and broken reception like effect, especially if you chain together multiple ring modulation effects with different frequencies.
The basic scheme for dealing with parameters in the example plug-ins is to define them as enum-values that you use as indices into an array of floats for both convenience and brevity.
enum Param
{
    P_FREQ,
    P_MIX,
    P_NUM
};

int InternalRegisterEffectDefinition(UnityAudioEffectDefinition& definition)
{
    int numparams = P_NUM;
    definition.paramdefs = new UnityAudioParameterDefinition [numparams];
    RegisterParameter(definition, "Frequency", "Hz",
        0.0f, kMaxSampleRate, 1000.0f,
        1.0f, 3.0f,
        P_FREQ);
    RegisterParameter(definition, "Mix amount", "%",
        0.0f, 1.0f, 0.5f,
        100.0f, 1.0f,
        P_MIX);
    return numparams;
}
The numbers in the RegisterParameter calls are the minimum, maximum, and default values followed by a scaling factor used for display-only. That is, for a percentage-value, the actual value goes from 0 to 1 and can be scaled to 100 when displayed. Although, there is no custom GUI code for this, Unity will generate a default GUI from these basic parameter definitions. No checks are performed for undefined parameters, so the AudioPluginUtil system expects that all declared enum values (except P_NUM) are matched up with a corresponding parameter definition.
Behind the scenes the RegisterParameter function fills out an entry in the UnityAudioParameterDefinition array of the UnityAudioEffectDefinition structure that’s associated with that plug-in (refer to the AudioEffectPluginInterface.h header file). In addition, set up the following remaining items in UnityAudioEffectDefinition:
- The callbacks to the functions that handle instantiating the plug-in (CreateCallback)
- Set and get parameters for
SetFloatParameterCallback/UnityAudioEffect_GetFloatParameterCallback - The actual processing for
UnityAudioEffect_ProcessCallback - Destroy the plug-in instance for
UnityAudioEffect_ReleaseCallbackwhen done
To make it easy to have multiple plug-ins in the same DLL, each plug-in resides in its own namespace, and a specific naming convention for the callback functions is used such that the DEFINE_EFFECT and DECLARE_EFFECT macros can fill out the UnityAudioEffectDefinition structure. Underneath the hood all the effects definitions are stored in an array to which a pointer is returned by the only entry point of the library UnityGetAudioEffectDefinitions.
This is useful to know in case you want to develop bridge plug-ins that map from other plug-in formats such as VST or AudioUnits to or from the Unity audio plug-in interface, in which case you need to develop a more dynamic way to set up the parameter descriptions at load time.
Instantiating the plug-in
You must next set the data for the instance of the plug-in. In the example plug-ins, data is set into the EffectData structure. The allocation of this must happen in the corresponding CreateCallback which is called for each instance of the plug-in in the mixer. Following is a simple example, where there’s only one sine-wave being multiplied to all channels. Typically, advanced plug-ins need you to allocate additional data per input channel.
struct EffectData
{
    struct Data
    {
        float p[P_NUM]; // パラメーター
        float s;        // オシレーターの正弦出力
        float c;        // オシレーターの余弦出力
    };
    union
    {
        Data data;
        unsigned char pad[(sizeof(Data) + 15) & ~15];
    };
};
UNITY_AUDIODSP_RESULT UNITY_AUDIODSP_CALLBACK CreateCallback(
    UnityAudioEffectState* state)
{
    EffectData* effectdata = new EffectData;
    memset(effectdata, 0, sizeof(EffectData));
    effectdata->data.c = 1.0f;
    state->effectdata = effectdata;
    InitParametersFromDefinitions(
        InternalRegisterEffectDefinition, effectdata->data.p);
    return UNITY_AUDIODSP_OK;
}
The UnityAudioEffectState contains various data from the host such as the sampling rate, the total number of samples processed (for timing), or whether the plug-in is bypassed, and is passed to all callback functions.
To free the plug-in instance, use the following corresponding function:
UNITY_AUDIODSP_RESULT UNITY_AUDIODSP_CALLBACK ReleaseCallback(
    UnityAudioEffectState* state)
{
    EffectData::Data* data = &state->GetEffectData<EffectData>()->data;
    delete data;
    return UNITY_AUDIODSP_OK;
}
The main processing of audio happens in ProcessCallback:
UNITY_AUDIODSP_RESULT UNITY_AUDIODSP_CALLBACK ProcessCallback(
    UnityAudioEffectState* state,
    float* inbuffer, float* outbuffer,
    unsigned int length,
    int inchannels, int outchannels)
{
    EffectData::Data* data = &state->GetEffectData<EffectData>()->data;

    float w = 2.0f * sinf(kPI * data->p[P_FREQ] / state->samplerate);
    for(unsigned int n = 0; n < length; n++)
    {
        for(int i = 0; i < outchannels; i++)
        {
            outbuffer[n * outchannels + i] =
                inbuffer[n * outchannels + i] *
                (1.0f - data->p[P_MIX] + data->p[P_MIX] * data->s);
        }
        data->s += data->c * w; // cheap way to calculate a sine-wave
        data->c -= data->s * w;
    }

    return UNITY_AUDIODSP_OK;
}
The GetEffectData function at the top is a helper function casting the effectdata field of the state variable to the EffectData::Data in the structure that’s declared above.
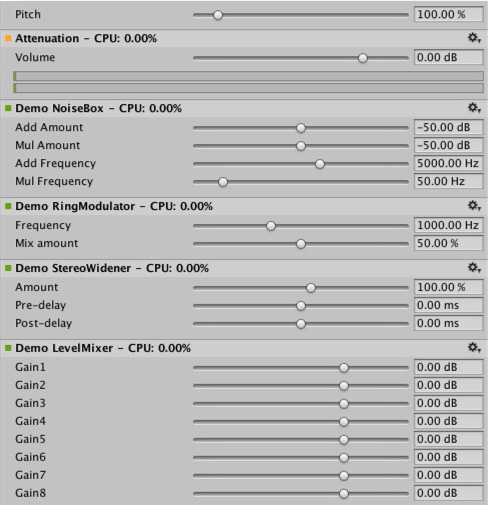
Other simple plug-ins included are the NoiseBox plug-in, which adds and multiplies the input signal by white noise at variable frequencies, or the Lofinator plug-in, which does simple downsampling and quantization of the signal. All these can be used in combination and with game-driven animated parameters to simulate anything from mobile phones to bad radio reception on walkies and broken loudspeakers.
StereoWidener は、可変遅延で mono (モノラル) や side コンポーネントにステレオ入力信号を分解し、その後、それらをステレオ効果の感覚を高めるために再結合します。
Determine what plug-in to load on which platform?
Native audio plug-ins use the same scheme as other native or managed plug-ins, in that, they must be associated with their respective platforms via the plug-in importer inspector. For information about the subfolders and where to place plug-ins, refer to Building plug-ins for desktop platforms. The platform association is necessary so that the system knows which plug-ins to include on a each build target in the standalone builds, and with the introduction of 64-bit support this even has to be specified within a platform. macOS plug-ins are useful because it supports universal binary format, which allows them to contain both 32 and 64 bit variants in the same bundle.
Native plug-ins in Unity that are called from managed code are loaded via the [DllImport] attribute, which reference the function to import from the native DLL. However, native audio plug-ins are different, because they need to be loaded before Unity starts creating any mixer assets that might need effects from the plug-in. The Editor doesn’t have this problem, because you can reload and rebuild the mixers that depend on plug-ins unlike in standalone builds, the plug-ins must be loaded before creating the mixer assets. To work around this, prefix the DLL of the plug-in audioplugin (case insensitive) for the system to detect and add it to a list of plug-ins that are automatically loaded at start. You must remember that the definitions inside the plug-in only define the names of the effects that are displayed inside Unity’s mixer. Regardless of what the .dll is called, it needs to start with the string audioplugin to be detected as such.
For platforms such as iOS, the plug-in code must be statically linked into the Unity binary that’s produced by the generated XCode project and just like plug-in rendering devices, the plug-in registration must be added explicitly to the startup code of the app.
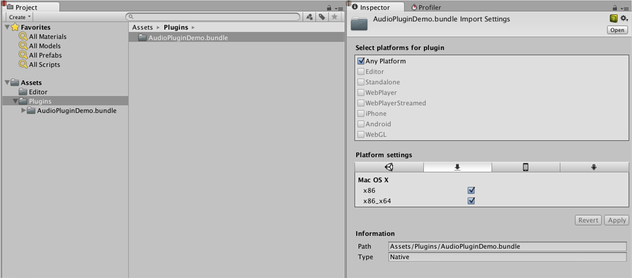
On macOS, one bundle can contain both the 32 and 64 bit version of the plug-in. You can also split them to save size.
Plug-ins with custom GUIs
This section provides advanced plug-in use cases, such as effects for equalization and multiband compression. These plug-ins have a much higher number of parameters than the simple plug-ins presented in the above section. In addition, the advanced plug-ins require physical coupling between parameters that require a better way to visualize the parameters than the simple sliders described above. Consider an equalizer for instance: each band has 3 different filters that collectively contribute to the final equalization curve and each of these filters has the 3 parameters frequency, Q-factor and gain which are physically linked and define the shape of each filter. It also useful to have an equalizer plug-in with a big display showing the resulting curve and the individual filter contributions. You operate the plug-in in such a way that multiple parameters are set simultaneously by simple dragging operations on the control instead of changing sliders one at a time.

For customizing the GUI of the Equalizer plug-in, drag the three bands to change the gains and frequencies of the filter curve. Hold shift down while dragging to change the shape of each band.
In summary, the definition, initialization, deinitialization, and parameter handling follows the exact same enum-based method that the simple plug-ins use, and even the ProcessCallback code is rather short.
To play around with a proper plug-in:
1. Open the AudioPluginDemoGUI.sln project in Visual Studio.
2. Locate the associated C# classes for the GUI code.
After Unity loads the native plug-in dlls and registers the contained audio plug-ins, it starts looking for corresponding GUIs that match the names of the registered plug-ins. This happens through the Name property of the EqualizerCustomGUI class which, like all custom plug-in GUIs, must inherit from IAudioEffectPluginGUI. The only important function inside this class is the bool OnGUI(IAudioEffectPlugin plugin) function. Through the IAudioEffectPlugin plug-in argument this function gets a handle to the native plug-in that it can use to read and write the parameters that the native plug-in has defined.
To read a parameter that the native plug-in calls:
plugin.GetFloatParameter("MasterGain", out masterGain);
Which returns true if the parameter is found. To set it, it calls:
plugin.SetFloatParameter("MasterGain", masterGain);
Which also returns true if the parameter exists, which is the most important binding between GUI and native code.
You can also use the function to query parameter NAME for its minimum, maximum, and default values to avoid duplicate definitions of these in the native and UI code.
plugin.GetFloatParameterInfo("NAME", out minVal, out maxVal, out defVal);
If your OnGUI function returns true, the Inspector will display the default UI sliders below the custom GUI. This is useful for GUI development as all the parameters are available while developing your custom GUI with the added advantage to check that the right actions performed on it result in the expected parameter changes.
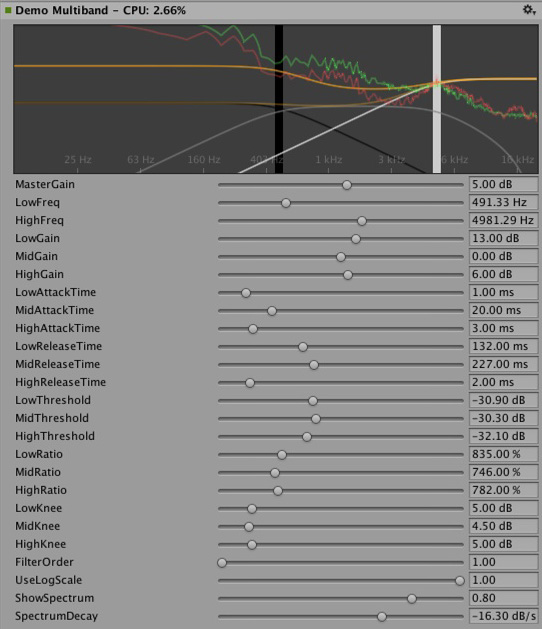
The DSP processing that goes on in the Equalizer and Multiband plug-ins are filters taken from Robert Bristow Johnson’s excellent Audio EQ Cookbook. You can use Unity’s internal API functions to plot the curves and draw antialiased curves for the frequency response.
Both Equalizer and Multiband plug-ins also provide code to overlay the input and output spectra for visualizing the effect of the plug-ins, which suggests: The GUI code runs at much lower update rate (the frame rate) than the audio processing and doesn’t have access to the audio streams. Therefore, to read this data, the native code provides the following special function:
UNITY_AUDIODSP_RESULT UNITY_AUDIODSP_CALLBACK GetFloatParameterCallback(
    UnityAudioEffectState* state,
    int index,
    float* value,
    char *valuestr)
{
    EffectData::Data* data = &state->GetEffectData<EffectData>()->data;
    if(index >= P_NUM)
        return UNITY_AUDIODSP_ERR_UNSUPPORTED;
    if(value != NULL)
        *value = data->p[index];
    if(valuestr != NULL)
        valuestr[0] = 0;
  return UNITY_AUDIODSP_OK;
}
It enables reading an array of floating-point data from the native plug-in. The plug-in system doesn’t care about what that data is, as long as the request doesn’t slow down the UI or the native code. For the Equalizer and Multiband code, a utility class called FFTAnalyzer makes it easy to feed in input and output data from the plug-in and get a spectrum back. This spectrum data is then resampled by GetFloatBufferCallback and handed to the C# UI code. The data must be resampled so that the FFTAnalyzer runs the analysis at a fixed frequency resolution while GetFloatBufferCallback just returns the number of samples requested, which is determined by the width of the view that’s displaying the data. For a simple plug-in that has a minimal amount of DSP code you might want to use the CorrelationMeter plug-in, which plots the amplitude of the left channel against the amplitude of the right channel to display the stereo effects of the signal.
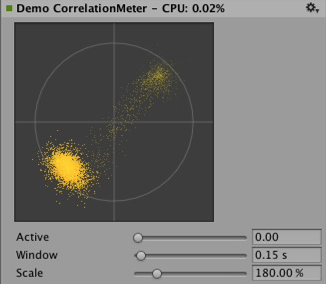
Left: Custom GUI of the CorrelationMeter plug-in.
下は、イコライザーGUI とスペクトル分析 (緑のカーブがソース、赤は処理後)。
At this point we would also like to point out that both the Equalizer and Multiband effects are kept intentionally simple and unoptimized, but we think they serve as good examples of more complex user interfaces that are supported by the plug-in system. There’s obviously a lot of work still in doing the relevant platform-specific optimizations, tons of parameter tweaking to make it fell really right and respond in the most musical way etc. etc… We might also implement some of these effects as built-in plug-ins in Unity at some point simply for the convenience of increasing Unity’s standard repertoire of plug-ins, but we sincerely hope that the reader will also take up the challenge to make some really awesome plug-ins – and who knows, they might at some point end up as built-in plug-ins. ;-)
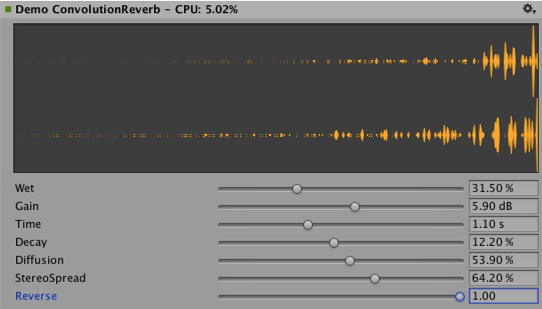
Convolution reverb example plug-in. The impulse response is decaying random noise, defined by the parameters. This is only for demonstration purposes, as a production plug-in should allow the user to load arbitrary recorded impulses, the underlying convolution algorithm remains the same nevertheless.
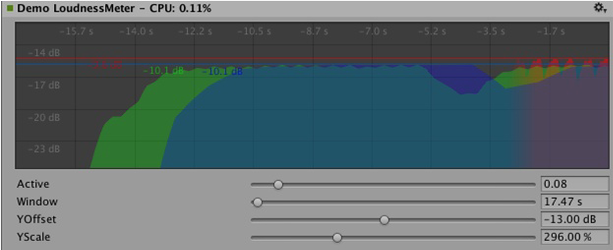
3 つの異なる時間スケールでレベルを測定するラウドネスモニターツールの例。 これもデモンストレーションを目的としたものですが、現在良く使われるラウドネス標準に準拠しており、モニターツールの構築し始めに適しています。 カーブレンダリングコードは Unity に組み込まれています。
Synchronizing to the DSP clock
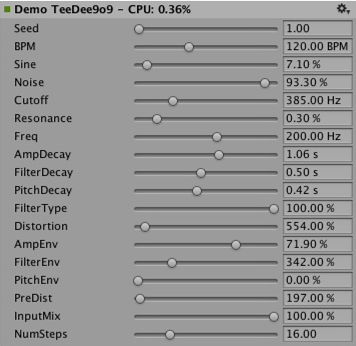
To try out some fun exercises, use the plug-in system to generate sound instead of processing it. For simple bassline and drum synthesizers for users who listen to acid trance, try simple clones of the main synths that defined this genre. Plugin_TeeBee.cpp and Plugin_TeeDee.cpp are simple synths that generate patterns with random notes, have parameters for tweaking the filters and envelopes in the synthesis engine. The state->dsptick parameter is read in the ProcessCallback to determine the position in a song. This counter is a global sample position, so you can divide it by the length of each note specified in samples and fire a note event to the synthesis engine whenever this division has a zero remainder. This way, all plug-in effects stay in sync to the same sample-based clock. If you want to play a prerecorded piece of music with a known tempo through such an effect, use the timing info to apply tempo-synchronized filter effects or delays on the music.

Spatialization
The native audio plug-in SDK is the foundation of the Spatialization SDK, which allows developing custom spatialization effects to instantiate per audio source. For more information, see Audio Spatializer SDK.
Outlook
This is just the beginning of an effort to open up parts of the sound system to high performance native code. Future plans include:
- Integrate native audio in other parts of Unity and utilize the effects outside the mixer.
- Extend the SDK to support other parameter types than floats with support for better default GUIs and storage of binary data.
Disclaimer:
While there are many similarities in the design, Unity’s native audio SDK isn’t built on top of other plug-in SDKs like Steinberg VST or Apple AudioUnits. While it’s possible to implement basic wrappers for these using this SDK that allow using such plug-ins with Unity, it’s important to note that this is strictly not managed by the Unity development team.
Hosting a plug-in poses its own challenges. For example, dealing with the intricacies of expected invocation orders and handling custom GUI windows that are based on native code can quickly become unmanageable, making the example code unhelpful.
While it’s possible to load your VST or AU plug-in or even effects for mocking up and testing sound design, note that using VST/AU limits you to few specific platforms. The advantage of writing audio plug-ins based on the Unity SDK however, is that it allows you to extend it to all platforms that support software-mixing and dynamically loaded native code. Therefore, use this approach only if you want to make a nice solution for mocking up early sound design with your favorite tools before committing to dedicating time to develop custom plug-ins (or simply to use metering plug-ins in the Editor that don’t alter the sound in any way).