IMGUI 기본 사항
이 섹션에서는 Unity의 IMGUI(Immediate Mode GUI) 시스템을 사용하여 Controls 를 스크립팅해야 하는 필요성에 대해 설명합니다.
IMGUI로 컨트롤을 제작하는 방법
Unity의 IMGUI 컨트롤은 OnGUI() 라는 특수 함수를 사용합니다. OnGUI() 함수는 이를 포함하는 스크립트가 활성화되면 Update() 함수와 마찬가지로 프레임마다 호출됩니다.
IMGUI 컨트롤 자체는 단순한 구조를 가지고 있습니다. 이 구조는 다음 예제에서 쉽게 확인할 수 있습니다.
/* Example level loader */


// JavaScript
function OnGUI () {
    // Make a background box
    GUI.Box (Rect (10,10,100,90), "Loader Menu");

    // Make the first button. If it is pressed, Application.Loadlevel (1) will be executed
    if (GUI.Button (Rect (20,40,80,20), "Level 1")) {
        Application.LoadLevel (1);
    }

    // Make the second button.
    if (GUI.Button (Rect (20,70,80,20), "Level 2")) {
        Application.LoadLevel (2);
    }
}


//C#
using UnityEngine;
using System.Collections;

public class GUITest : MonoBehaviour {

    void OnGUI () {
        // Make a background box
        GUI.Box(new Rect(10,10,100,90), "Loader Menu");

        // Make the first button. If it is pressed, Application.Loadlevel (1) will be executed
        if(GUI.Button(new Rect(20,40,80,20), "Level 1")) {
            Application.LoadLevel(1);
        }

        // Make the second button.
        if(GUI.Button(new Rect(20,70,80,20), "Level 2")) {
            Application.LoadLevel(2);
        }
    }
}
위의 예제는 완전한 함수 수준의 로더입니다. 이 스크립트를 복사하여 GameObject 에 연결하면 Play Mode 를 시작할 때 다음 메뉴가 나타납니다.

예제 코드를 자세하게 살펴보겠습니다.
첫 번째 GUI 라인 GUI.Box(Rect (10,10,100,90), “Loader Menu”); 는 “Loader Menu” 헤더 텍스트가 있는 Box 컨트롤을 표시하도록 합니다. 이는 잠시 후에 다룰 일반 GUI 컨트롤 선언 구성표를 따릅니다.
다음 GUI 라인은 Button 컨트롤 선언입니다. 이는 Box 컨트롤 선언과 조금 다릅니다. 자세히 말하면 전체 버튼 선언이 if 문 내부에 위치하고 있습니다. 게임이 실행 중이고 버튼이 클릭된 경우 이 if 문은 true 값을 반환하고 if 블록의 모든 코드가 실행됩니다.
OnGUI() 코드는 프레임마다 호출되므로 GUI 컨트롤을 명시적으로 생성하거나 제거할 필요는 없습니다. 컨트롤을 선언하는 라인과 생성하는 라인은 동일합니다. 컨트롤을 특정 시점에 표시해야 하는 경우 어떤 종류의 스크립팅 로직이라도 사용할 수 있습니다.
/* Flashing button example */


// JavaScript
function OnGUI () {
    if (Time.time % 2 < 1) {
        if (GUI.Button (Rect (10,10,200,20), "Meet the flashing button")) {
            print ("You clicked me!");
        }
    }
}


// C#
using UnityEngine;
using System.Collections;

public class GUITest : MonoBehaviour {

    void OnGUI () {
        if (Time.time % 2 < 1) {
            if (GUI.Button (new Rect (10,10,200,20), "Meet the flashing button")) {
                print ("You clicked me!");
            }
        }
    }
}
여기서 GUI.Button() 은 2초마다 호출되므로 버튼이 표시되었다가 사라집니다. 원래 사용자는 버튼이 보이는 경우에만 클릭할 수 있습니다.
보시다시피 원하는 로직을 사용하여 GUI 컨트롤이 표시되고 기능하는 시기를 제어할 수 있습니다. 이제 각 컨트롤의 선언에 대해 자세하게 살펴보겠습니다.
컨트롤의 구조
GUI 컨트롤을 선언할 때 필요한 다음과 같은 세 개의 주요 정보가 있습니다.
Type (Position, Content)
이 구조는 두 개의 인수를 가진 함수입니다. 이제 이 구조에 대해 자세하게 살펴보겠습니다.
타입(Type)
Type 은 Control Type 으로, 가이드의 레이아웃 모드 섹션에서 자세하게 설명된 Unity의 GUI 클래스 또는 GUILayout 클래스의 함수를 호출하여 선언됩니다. 예를 들어 GUI.Label() 는 비상호작용적 레이블을 생성합니다. 모든 컨트롤 타입은 나중에 가이드의 컨트롤 섹션에서 다룰 예정입니다.
포지션(Position)
Position 은 모든 GUI 컨트롤 함수의 첫 번째 인수입니다. 인수 자체는 Rect() 함수를 포함하고 있습니다. Rect() 함수는 left-most position, top-most position, total width, total height, 이렇게 네 개의 프로퍼티를 정의합니다. 이러한 값은 픽셀 값에 해당하는 integers 에서 설정됩니다. 모든 UnityGUI 컨트롤은 게시된 플레이어의 픽셀 해상도인 Screen Space 에서 작동합니다.
좌표 시스템은 왼쪽 상단을 원점으로 합니다. Rect(10, 20, 300, 100) 는 10,20 좌표에서 시작하고 310,120 좌표에서 끝나는 직사각형을 정의합니다. Rect() 의 세 번째와 네 번째 숫자는 직사각형 전체의 너비 및 높이이며, 컨트롤이 끝나는 좌표가 아닙니다. 따라서 위에 언급된 예제 직사각형은 310,120 좌표에서 끝나며, 300,100 좌표에서 끝나지 않습니다.
Screen.width 와 Screen.height 프로퍼티를 사용하여 플레이어에서 사용할 수 있는 스크린 공간의 총 크기를 구할 수 있습니다. 다음 예제는 이것이 어떻게 수행되는지 명확히 하는 데 도움이 될 수 있습니다.
/* Screen.width & Screen.height example */


// JavaScript
function OnGUI () {
    GUI.Box (Rect (0,0,100,50), "Top-left");
    GUI.Box (Rect (Screen.width - 100,0,100,50), "Top-right");
    GUI.Box (Rect (0,Screen.height - 50,100,50), "Bottom-left");
    GUI.Box (Rect (Screen.width - 100,Screen.height - 50,100,50), "Bottom-right");
}


// C#
using UnityEngine;
using System.Collections;

public class GUITest : MonoBehaviour {

    void OnGUI(){
        GUI.Box (new Rect (0,0,100,50), "Top-left");
        GUI.Box (new Rect (Screen.width - 100,0,100,50), "Top-right");
        GUI.Box (new Rect (0,Screen.height - 50,100,50), "Bottom-left");
        GUI.Box (new Rect (Screen.width - 100,Screen.height - 50,100,50), "Bottom-right");
    }

}

콘텐츠(Content)
GUI 컨트롤의 두 번째 인수는 컨트롤에서 표시되는 실제 콘텐츠입니다. 대부분의 경우 컨트롤에 일부 텍스트나 이미지를 표시하려고 합니다. 텍스트를 표시하려면 다음과 같이 문자열을 콘텐츠 인수로 전달하면 됩니다.
/* String Content example */


// JavaScript
function OnGUI () {
    GUI.Label (Rect (0,0,100,50), "This is the text string for a Label Control");
}


// C#
using UnityEngine;
using System.Collections;

public class GUITest : MonoBehaviour {

    void OnGUI () {
        GUI.Label (new Rect (0,0,100,50), "This is the text string for a Label Control");
    }

}
이미지를 표시하려면 public 변수인 Texture2D 를 선언하고 변수 이름을 다음과 같이 콘텐츠 인수로 전달해야 합니다.
/* Texture2D Content example */


// JavaScript
var controlTexture : Texture2D;

function OnGUI () {
    GUI.Label (Rect (0,0,100,50), controlTexture);
}


// C#
public Texture2D controlTexture;
  ...

void OnGUI () {
    GUI.Label (new Rect (0,0,100,50), controlTexture);
}
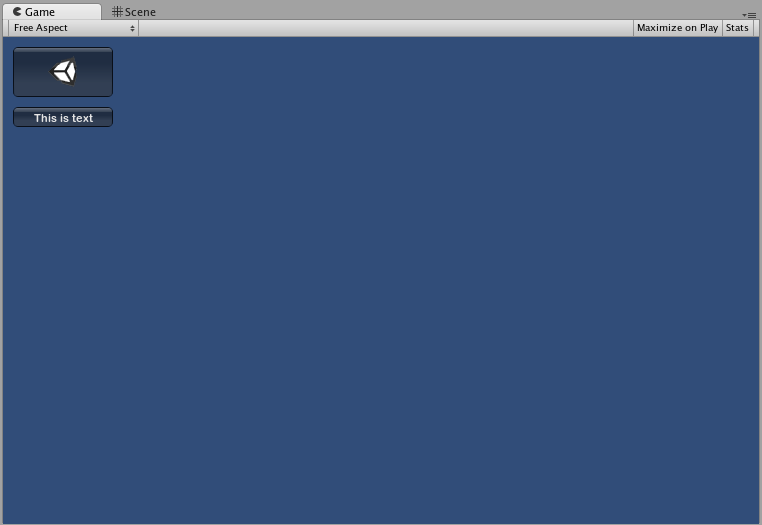
다음은 실제 시나리오와 유사한 예제입니다.
/* Button Content examples */


// JavaScript
var icon : Texture2D;

function OnGUI () {
    if (GUI.Button (Rect (10,10, 100, 50), icon)) {
        print ("you clicked the icon");
    }

    if (GUI.Button (Rect (10,70, 100, 20), "This is text")) {
        print ("you clicked the text button");
    }
}


// C#
using UnityEngine;
using System.Collections;

public class GUITest : MonoBehaviour {

    public Texture2D icon;

    void OnGUI () {
        if (GUI.Button (new Rect (10,10, 100, 50), icon)) {
            print ("you clicked the icon");
        }

        if (GUI.Button (new Rect (10,70, 100, 20), "This is text")) {
            print ("you clicked the text button");
        }
    }

}
GUI 컨트롤에서 이미지와 텍스트를 함께 표시할 수 있도록 하는 세 번째 옵션이 있습니다. GUIContent 오브젝트를 콘텐츠 인수로 제공하고 GUIContent에 표시될 문자열과 이미지를 정의할 수 있습니다.
/* Using GUIContent to display an image and a string */


// JavaScript
var icon : Texture2D;

function OnGUI () {
    GUI.Box (Rect (10,10,100,50), GUIContent("This is text", icon));
}


// C#
using UnityEngine;
using System.Collections;

public class GUITest : MonoBehaviour {

    public Texture2D icon;

    void OnGUI () {
        GUI.Box (new Rect (10,10,100,50), new GUIContent("This is text", icon));
    }

}
또한 GUIContent에서 Tooltip 을 정의하고 마우스 커서가 GUI 위에 있을 때 GUI의 다른 위치에 표시할 수도 있습니다.
/* Using GUIContent to display a tooltip */


// JavaScript
function OnGUI () {
    // This line feeds "This is the tooltip" into GUI.tooltip
    GUI.Button (Rect (10,10,100,20), GUIContent ("Click me", "This is the tooltip"));
    // This line reads and displays the contents of GUI.tooltip
    GUI.Label (Rect (10,40,100,20), GUI.tooltip);
}


// C#
using UnityEngine;
using System.Collections;

public class GUITest : MonoBehaviour {

    void OnGUI () {
        // This line feeds "This is the tooltip" into GUI.tooltip
        GUI.Button (new Rect (10,10,100,20), new GUIContent ("Click me", "This is the tooltip"));

        // This line reads and displays the contents of GUI.tooltip
        GUI.Label (new Rect (10,40,100,20), GUI.tooltip);
    }

}
GUIContent를 사용하여 문자열, 아이콘, 툴팁을 표시할 수도 있습니다.
/* Using GUIContent to display an image, a string, and a tooltip */


// JavaScript
var icon : Texture2D;

function OnGUI () {
    GUI.Button (Rect (10,10,100,20), GUIContent ("Click me", icon, "This is the tooltip"));
    GUI.Label (Rect (10,40,100,20), GUI.tooltip);
}


// C#
using UnityEngine;
using System.Collections;

public class GUITest : MonoBehaviour {

    public Texture2D icon;

    void OnGUI () {
        GUI.Button (new Rect (10,10,100,20), new GUIContent ("Click me", icon, "This is the tooltip"));
        GUI.Label (new Rect (10,40,100,20), GUI.tooltip);
    }

}
GUIContent 생성자 스크립트 레퍼런스 페이지에서 몇몇 사용 예제를 찾을 수 있습니다.
Copyright © 2023 Unity Technologies
优美缔软件(上海)有限公司 版权所有
"Unity"、Unity 徽标及其他 Unity 商标是 Unity Technologies 或其附属机构在美国及其他地区的商标或注册商标。其他名称或品牌是其各自所有者的商标。
公安部备案号:
31010902002961