프로그레시브 CPU 라이트매퍼

프로그레시브 라이트매퍼는 고속 경로 추적 기반 라이트매퍼 시스템으로, Unity 에디터의 프로그레시브 업데이트를 통해 베이크된 라이트맵과 라이트 프로브를 제공합니다. 이 라이트매퍼 시스템은 영역이 작고 각도 오류가 없으며 겹치지 않는 UV와 차트 사이의 충분한 패딩을 필요로 합니다
프로그레시브 라이트매퍼는 짧은 준비 단계를 통해 지오메트리와 인스턴스 업데이트를 처리하고 G버퍼 및 차트 마스크를 생성합니다. 그런 다음 결과물을 즉시 생성한 후 점진적으로 다듬기 때문에 인터랙티브 조명 워크플로를 크게 개선할 수 있습니다. 또한 프로그레시브 라이트매퍼는 베이크하는 동안 예상 시간을 제공하기 때문에 베이크 시간을 더욱 쉽게 예측할 수 있습니다.
또한 프로그레시브 라이트매퍼는 업샘플링 방식을 사용하거나 복사 조도 캐시 또는 기타 전역 데이터 구조를 사용하지 않고 각 개별 텍셀(texel)의 라이트맵 해상도 수준으로 전역 조명(GI)을 베이크할 수 있습니다. 또한 라이트맵 일부를 선택하여 베이크할 수 있으므로 더욱 빠르게 씬을 테스트하고 반복할 수 있습니다.
인터랙티브 워크플로에 대한 자세한 내용은 개발 - 프로그레시브 라이트매퍼(In Development - Progressive Lightmapper)(YouTube) 비디오 가이드를 참조하십시오.
설정
프로그레시브 CPU 라이트매퍼를 사용하려면 Window > Rendering > Lighting Settings 에서 Lightmapping Settings 로 이동한 후 Lightmapper 를 Progressive CPU 로 설정합니다. 이 창에 관한 자세한 내용은 라이트매핑 설정을 참조하십시오.

| Setting | Description | |
|---|---|---|
| Lightmapper | Use this to specify which internal lighting calculation software to use to calculate lightmaps in the Scene. The options are: Progressive CPU Progressive GPU Enlighten (deprecated) The default value is Progressive CPU. |
|
| Prioritize View | Enable this to make the Progressive Lightmapper apply changes to the texels that are currently visible in the Scene View, then apply changes to the out-of-view texels. | |
| Multiple Importance Sampling | Enable this to use multiple importance sampling for sampling the environment. This generally leads to faster convergence when generating lightmaps, but can lead to noisier results in certain low frequency environments. This is disabled by default. | |
| Direct Samples | The number of samples (paths) shot from each texel. This setting controls the number of samples Progressive Lightmapper uses for direct lighting calculations. Increasing this value can improve the quality of lightmaps, but increases the baking time. | |
| Indirect Samples | The number of samples (paths) shot from each texel. This setting controls the number of samples Progressive Lightmapper uses for indirect lighting calculations. For some Scenes, especially outdoor Scenes, 100 samples should be enough. For indoor Scenes with emissive geometry, increase the value until you see the result you want. | |
| Environment Samples | Define the number of samples the lightmapper uses for environment lighting calculations. Higher values can improve the quality of the lightmaps, but increase the time required for baking to complete. This is set to 500 by default. | |
| Bounces | Use this value to specify the number of indirect bounces to do when tracing paths. For most Scenes, two bounces is enough. For some indoor Scenes, more bounces might be necessary. | |
| Filtering | Configure the way the Progressive Lightmapper applies post-processing to lightmaps to limit noise. For lightmap post-processing, the lightmap is split into Direct, Indirect and Ambient Occlusion targets that Unity applies post-processing to individually, before it composites them together into a single lightmap. - Direct: Any light that arrives directly from a Light to a sensor (usually the Camera). - Indirect: Any light that arrives indirectly from a Light to a sensor. This most commonly applies to light that reflects off other GameObjects. - Ambient Occlusion: Any ambient light that the lighting system calculates. See Ambient Occlusion for more information. |
|
| None | Select this to use no filter or denoising for the lightmap. | |
| Auto | Select this to use a platform-dependent preset for post-processing the lightmap. If your development machine fulfils the requirements to run OptiX (the NVIDIA OptiX AI-Accelerated Denoiser), the Progressive Lightmapper uses the denoiser with a Gaussian filter that has a 1-texel radius for all targets. If your development machine cannot run OptiX, the Progressive Lightmapper uses a Gaussian filter that has a 1-texel radius for Direct, 5-texel radius for Indirect, and 2-texel radius for Ambient Occlusion. |
|
| Advanced | Select Advanced to manually configure options for each type of lightmap target. The targets types are Direct, Indirect and Ambient Occlusion. For more information, see Advanced Filtering settings, below. | |
| Indirect Resolution | Use this to specify the number of samples the lightmapper uses for indirect lighting calculations. Higher values can improve the quality of the lightmaps, but increase the time it takes to bake them. | |
| Lightmap Resolution | Use this to specify the number of texels per unit to use for lightmaps. Increasing this value improves lightmap quality, but also increases bake times. Note that doubling this value causes the number of texels to quadruple (because the value refers to both the height and width of the lightmap). See the Occupied texels count in the statistics area at the bottom of the Lighting window. | |
| Lightmap Padding | Use this to specify the separation (in texel units) between separate shapes in the baked lightmap. The default value is 2. | |
| Lightmap Size | The size (in pixels) of the full lightmap texture, which incorporates separate regions for the individual GameObject textures. The default value is 1024. | |
| Compress Lightmaps | A compressed lightmap requires less storage space, but the compression process can introduce unwanted visual effects into the texture. Tick this checkbox to compress lightmaps, or untick it to keep them uncompressed. The checkbox is ticked by default. | |
| Ambient Occlusion | Tick this checkbox to open a group of settings which allow you to control the relative brightness of surfaces in ambient occlusion. Higher values indicate a greater contrast between the occluded and fully lit areas. This only applies to the indirect lighting calculated by the GI system. This setting is enabled by default. | |
| Max Distance | Set a value to control how far the lighting system casts rays in order to determine whether or not to apply occlusion to an object. A larger value produces longer rays and contributes more shadows to the lightmap, while a smaller value produces shorter rays that contribute shadows only when objects are very close to one another. A value of 0 casts an infinitely long ray that has no maximum distance. The default value is 1. | |
| Indirect Contribution | Use the slider to scale the brightness of indirect light as seen in the final lightmap (that is, ambient light, or light bounced and emitted from objects) from a value between 0 and 10. The default value is 1. Values less than 1 reduce the intensity, while values greater than 1 increase it. | |
| Direct Contribution | Use the slider to scale the brightness of direct light from a value between 0 and 10. The default value is 0. The higher this value is, the greater the contrast applied to the direct lighting. | |
| Directional Mode | You can set the lightmap up to store information about the dominant incoming light at each point on the objects’ surfaces. See documentation on Directional Lightmapping for further details. The default mode is Directional. | |
| Directional | In Directional mode, Unity generates a second lightmap to store the dominant direction of incoming light. This allows diffuse normal mapped materials to work with the GI. Directional mode requires about twice as much storage space for the additional lightmap data. Directional lightmaps cannot be decoded on SM2.0 hardware or when using GLES2.0. They fall back to Non-Directional lightmaps. | |
| Non-directional | Non-directional mode disables Unity’s ability to generate a second lightmap to store the dominant direction of incoming light. | |
| Indirect Intensity | Use this slider to control the brightness of indirect light stored in realtime and baked lightmaps, from a value between 0 and 5. A value above 1 increases the intensity of indirect light while a value of less that 1 reduces indirect light intensity. The default value is 1. | |
| Albedo Boost | Use this slider to control the amount of light Unity bounces between surfaces, from a value between 1 and 10. To do this, Unity intensifies the albedo of materials in the Scene. Increasing this draws the albedo value towards white for indirect light computation. The default value of 1 is physically accurate. | |
| Lightmap Parameters | Unity uses a set of general parameters for the lightmapping in addition to properties of the Lighting window. A few defaults are available from the menu for this property but you can also create your own lightmap parameter file using the Create New option. See the Lightmap Parameters page for further details. The default value is Default-Medium. | |
고급 필터링 설정

| 설정 | 설명 | |
|---|---|---|
| Advanced |
Filtering을 Advanced로 설정하면 라이트맵 타겟의 각 타입에 대한 옵션을 수동으로 설정할 수 있습니다. 타겟 타입은 다음과 같습니다. - Direct: 조명에서 센서(보통 카메라)에 직접적으로 도착하는 광원입니다. - Indirect: 조명에서 센서에 간접적으로 도착하는 광원입니다. 일반적으로 다른 게임 오브젝트에서 반사되는 광원에 적용됩니다. - Ambient Occlusion: 조명 시스템이 계산하는 주변광입니다. 자세한 내용은 앰비언트 오클루전을 참조하십시오. |
|
| Denoiser | 라이트맵 타겟에 사용할 디노이저를 선택하십시오. 사용 가능한 옵션은 다음과 같습니다. Optix: NVIDIA Optix 디노이저는 베이크된 라이트맵의 노이즈를 줄여주는 AI 가속 디노이저입니다. NVIDIA GPU, 4GB+ VRAM 및 드라이버 버전 390+를 필요로 하고 Windows 플랫폼에서만 지원됩니다. - OpenImageDenoise: Intel Open Image 디노이저는 베이크된 라이트맵의 노이즈를 줄여주는 AI 가속 디노이저입니다. - None: 디노이저를 사용하지 않습니다. |
|
| Filter | 라이트맵 타겟에 사용할 필터를 선택합니다. - Gaussian: 이 옵션을 선택하면 라이트맵 타겟에 가우스 필터를 사용합니다. 가우스 필터는 라이트맵에 대칭 가우스 필터를 적용합니다. 그러면 라이트맵을 흐릿하게 만들어 눈에 보이는 노이즈를 줄입니다. - A-Trous: 이 옵션을 선택하면 라이트맵 타겟에 A-Trous 필터를 사용합니다. A-Trous 필터는 블러 정도를 최소화하고 라이트맵에 보이는 노이즈를 제거합니다. - None: 이 옵션을 선택하면 라이트맵 타겟에 대한 모든 필터링을 비활성화합니다. |
|
| Radius | 이 옵션은 Filter가 Gaussian으로 설정된 경우에만 사용할 수 있습니다. Radius 값을 사용하여 가우스 필터 커널의 반지름을 텍셀 단위로 설정하십시오. Radius 값을 높이면 블러 세기가 증가하고 눈에 띄는 노이즈가 감소하지만, 조명 디테일이 손실될 수 있습니다. | |
| Sigma | 이 옵션 Filter가 A-Trous로 설정된 경우에만 사용할 수 있습니다. Sigma 값을 사용하여 보존할 디테일 양 또는 조명의 블러 정도를 조정하십시오. Sigma 값을 높이면 블러 세기가 증가하고 눈에 띄는 노이즈가 감소하지만, 조명 디테일이 손실될 수 있습니다. | |
통계
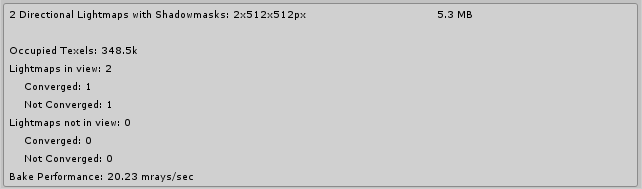
Auto Generate 및 Generate Lighting 옵션 밑에 있는 패널에는 다음과 같은 라이트매핑 통계가 표시됩니다.
- Unity가 생성한 라이트맵 개수
- Memory Usage: 현재 라이트매핑에 필요한 메모리 양입니다.
- Occupied Texels: 라이트맵 UV 공간에서 사용된 텍셀 수입니다.
- Lightmaps in view: 씬 뷰에 있는 라이트맵 개수입니다.
-
Lightmaps not in view: 씬 뷰 밖에 있는 라이트맵 개수입니다.
- Converged: 이 라이트맵에 대한 계산은 완료된 상태입니다.
- Not Converged: 이 라이트맵에 대한 베이킹이 아직 진행 중입니다.
- Bake Performance: 초당 광선 수입니다. 이 값이 2보다 낮으면 설정을 조정해야 합니다. 그러지 않으면 하드웨어가 한 번에 더 많은 광선을 처리해야 합니다.
Auto 모드에서 Unity는 라이트맵과 라이트 프로브를 자동으로 계산합니다. Auto 모드를 비활성화한 경우 Build 버튼을 눌러 베이크를 시작해야 합니다.
베이크 진행 중
프로그레시브 라이트매퍼는 베이크가 진행 중일 때 필요에 따라 베이크를 모니터링하거나 중지할 수 있는 옵션을 제공합니다.
ETA

Unity가 라이트맵을 베이크하는 동안 표시되는 진행 표시줄은 “완료 예상 시간”(ETA 로 표시)을 제공합니다. ETA는 현재 베이크가 완료될 예상 시간(단위: 초)입니다. 이를 통해 베이크 시간을 훨씬 쉽게 예측하고, 현재 조명 설정에서 베이크 시간이 얼마나 걸리는지 빠르게 파악할 수 있습니다.
강제 종료

수동 베이크를 진행하는 중 언제든지 Force Stop 을 클릭하여 베이크 프로세스를 중지할 수 있습니다. 이 기능을 이용하면 원하는 결과가 나올 때 프로세스를 바로 멈출 수 있습니다.
2018.1에서 프로그레시브 라이트매퍼 추가됨 NewIn20181
2018–11–27 페이지 수정됨
Copyright © 2023 Unity Technologies
优美缔软件(上海)有限公司 版权所有
"Unity"、Unity 徽标及其他 Unity 商标是 Unity Technologies 或其附属机构在美国及其他地区的商标或注册商标。其他名称或品牌是其各自所有者的商标。
公安部备案号:
31010902002961