커스텀화
IMGUI 컨트롤 커스텀화
Unity의 IMGUI는 개발자 툴과 디버깅 인터페이스를 제작하는 것이 주된 목적이지만, 이를 다양한 방법으로 커스터마이즈할 수 있습니다. Unity의 IMGUI 시스템에서는 컨트롤의 세부적인 모양까지 세세하게 조정할 수 있습니다. 컨트롤의 형상은 GUIStyles 로 지정할 수 있습니다. GUIStyle을 정의하지 않고 컨트롤을 생성하는 경우 기본적으로 Unity의 디폴트 GUIStyle이 적용됩니다. 이 스타일은 Unity에 내장되어 있으므로 빠른 프로토타이핑을 위해 퍼블리시된 게임 또는 컨트롤 스타일을 지정하지 않기로 선택할 경우 사용할 수 있습니다.
여러 개의 GUIStyle을 사용하는 경우 전부를 하나의 GUISkin 에서 정의할 수 있습니다. GUISkin은 GUIStyle의 컬렉션에 불과합니다.
스타일이 GUI 컨트롤의 모양을 바꾸는 방법
GUIStyle은 웹 브라우저의 CSS(Cascading Style Sheets)를 모방하도록 설계되었습니다. 스타일링을 위한 개별 상태 프로퍼티의 차별화 및 콘텐츠와 모양의 분리를 비롯하여 다양한 CSS 방법론이 적용되었습니다.
컨트롤이 콘텐츠를 정의하는 경우 스타일은 모양을 정의합니다. 이렇게 하면 정상적인 Button 처럼 보이지만 Toggle 처럼 기능하는 조합을 만들 수 있습니다.

스킨과 스타일의 차이점
앞에서 설명한 것처럼 GUISkin은 GUIStyle 컬렉션입니다. 스타일은 GUI 컨트롤의 모양을 정의합니다. 스타일을 사용하려면 스킨을 사용하지 않아도 됩니다.

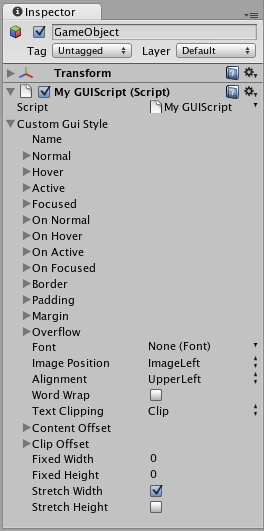
 인스펙터에 표시된 단일 GUISkin - 여러 GUIStyle이 포함되어 있습니다.
스타일 작업
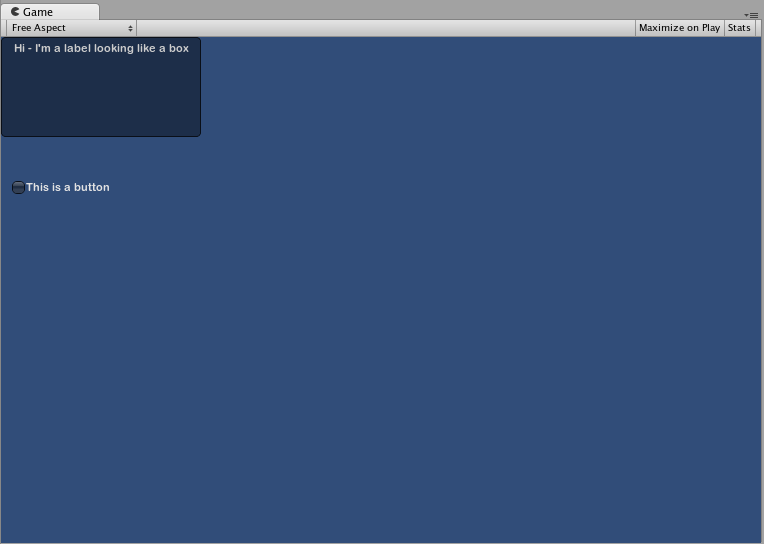
모든 GUI 컨트롤 함수에는 마지막 선택적 파라미터인 컨트롤 표시에 사용할 GUIStyle이 있습니다. 이 부분이 생략되면 Unity의 디폴트 GUIStyle이 사용됩니다. 내부적으로 컨트롤 타입의 이름을 문자열로 적용하여 GUI.Button() 이 “버튼” 스타일을 사용하고 GUI.Toggle() 이 “토글” 스타일 등을 사용합니다. 컨트롤을 위해 기본 GUIStyle을 마지막 파라미터로 지정하여 오버라이드할 수 있습니다.
/* Override the default Control Style with a different style in the UnityGUI default Styles */


// JavaScript
function OnGUI () {
    // Make a label that uses the "box" GUIStyle.
    GUI.Label (Rect (0,0,200,100), "Hi - I'm a label looking like a box", "box");

    // Make a button that uses the "toggle" GUIStyle
    GUI.Button (Rect (10,140,180,20), "This is a button", "toggle");
}


// C#
using UnityEngine;
using System.Collections;

public class GUITest : MonoBehaviour {

    void OnGUI () {
        // Make a label that uses the "box" GUIStyle.
        GUI.Label (new Rect (0,0,200,100), "Hi - I'm a label looking like a box", "box");

        // Make a button that uses the "toggle" GUIStyle
        GUI.Button (new Rect (10,140,180,20), "This is a button", "toggle");
    }

}

public 변수 GUIStyle 만들기
공용 GUIStyle 변수를 선언하는 경우 스타일의 모든 요소가 Inspector 에 표시됩니다. 여기서 다른 값을 모두 편집할 수 있습니다.
/* Overriding the default Control Style with one you've defined yourself */


// JavaScript
var customButton : GUIStyle;

function OnGUI () {
    // Make a button. We pass in the GUIStyle defined above as the style to use
    GUI.Button (Rect (10,10,150,20), "I am a Custom Button", customButton);
}


// C#
using UnityEngine;
using System.Collections;

public class GUITest : MonoBehaviour {

    public GUIStyle customButton;

    void OnGUI () {
        // Make a button. We pass in the GUIStyle defined above as the style to use
        GUI.Button (new Rect (10,10,150,20), "I am a Custom Button", customButton);
    }

}
다른 스타일 요소 변경
GUIStyle을 선언한 경우 해당 스타일을 인스펙터에서 수정할 수 있습니다. 정의할 수 있는 상태가 상당히 많이 있으며, 이를 모든 컨트롤 타입에 적용할 수 있습니다.

지정된 Text Color 가 적용되기 전에 모든 컨트롤 상태에 Background 컬러가 할당되어야 합니다.
개별 GUIStyle에 대한 자세한 내용은 GUIStyle 컴포넌트 레퍼런스 페이지를 참조하십시오.
스킨 작업
복잡한 GUI 시스템의 경우 한곳에서 스타일 컬렉션을 유지하는 것이 좋습니다. GUISkin이 바로 이와 같은 역할을 합니다. GUISkin에는 여러 개의 다른 스타일이 포함되어 있어 특히 모든 GUI 컨트롤의 모양을 완벽하게 바꿔줍니다.
새 GUISkin 만드는 방법
GUISkin을 만들려면 메뉴 바에서 Assets->Create->GUI Skin 을 선택해야 합니다. 프로젝트 폴더에 GUI 스킨이 생성됩니다. 이를 선택하면 인스펙터에서 스킨이 정의한 모든 GUIStyle을 볼 수 있습니다.
GUI에 스킨 적용
생성한 스킨을 사용하려면 OnGUI() 함수의 GUI.skin 에 스킨을 할당해야 합니다.
/* Make a property containing a reference to the skin you want to use */


// JavaScript
var mySkin : GUISkin;

function OnGUI () {
    // Assign the skin to be the one currently used.
    GUI.skin = mySkin;

    // Make a button. This will get the default "button" style from the skin assigned to mySkin.
    GUI.Button (Rect (10,10,150,20), "Skinned Button");
}


// C#
using UnityEngine;
using System.Collections;

public class GUITest : MonoBehaviour {

    public GUISkin mySkin;

    void OnGUI () {
        // Assign the skin to be the one currently used.
        GUI.skin = mySkin;

        // Make a button. This will get the default "button" style from the skin assigned to mySkin.
        GUI.Button (new Rect (10,10,150,20), "Skinned Button");
    }

}
단일 OnGUI() 호출을 통해 스킨을 원하는 만큼 교체할 수 있습니다.
/* Example of switching skins in the same OnGUI() call */


// JavaScript
var mySkin : GUISkin;

var toggle = true;

function OnGUI () {
    // Assign the skin to be the one currently used.
    GUI.skin = mySkin;

    // Make a toggle. This will get the "button" style from the skin assigned to mySkin.
    toggle = GUI.Toggle (Rect (10,10,150,20), toggle, "Skinned Button", "button");

    // Assign the currently skin to be Unity's default.
    GUI.skin = null;

    // Make a button. This will get the default "button" style from the built-in skin.
    GUI.Button (Rect (10,35,150,20), "Built-in Button");
}


// C#
using UnityEngine;
using System.Collections;

public class GUITest : MonoBehaviour {

    public GUISkin mySkin;
    private bool toggle = true;

    void OnGUI () {
        // Assign the skin to be the one currently used.
        GUI.skin = mySkin;

        // Make a toggle. This will get the "button" style from the skin assigned to mySkin.
        toggle = GUI.Toggle (new Rect (10,10,150,20), toggle, "Skinned Button", "button");

        // Assign the currently skin to be Unity's default.
        GUI.skin = null;

        // Make a button. This will get the default "button" style from the built-in skin.
        GUI.Button (new Rect (10,35,150,20), "Built-in Button");
    }

}
GUI 폰트 크기 변경
이 예제는 코드를 사용하여 폰트 크기를 동적으로 변경하는 방법을 설명합니다.
먼저 Unity에서 새 프로젝트를 생성해야 합니다. 그런 다음, Fontsize.cs라는 C# 스크립트를 생성한 후 다음 코드를 붙여놓습니다.
// C# example
using UnityEngine;

using System.Collections;

public class Fontsize : MonoBehaviour
{
    void OnGUI ()
    {
        //Set the GUIStyle style to be label
        GUIStyle style = GUI.skin.GetStyle ("label");

        //Set the style font size to increase and decrease over time
        style.fontSize = (int)(20.0f + 10.0f * Mathf.Sin (Time.time));

        //Create a label and display with the current settings
        GUI.Label (new Rect (10, 10, 200, 80), "Hello World!");
    }

}
스크립트를 저장한 후, 이를 빈 게임 오브젝트에 연결해야 합니다. 플레이 버튼을 클릭하면 폰트 크기가 시간에 따라 커졌다가 작아지기를 반복합니다. 이때 폰트 크기가 자연스럽게 바뀌지 않는 것을 알 수 있는데, 이는 폰트 크기의 개수가 무한하지 않기 때문입니다.
이번 예제의 경우 디폴트 폰트(Arial)가 로드되고 동적으로 표시되어 있어야 합니다. 동적으로 표시되지 않은 폰트는 모두 크기를 바꿀 수 없습니다.