스크린 전환 생성
여러 UI 스크린 간 전환은 일반적으로 자주 필요한 동작이므로 이 페이지에서는 애니메이션과 상태 머신을 사용하여 이러한 전환을 만들고 관리하여 각 스크린을 드라이브하고 컨트롤하는 간단한 방법에 대해 알아보겠습니다.
개요
고급 레벨의 개념은 각 스크린에 두 가지 상태(Open 및 Closed)와 부울 파라미터(Open)가 있는 애니메이터 컨트롤러가 포함된다는 것입니다. 스크린 간에 전환하려면 현재 열려 있는 스크린을 닫고 원하는 스크린을 열기만 하면 됩니다. 이 과정을 더 간편하게 진행하려면 이미 열려 있는 스크린을 추적하고 자동으로 닫는 작은 클래스인 ScreenManager를 만듭니다. 전환을 트리거하는 버튼은 ScreenManager에 원하는 화면을 열어달라고 요청하는 작업만 합니다.
탐색 고려
UI 요소의 컨트롤러/키보드 내비게이션을 지원하려면 몇 가지 사항을 염두에 두는 것이 중요합니다. 플레이어가 화면 밖의 요소를 선택할 수 있도록 하기 위해 Selectable 요소가 화면 외부에 있는 것을 피하는 것이 중요합니다. 스크린 밖의 계층 구조를 비활성화하여 선택할 수 있으며, 새 스크린이 표시 될 때 요소를 선택한 것으로 설정해야 하는지 확인해야 합니다. 그렇지 않으면 플레이어가 새 스크린으로 이동할 수 없습니다. 아래의 ScreenManager 클래스에서 이 모든 것을 처리합니다.
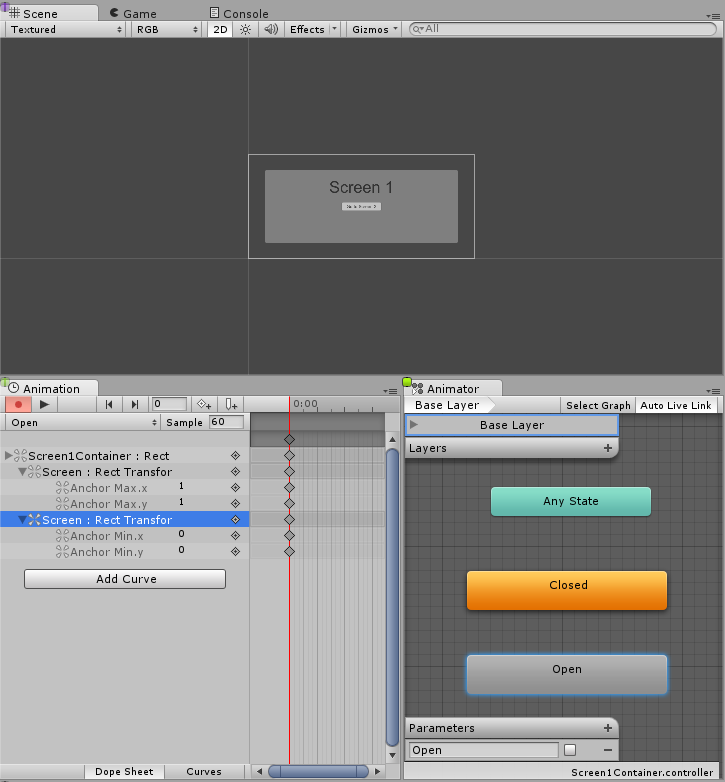
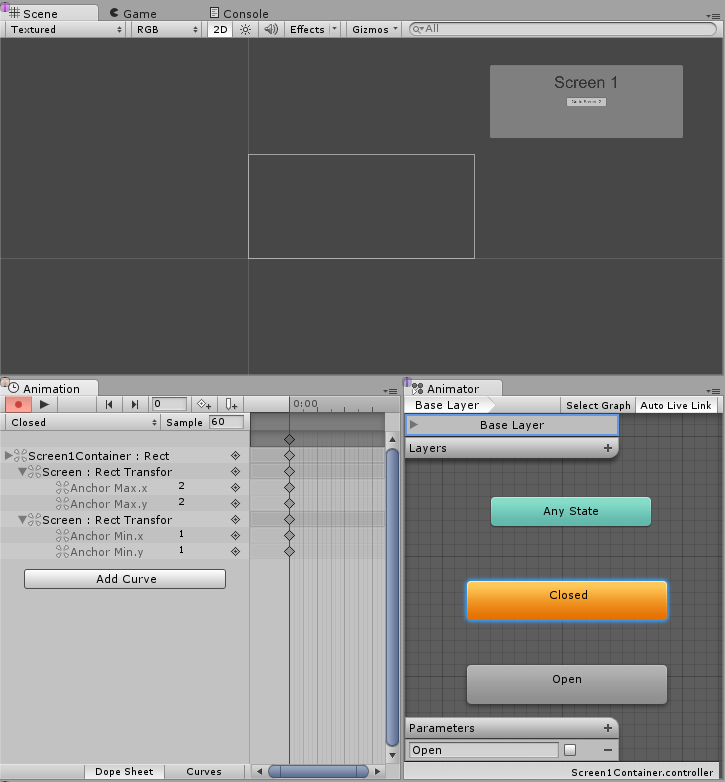
애니메이터 컨트롤러 설정
애니메이션 컨트롤러가 스크린 전환을 수행하기 위한 가장 일반적인 최소한의 설정에 대해 알아보겠습니다. 컨트롤러에는 하나의 부울 파라미터(Open)와 두 개의 상태(Open 및 Closed)가 필요하고, 각 상태에는 키프레임이 하나만 있는 애니메이션이 포함되어야 합니다. 이 방법으로 상태 머신이 전환 블렌딩을 자동으로 수행할 수 있게 합니다.
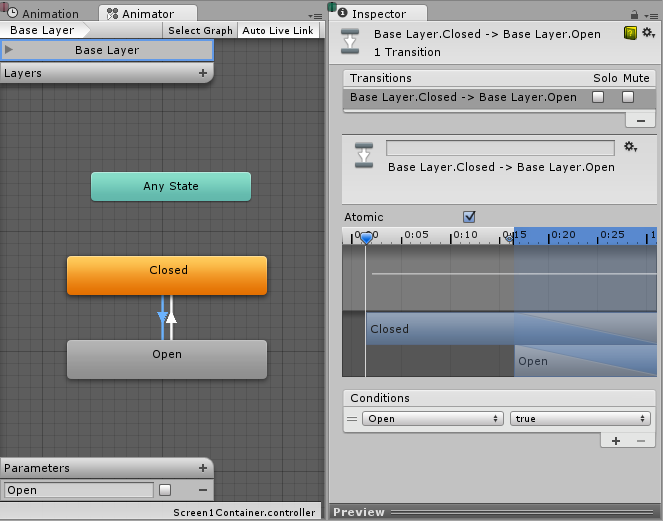
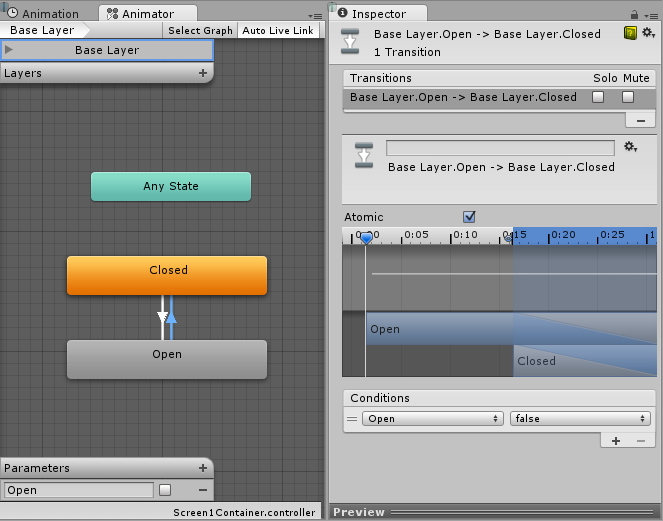
이제 두 상태 사이에 모두 전환을 생성해야 하므로, Open에서 Closed로 전환하는 것을 시작으로 조건을 올바르게 설정해 보겠습니다. 여기서는 Open 파라미터가 false로 설정된 경우 Open에서 Closed로 전환하려고 합니다. 이제 Closed에서 Open으로의 전환을 만들고 Open 파라미터가 true일 때 Closed에서 Open으로 전환하는 조건을 설정합니다.
스크린 관리
위에서 모든 것을 설정한 후에 남는 일은 전환 대상 스크린 애니메이터에서 Open 파라미터를 true로 설정하고 현재 열려있는 스크린 애니메이터에서 Open을 false로 설정하는 것 뿐입니다. 이렇게 하려면 다음과 같은 간단한 스크립트를 작성합니다.
using UnityEngine;
using UnityEngine.UI;
using UnityEngine.EventSystems;
using System.Collections;
using System.Collections.Generic;

public class ScreenManager : MonoBehaviour {

    //Screen to open automatically at the start of the Scene
    public Animator initiallyOpen;

    //Currently Open Screen
    private Animator m_Open;

    //Hash of the parameter we use to control the transitions.
    private int m_OpenParameterId;

    //The GameObject Selected before we opened the current Screen.
    //Used when closing a Screen, so we can go back to the button that opened it.
    private GameObject m_PreviouslySelected;

    //Animator State and Transition names we need to check against.
    const string k_OpenTransitionName = "Open";
    const string k_ClosedStateName = "Closed";

    public void OnEnable()
    {
        //We cache the Hash to the "Open" Parameter, so we can feed to Animator.SetBool.
        m_OpenParameterId = Animator.StringToHash (k_OpenTransitionName);

        //If set, open the initial Screen now.
        if (initiallyOpen == null)
            return;
        OpenPanel(initiallyOpen);
    }

    //Closes the currently open panel and opens the provided one.
    //It also takes care of handling the navigation, setting the new Selected element.
    public void OpenPanel (Animator anim)
    {
        if (m_Open == anim)
            return;

        //Activate the new Screen hierarchy so we can animate it.
        anim.gameObject.SetActive(true);
        //Save the currently selected button that was used to open this Screen. (CloseCurrent will modify it)
        var newPreviouslySelected = EventSystem.current.currentSelectedGameObject;
        //Move the Screen to front.
        anim.transform.SetAsLastSibling();

        CloseCurrent();

        m_PreviouslySelected = newPreviouslySelected;

        //Set the new Screen as then open one.
        m_Open = anim;
        //Start the open animation
        m_Open.SetBool(m_OpenParameterId, true);

        //Set an element in the new screen as the new Selected one.
        GameObject go = FindFirstEnabledSelectable(anim.gameObject);
        SetSelected(go);
    }

    //Finds the first Selectable element in the providade hierarchy.
    static GameObject FindFirstEnabledSelectable (GameObject gameObject)
    {
        GameObject go = null;
        var selectables = gameObject.GetComponentsInChildren<Selectable> (true);
        foreach (var selectable in selectables) {
            if (selectable.IsActive () && selectable.IsInteractable ()) {
                go = selectable.gameObject;
                break;
            }
        }
        return go;
    }

    //Closes the currently open Screen
    //It also takes care of navigation.
    //Reverting selection to the Selectable used before opening the current screen.
    public void CloseCurrent()
    {
        if (m_Open == null)
            return;

        //Start the close animation.
        m_Open.SetBool(m_OpenParameterId, false);

        //Reverting selection to the Selectable used before opening the current screen.
        SetSelected(m_PreviouslySelected);
        //Start Coroutine to disable the hierarchy when closing animation finishes.
        StartCoroutine(DisablePanelDeleyed(m_Open));
        //No screen open.
        m_Open = null;
    }

    //Coroutine that will detect when the Closing animation is finished and it will deactivate the
    //hierarchy.
    IEnumerator DisablePanelDeleyed(Animator anim)
    {
        bool closedStateReached = false;
        bool wantToClose = true;
        while (!closedStateReached && wantToClose)
        {
            if (!anim.IsInTransition(0))
                closedStateReached = anim.GetCurrentAnimatorStateInfo(0).IsName(k_ClosedStateName);

            wantToClose = !anim.GetBool(m_OpenParameterId);

            yield return new WaitForEndOfFrame();
        }

        if (wantToClose)
            anim.gameObject.SetActive(false);
    }

    //Make the provided GameObject selected
    //When using the mouse/touch we actually want to set it as the previously selected and
    //set nothing as selected for now.
    private void SetSelected(GameObject go)
    {
        //Select the GameObject.
        EventSystem.current.SetSelectedGameObject(go);

        //If we are using the keyboard right now, that's all we need to do.
        var standaloneInputModule = EventSystem.current.currentInputModule as StandaloneInputModule;
        if (standaloneInputModule != null)
            return;

        //Since we are using a pointer device, we don't want anything selected.
        //But if the user switches to the keyboard, we want to start the navigation from the provided game object.
        //So here we set the current Selected to null, so the provided gameObject becomes the Last Selected in the EventSystem.
        EventSystem.current.SetSelectedGameObject(null);
    }
}
스크립트를 연결해 보겠습니다. 이렇게 하려면 새 게임 오브젝트를 만들고 이름을 “ScreenManager” 등으로 바꾸고 그 위에 컴포넌트를 추가합니다. 여기에 초기 스크린을 할당할 수 있고, 씬이 시작될 때 이 스크린이 열립니다.
이제 마지막으로 UI 버튼이 작동하도록 해보겠습니다. 스크린 전환을 트리거할 버튼을 선택하고 인스펙터의 On Click () 리스트에 있는 새 액션을 추가합니다. 방금 생성한 ScreenManager 게임 오브젝트를 ObjectField로 드래그하고 드롭다운에서 ScreenManager->OpenPanel (Animator) 를 선택한 후 사용자가 버튼을 클릭하면 열고자 하는 패널을 마지막 ObjectField로 드래그 앤 드롭합니다.

참고
이 방법을 사용하려면 각 스크린에 Open 파라미터와 Closed 상태가 있는 AnimatorController만 있으면 됩니다. 스크린이나 상태 머신의 구성은 상관이 없습니다. 이 방법은 중첩된 스크린에도 효과적입니다. 즉, 각 중첩된 레벨마다 ScreenManager가 하나씩만 필요합니다.
위에서 설정한 상태 머신의 디폴트 상태는 Closed이므로, 이 컨트롤러를 사용하는 모든 스크린은 닫힌 상태로 시작됩니다. ScreenManager는 먼저 표시할 스크린을 지정할 수 있도록 initiallyOpen 프로퍼티를 제공합니다.
Copyright © 2023 Unity Technologies
优美缔软件(上海)有限公司 版权所有
"Unity"、Unity 徽标及其他 Unity 商标是 Unity Technologies 或其附属机构在美国及其他地区的商标或注册商标。其他名称或品牌是其各自所有者的商标。
公安部备案号:
31010902002961