- Unity User Manual 2022.2
- 사용자 인터페이스(UI) 생성
- UI 툴킷
- Structure UI
- Structure UI examples
- Create a complex list view
Create a complex list view
This example demonstrates how to create a complex ListView.
개요 예시
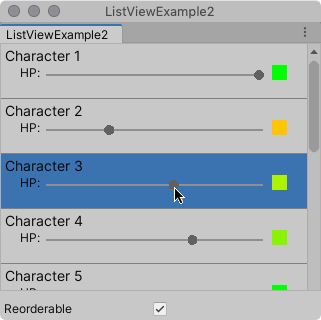
The example creates a custom Editor window with a list of characters. Each character has a slider and a color palette. Moving the slider changes the color of the palette.

You can find the completed files that this example creates in this GitHub repository.
선행 조건
This guide is for developers familiar with the Unity Editor, UI Toolkit, and C# scripting. Before you start, get familiar with the following:
Create the example
This example builds the visual elements in the list from a C# script. It uses a custom CharacterInfoVisualElement class that inherits from VisualElement, and binds the custom elements to CharacterInfo objects.
Create a Unity project with any template.
In the Project window, create a folder named
Editor.-
In the
Editorfolder, create a C# script file namedListViewExample.cswith the following content:using System; using System.Collections.Generic; using UnityEditor; using UnityEngine; using UnityEngine.UIElements; public class ListViewExample : EditorWindow { // Gradient used for the HP color indicator. private Gradient hpGradient; private GradientColorKey[] hpColorKey; private GradientAlphaKey[] hpAlphaKey; // ListView is kept for easy reference. private ListView listView; // List of CharacterInfo items, bound to the ListView. private List<CharacterInfo> items; [MenuItem("Window/ListView Custom Item")] public static void OpenWindow() { GetWindow<ListViewExample>().Show(); } private void OnEnable() { SetGradient(); // Create and populate the list of CharacterInfo objects. const int itemCount = 50; items = new List<CharacterInfo>(itemCount); for(int i = 1; i <= itemCount; i++) { CharacterInfo character = new CharacterInfo {name = $"Character {i}", maxHp = 100}; character.currentHp = character.maxHp; items.Add(character); } // The ListView calls this to add visible items to the scroller. Func<VisualElement> makeItem = () => { var characterInfoVisualElement = new CharacterInfoVisualElement(); var slider = characterInfoVisualElement.Q<SliderInt>(name: "hp"); slider.RegisterValueChangedCallback(evt => { var hpColor = characterInfoVisualElement.Q<VisualElement>("hpColor"); var i = (int)slider.userData; var characterInfo = items[i]; characterInfo.currentHp = evt.newValue; SetHp(slider, hpColor, characterInfo); }); return characterInfoVisualElement; }; // The ListView calls this if a new item becomes visible when the item first appears on the screen, // when a user scrolls, or when the dimensions of the scroller are changed. Action<VisualElement, int> bindItem = (e, i) => BindItem(e as CharacterInfoVisualElement, i); // Height used by the ListView to determine the total height of items in the list. int itemHeight = 55; // Use the constructor with initial values to create the ListView. listView = new ListView(items, itemHeight, makeItem, bindItem); listView.reorderable = false; listView.style.flexGrow = 1f; // Fills the window, at least until the toggle below. listView.showBorder = true; rootVisualElement.Add(listView); // Add a toggle to switch the reorderable property of the ListView. var reorderToggle = new Toggle("Reorderable"); reorderToggle.style.marginTop = 10f; reorderToggle.value = false; reorderToggle.RegisterValueChangedCallback(evt => listView.reorderable = evt.newValue); rootVisualElement.Add(reorderToggle); } // Sets up the gradient. private void SetGradient() { hpGradient = new Gradient(); // HP at 0%: Red. At 10%: Dark orange. At 40%: Yellow. At 100%: Green. hpColorKey = new GradientColorKey[4]; hpColorKey[0] = new GradientColorKey(Color.red, 0f); hpColorKey[1] = new GradientColorKey(new Color(1f, 0.55f, 0f), 0.1f); // Dark orange hpColorKey[2] = new GradientColorKey(Color.yellow, 0.4f); hpColorKey[3] = new GradientColorKey(Color.green, 1f); // Alpha is always full. hpAlphaKey = new GradientAlphaKey[2]; hpAlphaKey[0] = new GradientAlphaKey(1f, 0f); hpAlphaKey[1] = new GradientAlphaKey(1f, 1f); hpGradient.SetKeys(hpColorKey, hpAlphaKey); } // Bind the data (characterInfo) to the display (elem). private void BindItem(CharacterInfoVisualElement elem, int i) { var label = elem.Q<Label>(name: "nameLabel"); var slider = elem.Q<SliderInt>(name: "hp"); var hpColor = elem.Q<VisualElement>("hpColor"); slider.userData = i; CharacterInfo characterInfo = items[i]; label.text = characterInfo.name; SetHp(slider, hpColor, characterInfo); } private void SetHp(SliderInt slider, VisualElement colorIndicator, CharacterInfo characterInfo) { slider.highValue = characterInfo.maxHp; slider.SetValueWithoutNotify(characterInfo.currentHp); float ratio = (float)characterInfo.currentHp / characterInfo.maxHp; colorIndicator.style.backgroundColor = hpGradient.Evaluate(ratio); } // This class inherits from VisualElement to display and modify data to and from a CharacterInfo. public class CharacterInfoVisualElement : VisualElement { // Use Constructor when the ListView uses makeItem and returns a VisualElement to be // bound to a CharacterInfo data class. public CharacterInfoVisualElement() { var root = new VisualElement(); // The code below to style the ListView is for demo purpose. It's better to use a USS file // to style a visual element. root.style.paddingTop = 3f; root.style.paddingRight = 0f; root.style.paddingBottom = 15f; root.style.paddingLeft = 3f; root.style.borderBottomColor = Color.gray; root.style.borderBottomWidth = 1f; var nameLabel = new Label() {name = "nameLabel"}; nameLabel.style.fontSize = 14f; var hpContainer = new VisualElement(); hpContainer.style.flexDirection = FlexDirection.Row; hpContainer.style.paddingLeft = 15f; hpContainer.style.paddingRight = 15f; hpContainer.Add(new Label("HP:")); var hpSlider = new SliderInt {name = "hp", lowValue = 0, highValue = 100}; hpSlider.style.flexGrow = 1f; hpContainer.Add(hpSlider); var hpColor = new VisualElement(); hpColor.name = "hpColor"; hpColor.style.height = 15f; hpColor.style.width = 15f; hpColor.style.marginRight = 5f; hpColor.style.marginBottom = 5f; hpColor.style.marginLeft = 5f; hpColor.style.backgroundColor = Color.black; hpContainer.Add(hpColor); root.Add(nameLabel); root.Add(hpContainer); Add(root); } } // Basic data class used for a character, with a name and HP data. Use a list of CharacterInfo as // a data source for the ListView. The CharacterInfo can be bound to CharacterInfoVisualElement when needed. [Serializable] public class CharacterInfo { public string name; public int maxHp; public int currentHp; } } To see the example, from the menu, select Window > ListView Custom Item.