AudioGroup Inspector
AudioGroup 계층 구조, AudioGroup 뷰 또는 프로젝트 창에서 AudioGroup을 (서브 에셋으로) 선택하면 해당 AudioGroup의 인스펙터가 표시됩니다.
AudioGroup 인스펙터는 다음과 같은 여러 엘리먼트로 구성됩니다.
Inspector Header
AudioGroup 인스펙터 상단에는 모든 오브젝트 인스펙터에 공통으로 있는 톱니바퀴 드롭다운 메뉴와 함께 AudioGroup의 이름이 있습니다.

톱니바퀴 메뉴에는 다음과 같은 기능이 있습니다.
- Copy all effect settings to all snapshots: This lets you to copy all of the effect parameter, volume and pitch settings of this AudioGroup to all of the other snapshots present within the Audio Mixer. This lets you to quickly make all snapshots ‘like this one’ for this AudioGroup.
- Toggle CPU usage display: This toggles CPU performance information for all of the effects present in the AudioGroup inspector. This is used to get an idea of which effects within your DSP setup are consuming the most resources.
Edit in Playmode


When in Playmode within Unity, the Inspector for an AudioGroup includes a button at the top called Edit in Playmode. By default, the parameter values of an Audio Mixer are not editable in Playmode and are fully controlled by the current snapshot within the game.
Edit in Playmode allows you to override the snapshot system and make edits to the current snapshot directly during playmode. This is a great way to mix and master a game while playing it in realtime.
Pitch slider
모든 AudioGroup 인스펙터 상단에는 해당 AudioGroup을 통한 재생의 피치를 정의하는 슬라이더가 있습니다. 피치를 변경하려면 슬라이더를 사용하거나 오른쪽에 있는 텍스트 필드에 피치를 직접 입력합니다.

Attenuation Unit
Every AudioGroup within an Audio Mixer has exactly 1 Attenuation Unit.
감쇠 유닛에서 AudioGroup을 지나가는 오디오 신호에 감쇠/이득을 적용할 수 있습니다. 감쇠는 ‘유닛에서’ 계산되고 신호에 적용되며, 다른 감쇠 설정에 통합되고 음성 소스에 적용되지 않습니다. 따라서 송신/수신과 비선형 DSP 효과에 통합하면 매우 복잡하고 재미있는 설정이 가능합니다. 감쇠는 –80dB(음소거)에 적용할 수 있고 게인은 +20dB에 적용할 수 있습니다.

모든 감쇠 유닛의 VU 미터가 인스펙터에 있습니다. 이 미터는 신호 체인 내 해당 시점(감쇠 적용 직후)의 오디오 신호 레벨을 표시합니다. 즉 감쇠 유닛 다음에 DSP 효과나 리시브가 있는 경우 해당 오디오그룹에 대한 AudioGroup 스트립에 대해 표시되는 미터링 정보는 감쇠 유닛의 미터링 정보와 다릅니다. 이 방법은 각기 다른 지점의 미터링을 보기 위해 감쇠 유닛을 프로세싱 체인에서 위아래로 드래그하여 AudioGroup의 신호 체인을 디버그하는 데 매우 유용합니다.
VU 미터는 RMS 및 피크 고정값을 모두 표시합니다.
- To move the Attenuation Unit (or any effect) up or down the signal chain, select the Unit’s header and drag up or down the inspector to reposition it.
- 감쇠 설정을 변경하려면 미터링 위의 슬라이더를 움직이거나 텍스트 상자에 값을 입력합니다.
Effect Units
이펙트 유닛은 예를 들어, 하이패스 또는 리버브처럼 AudioGroup을 통해 재생되는 오디오 신호를 수정하는 일반적인 DSP 효과입니다. 이펙트 유닛은 전송 유닛에서 전송된 사이드 체인 신호 정보도 처리할 수 있습니다. 각 이펙트 유닛마다 인터페이스가 다르지만, 대부분은 효과가 신호에 적용되는 방법을 변경하기 위해 수정할 수 있는 파라미터 컬렉션을 표시합니다. 예를 들어, 파라미터 EQ 효과에는 신호 처리 방법을 수정하는 파라미터가 3개 있습니다.

Unity comes with a collection of in-built effects that you can use within an AudioGroup. There is also the ability to create custom DSP effect plugins that can be used within an Audio Mixer.
- To add an effect to the AudioGroup, select Add Effect button at the bottom of the AudioGroup Inspector.

To change the ordering of the effect within the AudioGroup, select the effect header and drag up or down to place it in a different position.
To remove the effect from the AudioGroup, right-click on the effect header and select Remove this effect.
Send Units
보내기를 사용하여 오디오 신호 흐름을 분기하고 신호의 감쇠되었을 수 있는 복사본을 전송하여 다른 이펙트 유닛(예: 사이드 체인 압축기) 안에서 사이드 체인으로 사용되도록 할 수 있습니다. 신호 체인의 어디에든 보내기를 삽입하여 어느 지점에서든 신호를 분기할 수 있습니다.

Initially, when Sends are added to an AudioGroup, they don’t send to anything, and the Send Level is set to 80dB. To send to another Effect Unit, you must already have an Effect Unit that can accept side-chain signals in the Audio Mixer somewhere. After the destination Effect Unit has been selected, you need to increase the Send Level to send signal to the destination.
- To add a Send to an AudioGroup, select Add Effect at the bottom of the AudioGroup Inspector and choose Send.
- 보내기를 (신호를 수신할 수 있는) 다른 이펙트 유닛에 연결하려면 보내기 유닛 인스펙터의 드롭다운 메뉴에서 대상을 선택합니다.
- 대상으로 보내는 신호 레벨을 “보내기 레벨”을 사용하여 설정합니다.
Receive Units
Receives are the signal sinks of Sends. They take the audio signal that is sent to them from Sends and mix it with the current signal passing through their AudioGroup. There are no parameters to a Receive.

Note: If you Solo a Receive unit, the sound stops playing. This is by design.
Duck Volume Units
Duck Volume Units allow you to create side-chain compression from signal sent from Sends. Duck Volume is a great way to control the attenuation of a signal based on audio being played somewhere else in the Audio Mixer.

덕 볼륨 유닛은 다른 이펙트 유닛처럼 추가할 수 있으며, 이 유닛이 유용하려면 하나 이상의 보내기에서 전송된 신호가 있어야 합니다.
Common options
AudioGroup 인스펙터의 각 유닛에는 여러 공통 기능이 있습니다.
Gear options
- Allow Wet Mixing - 이 옵션을 토글하면 효과 주변에 드라이 채널이 생성됩니다. 이 옵션이 활성화되었을 때 표시되는 슬라이더는 wet/dry 컴포넌트로 전달되는 신호의 비율(%)을 지정합니다. 이 옵션을 활성화하면 메모리 사용량과 CPU 부하가 증가합니다. 이 옵션은 특정 유닛에서만 사용 가능합니다.
- Bypass - 이 옵션을 토글하면 이펙트 유닛을 완전히 우회하여 신호 체인에서 사실상 비활성화합니다.
- Copy Effect Settings to all Snapshots - Selecting this will copy all the parameter values within this Effect Unit to all the other Snapshots in the Audio Mixer. This is useful when adding a new Effect Unit, making changes to that Effect Unit and wanting those settings to be the same across all Snapshots.
- Add Effect Before - AudioGroup 내 현재 이펙트 유닛 앞에 이펙트 유닛을 삽입하기 위해 사용할 수 있습니다. 표시되는 메뉴에서 원하는 효과를 선택합니다.
- Add Effect After - AudioGroup의 현재 이펙트 유닛 뒤에 이펙트 유닛을 삽입하기 위해 사용할 수 있습니다. 표시되는 메뉴에서 원하는 효과를 선택합니다.
- Remove This Effect - Remove this Effect Unit completely from the Audio Mixer. Attenuation Units cannot be removed from AudioGroups.
Wet Mixing
Allowing Wet Mixing on a DSP effect allows you to decide how much of the audio signal that is to enter the effect actually is processed by the effect. Enabling Wet Mixing effectively creates a dry channel around the effect. You can then select the effect slot and drag left and right to increase or decrease the percentage of audio signal that is passed through the DSP effect unit. The rest of the signal is passed through the dry channel. The following diagram illustrates this concept:
웨트 믹싱은 효과가 믹스에 미치는 영향을 조절하거나 오리지널 신호의 일정 비율(%)을 유지하려는 경우에 유용합니다.

Exposed parameters
Exposed parameters allow you to bypass the Snapshot system of an Audio Mixer and set the value of any parameter within an Audio Mixer from script. When an exposed parameter is set via script, that parameter is locked to that value and will not change as the the game transitions Snapshots.
Exposing a parameter with an Audio Mixer is done in the AudioGroup Inspector. For any parameter shown in the Inspector (including Pitch, Volume, Send Level and Wet Level), you can right-click on the name of the parameter and choose ‘Expose X to script’.
After a parameter is exposed, it shows up in the Exposed Parameter drop down in the top right corner of the Audio Mixer Window. Selecting on this drop down reveals all the exposed parameters in the Audio Mixer.

- To rename an exposed parameter, right-click on the name of the exposed parameter and select Rename. This name will be how you reference the parameter from the AudioMixer API.
- To delete an exposed parameter, right-click on the name of the exposed parameter and select Delete.
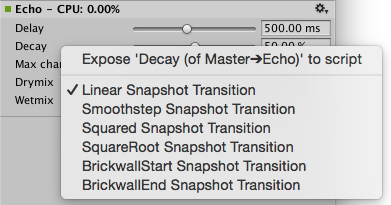
Transition overrides
When transitioning between Snapshots, by default all transitions are done with linear interpolation from the beginning to target values. In some cases this transition behaviour is not desired however, for example when it’s preferable to brick-wall the change at the start or end of the transition.
All of the parameters available within the Audio Mixer can have their transition behaviour changed. Transition behaviours are defined per-Snapshot, with the target Snapshot defining the transition behaviour.
To set the transition override for a particular parameter for the current Snapshot, right-click on the parameter name and select the required transition type.
![]()
Audi Mixer inspector
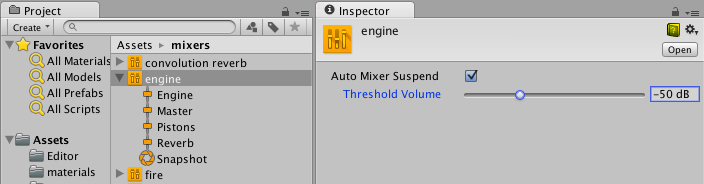
오디오 믹서 에셋 자체에는 인스펙터가 있고, 여기서 믹서의 전반적인 활성화/ 중지 동작을 지정할 수 있습니다. 오디오 믹서는 에셋이기 때문에 오디오 소스가 믹서에서 재생될 때 기본적으로 활성화되고 오디오 데이터를 믹서에 공급하는 드라이버가 존재하는 한 계속 활성 상태로 유지됩니다. 씬 뷰의 오디오 프리뷰 버튼으로 믹서를 활성화할 수도 있으므로, 활성화 동작은 MonoBehaviors 같은 씬 오브젝트와 다릅니다. 따라서 믹서는 정지 모드에서도 활성화되어 CPU를 사용할 수 있습니다.
To avoid running out of CPU resources in a project that contains a large number of mixers that are not supposed to be running all at the same time (say, because specific levels use certain specialized mixers), the audio mixers have functionality built-in to put themselves into suspended mode in which all processing stops. To do this in a natural way that doesn’t lead to audible artefacts such as clicks or missing reverb/echo tails each mixer uses the following strategy:
As long as any audio source is playing into this mixer or the mixer is receiving audio data from other sub-mixers the mixer will keep itself active. After the last sound source has finished playing, the mixer will wait for a second and then continually use loudness-measurement at its own output to decide if it should suspend itself. This is needed because reverb and echo tails can potentially decay very slowly. The loudness threshold at which the mixer suspends itself is determined by enabling Auto Mixer Suspend and setting the Threshold Volume parameter on the mixer asset’s inspector which is shown then the mixer asset is selected in the project browser (not when selecting a sub-asset like a mixer group or snapshot). The value of –80 dB is chosen as the default and matches the lowest value of the faders in the mixer. In practice it is often possible to set it to a significantly larger value to get quicker deactivation and avoid intermediate CPU spikes that could cause stutter.
Copyright © 2023 Unity Technologies
优美缔软件(上海)有限公司 版权所有
"Unity"、Unity 徽标及其他 Unity 商标是 Unity Technologies 或其附属机构在美国及其他地区的商标或注册商标。其他名称或品牌是其各自所有者的商标。
公安部备案号:
31010902002961