UI Builder interface overview
To open the UI Builder window:
- Select Window > UI Toolkit > UI Builder. This opens a UXML document that has been previously loaded with UIBuilder.
- From the Project window, double-click a UXML file.
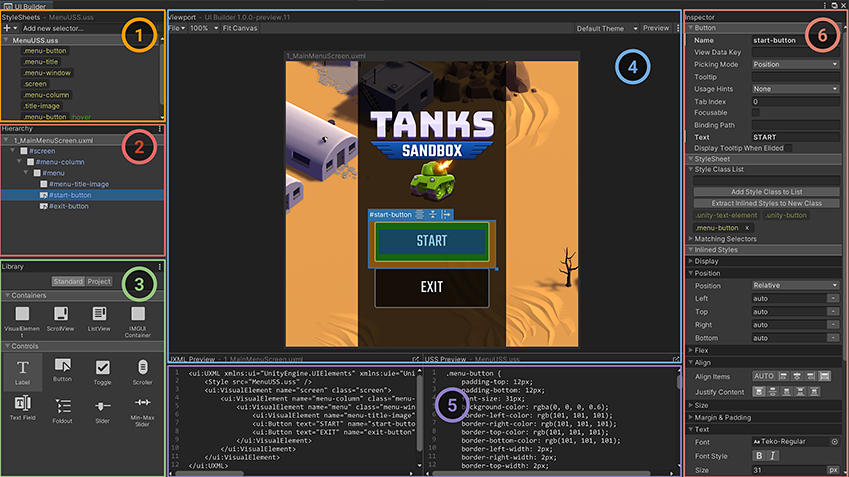
The following image shows an example UI Builder window:
Open and save UI Documents (UXML)
To open a UI Document in UI Builder:
- Use the File menu inside the UI Builder Viewport pane toolbar and select Open….
- In the Project tab of the Library pane, right-click on the document and select Open in UI Builder.
To open a UI Document (UXML) in your default text editor or IDE:
- Use the inlineStyle file icon.
- Go to the Project window > Assets.
- Click the arrow in the middle of the UXML file icon.
- Double-click the inlineStyle file icon.
- Use the Open with IDE button.
- In UI Builder, go to Library > Project tab.
- Open the Assets folder.
- Right-click on the UI Document (UXML) and select Open with IDE.
- Use the UXML Preview pane.
- In UI Builder, make sure your UI Document (UXML) is currently loaded.
- Go to the UXML Preview pane.
- Select the top-right icon.
The currently opened and active UI Document (UXML) asset name is displayed in the Hierarchy pane as a root tree item, in the Canvas header inside the Viewport, and in the UXML Preview pane at the bottom of the Viewport. An asterisk (*) next to the name indicates unsaved changes.
To save a UI Document (UXML):
- Use the File > Save menu in the UI Builder’s Viewport pane toolbar.
- Use Ctrl/CMD + S. It also prompts you to save the Scene in the Editor.
Note: The Unity project-wide save doesn’t save the active UI Document (UXML) opened in the UI Builder.
StyleSheets
StyleSheets and the USS Selectors in UI Toolkit are used to share and apply styles across many elements and UI Documents (UXML).
StyleSheets 창 에서 다음을 수행할 수 있습니다.
- Add, reorder, or remove StyleSheets (USS) in the current UI Document (UXML).
- Create, reorder, copy, or remove USS Selectors within StyleSheets to share styles across different elements.
계층 구조
The Hierarchy pane  contains the tree view representing the element hierarchy of the current document. It’s a superset of the hierarchy you see in the UXML text representation of the UI Document (UXML). Besides the elements created directly from UXML, the Hierarchy pane also contains elements created dynamically that only exist in the runtime of the UI. For example, the Hierarchy pane includes elements that are part of a Template instance (a different document instanced inside the current document), whereas the UXML would just have a single
 <Instance> tag.
계층 구조 창에서 다음 작업을 수행할 수 있습니다.
- Select elements for inspecting or editing.
- Cut, copy, delete, or reorder elements.
- Open instanced template documents as sub-documents for in-place (in context) editing.
- Check at once many elements’ style class lists, name attributes, and locally attached StyleSheets.
Elements appear in the tree according to their name attributes. If an element’s name attribute isn’t set, it appears according to its C# type. You can double-click an element to quickly rename it.
계층 구조 창 헤더의 오른쪽 상단에서 ⋮ 아이콘을 클릭하여 디스플레이 옵션 메뉴에 액세스하십시오.
- 계층 구조가 이름 유무와 관계없이 각 요소의 C# 타입을 표시하도록 강제하려면 Type을 선택합니다.
- 각 요소의 스타일 클래스 리스트를 Hierarchy 입력 항목 옆에 표시하려면 Class List를 선택합니다.
- 로컬에서 첨부된 StyleSheet를 해당 요소 옆에 표시하려면 Attached StyleSheets를 선택합니다.
라이브러리
Library 창 은 Unity 에디터의 프로젝트 창과 비슷합니다. 이 창은 사용할 수 있는 UI 요소를 표시합니다.
- Standard 탭은 Unity가 제공하는 표준 빌트인 요소를 표시합니다. 이러한 요소는 지원되는 모든 Unity 에디터와 런타임 테마에 대해 작동하는 표준 스타일링을 포함합니다.
Library 창의 오른쪽 상단에 있는 ⋮ 아이콘을 사용하고 Tree View를 선택하여 이 뷰 모드를 타일 뷰와 트리 뷰 간 변경할 수 있습니다.
-
Project 탭에는 프로젝트의 커스텀
.uxml에셋이 표시됩니다. 또한VisualElement에서 상속하는 모든 커스텀 C# 요소가 표시되며, UXML을 통해 이러한 요소의UxmlFactory를 인스턴스화 가능하도록 설정합니다. Library의 Project 탭에서 요소를 미리 보려면 해당 요소 위에 마우스 커서를 올립니다. 그러면 Library 창의 오른쪽에 미리 보기가 표시됩니다.
요소를 인스턴스화하려면 다음 중 하나를 수행합니다.
- 계층 구조 창으로 요소를 드래그합니다.
- Drag the element onto the Canvas in the Viewport.
- Double-click the element. This adds the element as a sibling of the currently selected element. If nothing is selected, the element is added at the root of the UI Document (UXML).
You can select elements in the Hierarchy window or in the Canvas. In the Hierarchy, hold down Ctrl/Cmd to select additional elements. In the Canvas, when an element is focused, you can click the element to select its parent element, which you can repeat to travel up the element hierarchy until it reverts back to the original element.
Viewport
The Viewport pane  displays the output of a UI Document (UXML) on a floating resizable edit-time Canvas. The toolbar contains menus of UI Builder-specific commands, Viewport settings, Theme selector, and the Preview button. You can find additional UI Builder settings in the top-right corner of the Viewport under the ⋮ menu, including a shortcut to the UI Builder’s Settings in Unity’s Project Settings.
Navigate in the Viewport
Pan and zoom to navigate in the Viewport. The UI Builder saves each UI Document (UXML)’s current pan and zoom state, and restores them after the UI Builder window reloads, a domain reloads, or when you close and re-open the same UI Document (UXML).
새 문서를 만들고 열면 UI 빌더가 이동 및 확대/축소 상태를 재설정합니다.
이동하려면 다음 중 하나를 수행하십시오.
- Middle-click and drag in the Viewport.
- Hold down Ctrl/Cmd + Alt/Option and click and drag in the Viewport.
확대/축소하려면 Viewport에서 마우스 포인터의 위치를 지정하고 다음 중 하나를 수행하십시오.
- Position the mouse pointer in the Viewport, and rotate the mouse wheel.
- Hold down Alt/Option and right-mouse drag. Drag right to zoom in, and left to zoom out.
Set up the Canvas
The Canvas is where you edit, preview, and interact with the UI Document (UXML) you are authoring. If you can’t see it, select the Fit Canvas button in the Viewport toolbar to bring it into view. The header of the Canvas displays the name of the currently loaded UI Document (UXML). An asterisk (*) next to the name indicates unsaved changes.
To resize the Canvas:
- Inside the Viewport, drag the edges or corners.
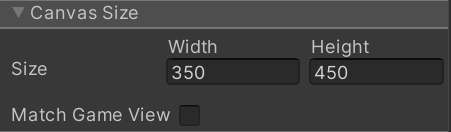
- Select the Canvas header to display the Inspector window of the canvas, where you can enter the canvas’ width and height.
To match the Canvas size to the size of the Unity Game window, select the Match Game View checkbox.
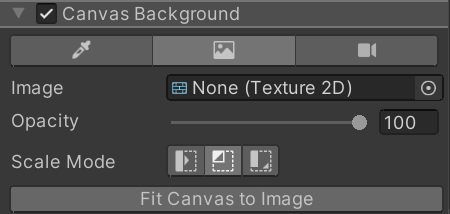
You can change the Canvas background to make it easier to edit the UI. To change the background, select the Canvas in the Inspector pane. You can set it to be a solid color, a specific texture (a mock-up from a UI Designer), or a live view from a Camera in an open Unity Scene:
Any settings related to the Canvas, like its size, aren’t saved as part of the UI Document (UXML) but stored in a separate settings file for the next time you open the same UI Document (UXML).
코드 미리 보기
UI를 빌드하면 UI 빌더가 자동으로 기반 UXML 및 USS 텍스트를 생성하여 UXML Preview 및 USS Preview 창에 표시합니다 .
.
인스펙터
The UI Builder Inspector pane  is similar to the Unity Inspector window. The Inspector displays slightly different content, depending on the object you have selected inside the UI Builder:
- Elements display an attribute section for per-element (UXML) attributes, a StyleSheets section to assign style classes and view applied styles from StyleSheets, and an Inlined Styles section to edit inline per-element style properties.
- USS Selectors display a Style Selector section to change the selector query string and a Styles section to edit style properties.
- Canvas displays a Canvas Size section to change the Canvas size, a Canvas Background section to change the edit-time canvas background, and a Document Settings section for per-document edit-time settings.
UI 문서(UXML)에 대해 에디터 확장 프로그램 저작 활성화
By default, new UI Documents (UXML) created in the UI Builder have a setting saved within the UXML that marks them as runtime-only UI:
<ui:UXML xmlns:ui="UnityEngine.UIElements" xmlns:uie="UnityEditor.UIElements" editor-extension-mode="False">
This means that, by default, the Library pane’s Standard tab only contains elements that work best at runtime.
To create UI for the Unity Editor, like custom Editor Windows or custom Inspectors, you can enable Editor Extension Authoring to see additional Editor-Only controls in the Standard tab of the Library pane.
To enable Editor Extension Authoring:
- Select the Canvas header to display the Inspector window of the canvas, where you select the Document Settings > Editor Extension Authoring option:

- In the menu on the Library pane, select Editor Extension Authoring.
Note: Unlike the other Canvas settings, this setting is saved in the editor-extension-mode attribute of the root element of the UI Document (UXML).
To enable Editor Extension Authoring on any new UI Documents (UXML) by default:
- Go to Edit > Project Settings > UI Builder.
- Enable Editor Extension Authoring by Default를 선택합니다.
UI Documents (UXML) that you create outside of the UI Builder, for example, in a text editor or IDE, don’t have an Editor Extension Authoring attribute until you open them in the UI Builder. However, you can add the editor-extension-mode attribute manually in your UI Document (UXML) in a text editor or IDE at any moment. When you open an externally created UI Document (UXML) in the UI Builder for the first time, the Editor Extension Authoring attribute is set according to the default specified in the UI Builder project settings.
추가 리소스
Copyright © 2023 Unity Technologies
优美缔软件(上海)有限公司 版权所有
"Unity"、Unity 徽标及其他 Unity 商标是 Unity Technologies 或其附属机构在美国及其他地区的商标或注册商标。其他名称或品牌是其各自所有者的商标。
公安部备案号:
31010902002961