셰이더 시맨틱
HLSL 셰이더 프로그램을 작성할 때 입력 및 출력 변수는 semantics를 통해 각각의 “의도”를 명시해야 합니다. 이는 HLSL 셰이더 언어의 표준 개념이며 자세한 내용은 MSDN의 시맨틱 문서를 참조하십시오.
버텍스 셰이더 입력 시맨틱
The main vertex shader function (indicated by the #pragma vertex
directive) needs to have semantics on all the input parameters.
These correspond to individual Mesh data elements, like vertex position, normal mesh, and texture coordinates.
See vertex program inputs for more details.
다음은 버텍스 포지션 및 텍스처 좌표를 입력으로 받는 단순한 버텍스 셰이더의 예제입니다. 이 픽셀 셰이더는 텍스처 좌표를 컬러로 시각화합니다.
Shader "Unlit/Show UVs"
{
    SubShader
    {
        Pass
        {
            CGPROGRAM
            #pragma vertex vert
            #pragma fragment frag

            struct v2f {
                float2 uv : TEXCOORD0;
                float4 pos : SV_POSITION;
            };

            v2f vert (
                float4 vertex : POSITION, // vertex position input
                float2 uv : TEXCOORD0 // first texture coordinate input
                )
            {
                v2f o;
                o.pos = UnityObjectToClipPos(vertex);
                o.uv = uv;
                return o;
            }

            fixed4 frag (v2f i) : SV_Target
            {
                return fixed4(i.uv, 0, 0);
            }
            ENDCG
        }
    }
}
Instead of spelling out all individual inputs one by one, it’s also possible to declare a structure of them, and indicate semantics on each individual member variable of the struct.
프래그먼트 셰이더 출력 시맨틱
프래그먼트(픽셀) 셰이더는 SV_Target 시맨틱을 가진
컬러를 출력하는 경우가 많습니다. 바로 위의 예제가
그런 경우입니다.
fixed4 frag (v2f i) : SV_Target
frag 함수는 fixed4 타입(낮은 정밀도 RGBA 컬러)을 반환합니다.
함수는 하나의 값만을 반환하므로 시맨틱을
: SV_Target로 함수 자체에 명시하였습니다.
It’s also possible to return a structure with the outputs. The fragment shader above could be rewritten this way too, and it would do exactly the same:
struct fragOutput {
    fixed4 color : SV_Target;
};
fragOutput frag (v2f i)
{
    fragOutput o;
    o.color = fixed4(i.uv, 0, 0);
    return o;
}
프래그먼트 셰이더에서 구조를 반환하는 것은 단일 컬러만을 반환하지 않는 셰이더의 경우에 특히 유용합니다. 프래그먼트 셰이더가 지원하는 추가 시맨틱은 다음과 같습니다.
SV_TargetN: 다수의 렌더 타겟
SV_Target1, SV_Target2 등은 셰이더가 작성한 추가 컬러입니다. 한 번에 하나 이상의 렌더 타겟에 렌더링할 때 사용되며 이를 멀티플 렌더 타겟 렌더링 기법 또는 MRT라고 합니다. SV_Target0은 SV_Target과 동일합니다.
SV_Depth: 픽셀 셰이더 뎁스 출력
Usually the fragment shader doesn’t override the Z buffer value, and a default value is used from the regular triangle rasterization. However, for some effects it’s useful to output custom Z buffer depth values per pixel.
Note that on many GPUs this turns off some depth buffer optimizations, so don’t override Z buffer value without a good reason. The cost incurred by SV_Depth varies depending on the GPU architecture, but overall it’s fairly similar to the cost of alpha testing (using the built-in clip() function in HLSL). Render shaders that modify depth after all regular opaque shaders (for example, by using the AlphaTest rendering queue.
뎁스 출력값은 단일 float이어야 합니다.
버텍스 셰이더 출력 및 프래그먼트 셰이더 입력
버텍스 셰이더는 버텍스의 마지막 클립 공간 포지션을 출력해 GPU에 화면의 어느 부분을 어느 뎁스로 래스터화할지 알려줍니다. 이 출력은 SV_POSITION 시맨틱을 가진 float4 타입이어야 합니다.
버텍스 셰이더로 생성된 다른 출력(“interpolators” 또는 “varyings”)은 특정 셰이더에 필요합니다. 버텍스 셰이더에서 출력된 이 값은 여러 렌더링된 삼각형의 표면에 보간되며 각 픽셀의 값은 프래그먼트 셰이더에 입력으로 전달됩니다.
Many modern GPUs don’t really care what semantics these variables have; however some old systems (most notably, shader model 2 GPUs) did have special rules about the semantics:
-
TEXCOORD0,TEXCOORD1등은 텍스처 좌표 및 포지션과 같은 임의의 고정밀도 데이터를 나타낼 때 사용합니다. - 버텍스 출력과 프래그먼트 입력의
COLOR0,COLOR1시맨틱은 단순한 컬러 값과 같은 정밀도가 낮은 0–1 범위의 데이터입니다.
최상의 크로스 플랫폼 지원을 위해서는 버텍스 출력과
프래그먼트 입력을 TEXCOORDn 시맨틱으로 레이블해야 합니다.
인터폴레이터 개수 한계
버텍스에서 프래그먼트 셰이더로 정보를 넘기는 데 사용할 수 있는 전체 인터폴레이터 변수 개수에는 제한이 있습니다. 이 제한은 플랫폼 및 GPU에 따라 달라지며 일반적인 가이드라인은 다음과 같습니다.
-
Up to 8 interpolators: Direct3D 11 9.x level
(Windows Phone) . Since the interpolator count is limited, but each interpolator can be a 4-component vector, some shaders pack things together to stay within limits. For example, you can pass two texture coordinates in one
float4variable (.xy for one coordinate, .zw for the second coordinate). -
Up to 10 interpolators: Shader model 3.0 (
#pragma target 3.0). - 인터폴레이터 최대 16개: OpenGL ES 3.0(Android), Metal(iOS)입니다.
-
인터폴레이터 최대 32개: Direct3D 10 셰이더 모델 4.0(
#pragma target 4.0)입니다.
Regardless of your particular target hardware, it’s generally a good idea to use as few interpolators as possible for performance reasons.
기타 특수 시맨틱
스크린 공간 픽셀 포지션: VPOS
프래그먼트 셰이더는 렌더링되고 있는 픽셀의 포지션을 특수 VPOS 시맨틱을 통해 받을 수 있습니다.
이 기능은 셰이더 모델 3.0 이후로만 지원되므로 셰이더에 #pragma target 3.0 컴파일 지시자가 있어야 합니다.
On different platforms the underlying type of the screen space position input varies, so for maximum portability use the UNITY_VPOS_TYPE type for it, which is float4 on most platforms.
Additionally, using the pixel position semantic makes it hard to have both the clip space position (SV_POSITION) and VPOS in the same vertex-to-fragment structure. Therefore, the vertex shader should output the clip space position as a separate “out” variable. See the example shader below:
Shader "Unlit/Screen Position"
{
    Properties
    {
        _MainTex ("Texture", 2D) = "white" {}
    }
    SubShader
    {
        Pass
        {
            CGPROGRAM
            #pragma vertex vert
            #pragma fragment frag
            #pragma target 3.0

            // note: no SV_POSITION in this struct
            struct v2f {
                float2 uv : TEXCOORD0;
            };

            v2f vert (
                float4 vertex : POSITION, // vertex position input
                float2 uv : TEXCOORD0, // texture coordinate input
                out float4 outpos : SV_POSITION // clip space position output
                )
            {
                v2f o;
                o.uv = uv;
                outpos = UnityObjectToClipPos(vertex);
                return o;
            }

            sampler2D _MainTex;

            fixed4 frag (v2f i, UNITY_VPOS_TYPE screenPos : VPOS) : SV_Target
            {
                // screenPos.xy will contain pixel integer coordinates.
                // use them to implement a checkerboard pattern that skips rendering
                // 4x4 blocks of pixels

                // checker value will be negative for 4x4 blocks of pixels
                // in a checkerboard pattern
                screenPos.xy = floor(screenPos.xy * 0.25) * 0.5;
                float checker = -frac(screenPos.r + screenPos.g);

                // clip HLSL instruction stops rendering a pixel if value is negative
                clip(checker);

                // for pixels that were kept, read the texture and output it
                fixed4 c = tex2D (_MainTex, i.uv);
                return c;
            }
            ENDCG
        }
    }
}

페이스 오리엔테이션: VFACE
프래그먼트 셰이더는 렌더링된 표면이 카메라를 향하는지, 카메라를 등지고 있는지를 나타내는 변수를 받을 수 있습니다. 이 변수는 나뭇잎이나 얇은 오브젝트 같이 양면에서 볼 수 있어야 하는 지오메트리를 렌더링할 때 유용합니다. VFACE 시맨틱 입력 변수는 전면을 향하는 삼각형에 대해서는 양의 값, 후면을 향하는 삼각형에는 음의 값이 됩니다.
이 기능은 셰이더 모델 3.0 이후로만 지원되므로 셰이더에 #pragma target 3.0 컴파일 지시자가 있어야 합니다.
Shader "Unlit/Face Orientation"
{
    Properties
    {
        _ColorFront ("Front Color", Color) = (1,0.7,0.7,1)
        _ColorBack ("Back Color", Color) = (0.7,1,0.7,1)
    }
    SubShader
    {
        Pass
        {
            Cull Off // turn off backface culling

            CGPROGRAM
            #pragma vertex vert
            #pragma fragment frag
            #pragma target 3.0

            float4 vert (float4 vertex : POSITION) : SV_POSITION
            {
                return UnityObjectToClipPos(vertex);
            }

            fixed4 _ColorFront;
            fixed4 _ColorBack;

            fixed4 frag (fixed facing : VFACE) : SV_Target
            {
                // VFACE input positive for frontbaces,
                // negative for backfaces. Output one
                // of the two colors depending on that.
                return facing > 0 ? _ColorFront : _ColorBack;
            }
            ENDCG
        }
    }
}
The shader above uses the Cull state to disable back-face culling (by default back-facing triangles aren’t rendered at all). Here is the shader applied to a bunch of Quad meshes, rotated at different orientations:

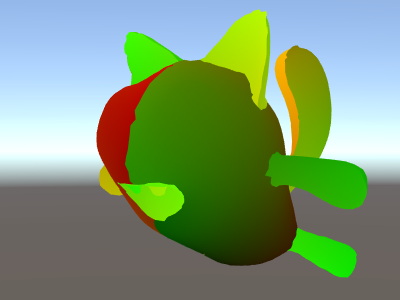
버텍스 ID: SV_VertexID
버텍스 셰이더는 “버텍스 수”를 서명되지 않은 정수로 가지는 변수를 받을 수 있습니다. 대부분 버텍스당 데이터를 텍스처 또는 컴퓨트 버퍼에서 추가로 가져오고자 할 때 유용합니다.
이 기능은 DX10(셰이더 모델 4.0) 및 GLCore / OpenGL ES 3 이후로만 지원되므로, 셰이더에 #pragma target 3.5 컴파일 지시자가 있어야 합니다.
Shader "Unlit/VertexID"
{
    SubShader
    {
        Pass
        {
            CGPROGRAM
            #pragma vertex vert
            #pragma fragment frag
            #pragma target 3.5

            struct v2f {
                fixed4 color : TEXCOORD0;
                float4 pos : SV_POSITION;
            };

            v2f vert (
                float4 vertex : POSITION, // vertex position input
                uint vid : SV_VertexID // vertex ID, needs to be uint
                )
            {
                v2f o;
                o.pos = UnityObjectToClipPos(vertex);
                // output funky colors based on vertex ID
                float f = (float)vid;
                o.color = half4(sin(f/10),sin(f/100),sin(f/1000),0) * 0.5 + 0.5;
                return o;
            }

            fixed4 frag (v2f i) : SV_Target
            {
                return i.color;
            }
            ENDCG
        }
    }
}
Copyright © 2023 Unity Technologies
优美缔软件(上海)有限公司 版权所有
"Unity"、Unity 徽标及其他 Unity 商标是 Unity Technologies 或其附属机构在美国及其他地区的商标或注册商标。其他名称或品牌是其各自所有者的商标。
公安部备案号:
31010902002961