앱 감량
Apple 스토어와 iOS 는 사용자 특정 디바이스의 성능에 맞게 앱을 제공함으로써 iOS, tvOS, watchOS 앱 설치를 최적화합니다. 이를 앱 감량(App thinning)이라고 부릅니다. 앱 감량은 장치의 기능을 대부분 활용하면서 최소의 디스크 용량을 차지하고, Apple 이 추후 적용하는 업데이트를 수용할 수 있는 앱을 생성할 수 있게 합니다. 이 최적화 과정에 대한 자세한 내용은 앱 감량에 대한 Apple 개발자 라이브러리 페이지를 참조하십시오.
Unity lets you implement the following two major components for app thinning:
온디멘드 리소스(On-demand resources)
On-demand resources (ODR) is a feature available for the iOS and tvOS platforms, from version 9.0 of iOS and tvOS onwards. It allows you to reduce the size of your application by separating the core Assets (those that are needed from application startup) from Assets which may be optional, or which appear in later levels of your game. These additional Assets are called AssetBundles that are available across all Unity build targets, but you must take additional steps to enable them for hosting from the App Store.
AssetBundles can contain Asset files such as models, Materials, Textures, and Scenes, but they can’t include scripts. Therefore, all your scripting logic must reside in the main application. Apple recommends that an AssetBundle be no larger than 64MB in size, to reduce loading time (particularly over-the-air) and minimize the amount of storage space used on the device.
ODR 설정
프로젝트에 ODR을 사용할 수 있도록 설정하려면, 우선 빌드 타입이 iOS인지 확인합니다. 메뉴 바의 파일(File) > 빌드 설정(Build Settings) 에서 확인할 수 있습니다.
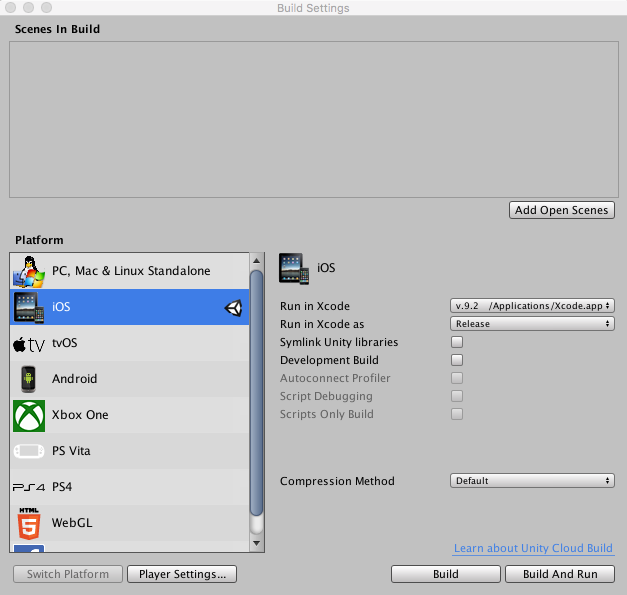
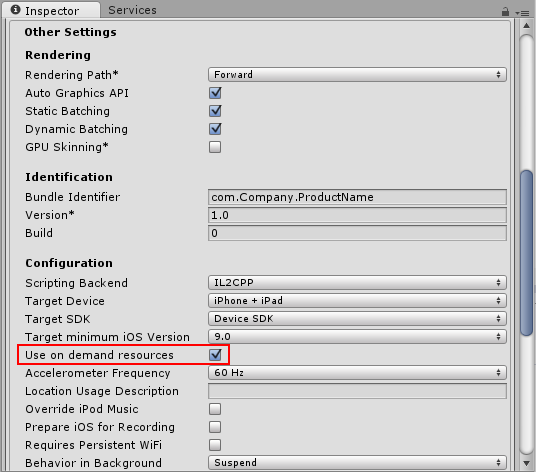
만일 iOS가 아닌 경우 iOS 를 선택하고, 플랫폼 전환(Switch Platform) 버튼을 클릭합니다. 그런 다음 플레이어 설정(Player Settings) 버튼을 클릭합니다. 인스펙터 창에서 기타 설정(Other Settings) 창을 열고 설정(Configuration) 부분으로 가서 주문형 리소스 사용(Use on demand resources) 체크박스를 선택합니다.
에셋 번들(AssetBundle) 생성
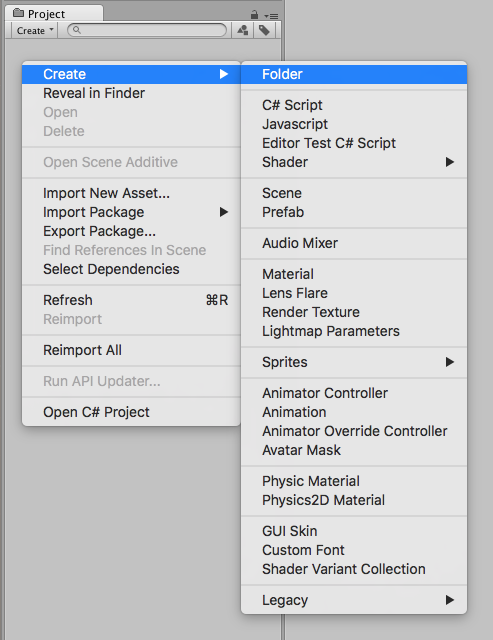
우선, 에셋 번들에 포함하고자 하는 에셋을 모아 새로운 폴더를 만듭니다. 프로젝트 창을 마우스 오른쪽 버튼으로 클릭한 후 생성(Create) > 폴더(Folder) 를 클릭하거나, 프로젝트 창의 왼쪽 상단에서 생성(Create) > 폴더(Folder) 를 클릭합니다.
에셋 번들에 포함하고자 하는 에셋 파일을 선택하고, 이를 새 폴더에 드래그해서 넣습니다.
에셋 번들을 생성하려면, 태그를 할당해야 합니다. 태그는 에셋 번들 다운로드를 요청할 때 식별자로서 활용됩니다. 보통 번들의 파일 이름에 해당하는 레이블을 생성하는데, 이는 레이블이 중복되지 않도록 하여 나중에 번들을 작업할 때 파악하기 더 쉬워지기 때문입니다.
태그를 생성하거나 할당하려면, 새로운 폴더를 선택하고 인스펙터 창 하단에 있는 에셋 레이블 섹션으로 갑니다. 왼쪽 드롭다운 메뉴를 클릭하고 신규(New) 를 선택합니다. 그 다음 새 레이블을 입력합니다. 이때, 에셋 번들의 레이블은 소문자로 이루어져야 합니다.

In this example, a folder called Textures is being given a new label.
To generate the new AssetBundle file, you must references the new label in an Editor script. To create an Editor script, create a new folder inside the Project window called Editor. Right-click on the Editor folder and select Create > C# Script. Name the new script BuildiOSAssetBundles.cs.
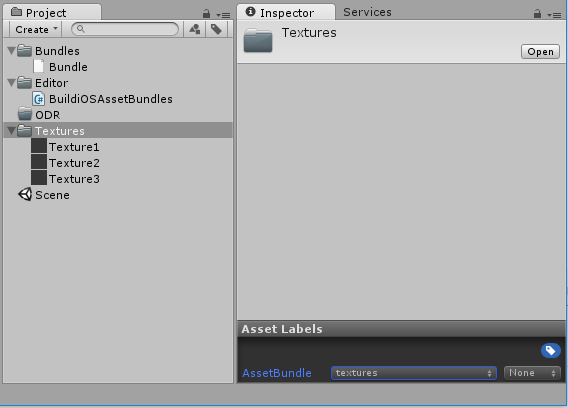
In this example, the Textures folder has the label textures and the new script BuildiOSAssetBundles.cs is created in the Editor folder.
Open BuildiOSAssetBundles.cs and copy in the code below. In this example, the label textures is used; change this throughout with the name of your label (in lower-case text).
Note that this example uses uncompressed bundles; however, this isn’t a requirement for app thinning.
using UnityEngine;
using UnityEditor;


public class BuildiOSAssetBundles : MonoBehaviour
{
    [InitializeOnLoadMethod]
    static void SetupResourcesBuild( )
    {
        UnityEditor.iOS.BuildPipeline.collectResources += CollectResources;
    }

    static UnityEditor.iOS.Resource[] CollectResources( )
    {
        return new UnityEditor.iOS.Resource[]
        {
            new UnityEditor.iOS.Resource( "textures", "Assets/ODR/textures" ).AddOnDemandResourceTags( "textures" ),
            new UnityEditor.iOS.Resource( "bundle", "Assets/Bundles/bundle.unity3d" ).AddOnDemandResourceTags( "bundle" ),
        };
    }

    [MenuItem( "Bundle/Build iOS AssetBundle" )]
    static void BuildAssetBundles( )
    {
        var options = BuildAssetBundleOptions.None;

        bool shouldCheckODR = EditorUserBuildSettings.activeBuildTarget == BuildTarget.iOS;

#if UNITY_TVOS
            shouldCheckODR |= EditorUserBuildSettings.activeBuildTarget == BuildTarget.tvOS;
#endif

        if( shouldCheckODR )
        {
#if ENABLE_IOS_ON_DEMAND_RESOURCES
            if( PlayerSettings.iOS.useOnDemandResources )
                options |= BuildAssetBundleOptions.UncompressedAssetBundle;
#endif

#if ENABLE_IOS_APP_SLICING
            options |= BuildAssetBundleOptions.UncompressedAssetBundle;
#endif
        }

        BuildPipeline.BuildAssetBundles( "Assets/ODR", options, EditorUserBuildSettings.activeBuildTarget );
    }

}
위의 코드 예제는 아래와 같이 textures 레이블에 태그된 파일을 가져다가 textures 이름을 가지는 에셋 번들 파일을 Assets/ODR 폴더에 생성하는 코드입니다.
new UnityEditor.iOS.Resource( "textures", "Assets/ODR/textures" ).AddOnDemandResourceTags( "textures" )
For demonstration purposes, the above code sample also includes the following line, which adds an AssetBundle called bundle that’s already built - for example, from another project or a third-party vendor:
new UnityEditor.iOS.Resource( "bundle", "Assets/Bundles/bundle.unity3d" ).AddOnDemandResourceTags( "bundle" )
전체 코드 예제는 Unity 에디터 메뉴 바에 새로운 메뉴를 생성합니다. 번들(Bundle) > iOS 에셋번들 빌드(Build iOS AssetBundle) 를 클릭합니다. 이렇게 하면 ODR 폴더에 에셋 번들이 생성됩니다.

The following script downloads the textures ODR AssetBundle, assigning it to the public member TextureBundle. Place this somewhere in your project.
using UnityEngine;
using UnityEngine.iOS;
using System;
using System.Collections;

public class LoadBundle : MonoBehaviour
{
    public AssetBundle     TextureBundle;


    void Start( )
    {
        LoadAssetAsync( "textures", "textures" );
    }

    public async Awaitable LoadAssetAsync( string resourceName, string odrTag )
    {
        // Create the request
        using(OnDemandResourcesRequest request = OnDemandResources.PreloadAsync( new string[] { odrTag } ))
        {
            // Wait until request is completed
            await request;

            // Check for errors
            if( request.error != null )
                throw new Exception( "ODR request failed: " + request.error );

            TextureBundle = AssetBundle.LoadFromFile( "res://" + resourceName );
        }
    }
}
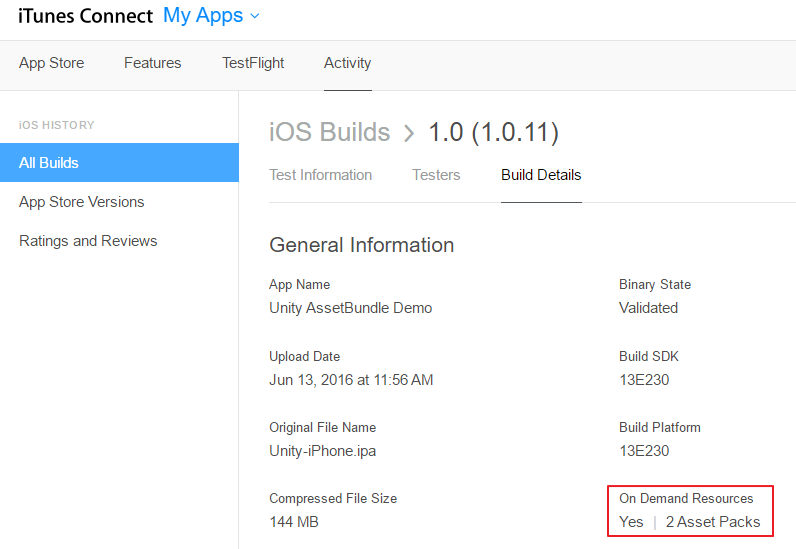
다음 단계는 Xcode 프로젝트를 생성하고 .IPA를 빌드한 다음, iTunes Connect’s TestFlight에 업로드합니다. TestFlight 처리 과정의 일부로서, 앱에 포함된 ODR 에셋 번들을 제거합니다. 그 이후 앱은 Apple 서버에 호스트되어 다운로드 받을 수 있습니다.
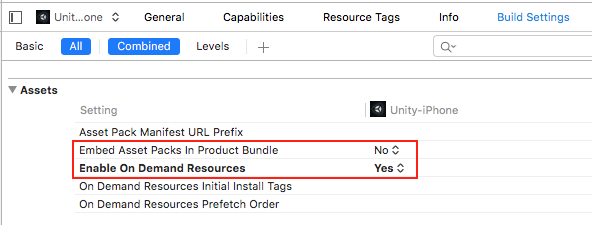
Xcode에서 .IPA를 빌드하기 전에, Xcode의 빌드 설정의 에셋 섹션에서 Embed Asset packs In Product Bundle 이 No 로 설정되어 있는지, 또는 Enable On Demand Resources 가 Yes 로 설정되어 있는지 확인합니다.
iTunes Connect가 앱 업로드를 마쳤다면, TestFlight의 빌드 버전을 클릭해서 더 자세한 정보를 알아보십시오.
앱 슬라이싱(App slicing)
앱 슬라이싱은 ODR 과 비슷한 과정으로, 앱이 작동하는 디바이스에 따라 에셋을 능동적으로 다운로드 받을 수 있도록 하는 기능입니다. 예를 들어, 레티나 iPad 의 경우에는 고해상도 에셋을, iPhone 이나 iPad Mini 의 경우에는 저해상도 에셋을 다운로드 받을 수 있도록 합니다. 이는 에셋 번들을 정의할 때 variants 항목을 추가하면 됩니다. 이렇게 하면 앱을 실행하는 시점에서 어떤 배리언트를 사용할 지 결정할 수 있으며, 이것은 다운로드 시 자동으로 에셋 파일 이름에 덧붙여집니다.
배리언트를 생성하려면, 새로 만든 폴더를 클릭하고 인스펙터 창 하단의 에셋 레이블(Asset Labels) 섹션으로 갑니다. 오른쪽 드롭다운 메뉴를 클릭하고 신규(New) 를 선택합니다. 그 다음 새 배리언트의 이름을 입력합니다. 이때 에셋 번들 배리언트의 이름은 소문자로 이루어져야 합니다.
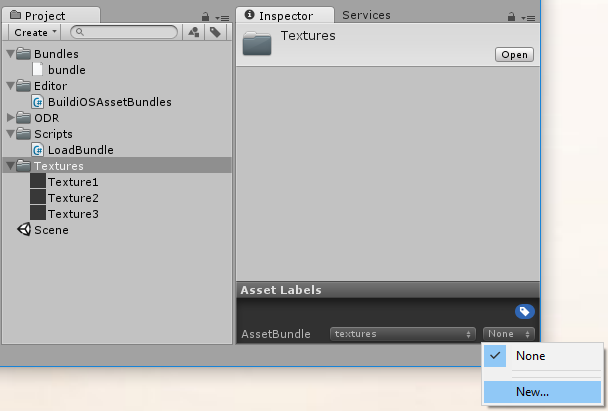
에디터 스크립트에서 새 배리언트를 참조시켜야 합니다. 에디터 스크립트를 생성하려면 Editor 라는 이름으로 프로젝트 창에서 폴더를 새로 만듭니다. Editor 폴더를 마우스 오른쪽 버튼으로 클릭하고 생성(Create) > C# 스크립트(C# Script) 를 클릭합니다. 새로운 스크립트의 이름은 BuildiOSAppSlices.cs 이여야 합니다.
다음의 코드를 그대로 복사해서 붙여넣되, 레이블(“textures”)과 배리언트(“hd”와 “sd”)의 이름은 사용자가 설정한 이름으로 교체합니다. 이 코드 예제에서는, 다수의 폴더가 참조된 것을 알 수 있습니다. 하나는 HD 텍스처를 포함하고 있고, 다른 하나는 SD 텍스처를 포함하고 있습니다. 이는 각각 “hd”와 “sd” 배리언트가 주어진 상태입니다.
using UnityEngine;
using UnityEditor;


public class BuildiOSAppSlices : MonoBehaviour
{
    [InitializeOnLoadMethod]
    static void SetupResourcesBuild( )
    {
        UnityEditor.iOS.BuildPipeline.collectResources += CollectResources;
    }

    static UnityEditor.iOS.Resource[] CollectResources( )
    {
        return new UnityEditor.iOS.Resource[]
        {
            new UnityEditor.iOS.Resource("textures").BindVariant( "Assets/ODR/textures.hd", "hd" )
                                     .BindVariant( "Assets/ODR/textures.sd", "sd" )
                     .AddOnDemandResourceTags( "textures" ),
    };
    }

    [MenuItem( "Bundle/Build iOS App Slices" )]
    static void BuildAssetBundles( )
    {
        var options = BuildAssetBundleOptions.None;

        bool shouldCheckODR = EditorUserBuildSettings.activeBuildTarget == BuildTarget.iOS;

#if UNITY_TVOS
            shouldCheckODR |= EditorUserBuildSettings.activeBuildTarget == BuildTarget.tvOS;
#endif

        if( shouldCheckODR )
        {
#if ENABLE_IOS_ON_DEMAND_RESOURCES
            if( PlayerSettings.iOS.useOnDemandResources )
                options |= BuildAssetBundleOptions.UncompressedAssetBundle;
#endif

#if ENABLE_IOS_APP_SLICING
            options |= BuildAssetBundleOptions.UncompressedAssetBundle;
#endif
        }

        BuildPipeline.BuildAssetBundles( "Assets/ODR", options, EditorUserBuildSettings.activeBuildTarget );
    }

}
이는 Unity 에디터 메뉴 바에 Bundle 이라는 새 메뉴를 생성합니다. 이를 클릭하고, 리스트의 유일한 항목인 Build iOS App Slices 를 선택합니다. 이는 ODR 폴더에 에셋 번들을 생성합니다.
그 이후, 에셋을 로드하려면 아래의 클래스를 프로젝트에 위치시키고, 로드하고자 하는 배리언트의 이름에 전달합니다.
using UnityEngine;
using UnityEngine.iOS;
using System;
using System.Collections;

public class LoadBundle : MonoBehaviour
{
    public AssetBundle     TextureBundle;


    void Start( )
    {
        LoadAssetAsync( "textures", "textures" );
    }

    public IEnumerator LoadAsset( string resourceName, string odrTag )
    {
        // Create the request
        using(OnDemandResourcesRequest request = OnDemandResources.PreloadAsync( new string[] { odrTag } ))
        {
            // Wait until request is completed
            await request;

            // Check for errors
            if( request.error != null )
                throw new Exception( "ODR request failed: " + request.error );

            TextureBundle = AssetBundle.LoadFromFile( "res://" + resourceName );

        }
    }
}
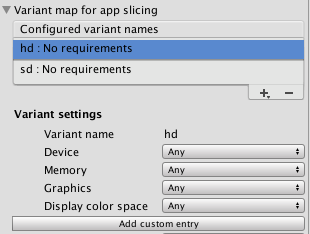
You can now see and modify variants in Player Settings > Other Settings > Configuration in a Variant map for app slicing drop-down menu. The Variant map for app slicing menu is visible only if Use on demand resources is enabled in Player Settings.
